Tosca Tutorial – Table of Content
We have segregated the entire Tosca tutorial into the below articles. We have wrote this “Tosca Execution” article in a simple wording with examples which can be very helpful for entry level software tester to understand the concept easily. The moto of this article is to understand the concepts of Tosca Execution.
- Tosca Tutorial #1: Tosca Overview
- Tosca Tutorial #2: Tricentis Tosca Setup – Install, Uninstall and License Configuration
- Tosca Tutorial #3: Tosca Workspace Creation
- Tosca Tutorial #4: Understanding of TOSCA Commander and Tosca User Management
- Tosca Tutorial #5: Tosca Scanning – An Introduction to Modules
- Tosca Tutorial #6: Tosca Test Case Creation
- Tosca Tutorial #7: Tosca Parameters and Library– Buffer, Business Parameter, TCP
- Tosca Tutorial #8:Tosca Test Execution, Reports, and Bug management
- Tosca Tutorial #9: Test Case Design – An approach to test data management
- Tosca Tutorial #10: Tosca Test Data Management.
- Tosca Tutorial #11: API Testing in Tosca
Tosca Tutorial #12: Tosca Interview Questions and Answers
Through out the “Tosca Execution and Tosca Issues” article, we will provide the step by step guidance on Tosca Execution process . Also, we will explain the overview of Tosca Issues.
Tosca ExecutionList – Overview of Test Execution
Why Automation Test Execution?
Test execution is a process to verify the application functionality based on the test cases. The test execution can done manually or through automated approach. In this article, we will learn the automation test execution for the test cases developed in Tosca. The primary purposes of automation test executions with the help of Tosca are –
- Reduce human efforts.
- Increase functional coverage.
- Ensure the quality of the delivery by avoiding unwanted human efforts.
- Reduce costs and test execution duration.
- Easy to data management and test maintenance.
- More professional way of test reporting to the stack holders.
- Unattended test execution through the distributed execution model of Tosca.
Approach to capture screenshots during execution?
- Screen Capture of Failed TestSteps: Tosca is able to capture the screens for each test steps that failed due to verification of dialog failures. For the test cases which are created using Classic Engines, Tosca allows to capture screen on user aborts. The captured screenshot will be available in the path – @{Environment.ProjectDir}\\Screenshots. Path to configure this setting –
- Engines 3.0 – Project->Settings->TBox->Logging->Screenshots
- Classic Engines – Project->Settings->Engine->Logging Options->Screenshots

- Off – Tosca will not take the screenshot.
- Dialog Failure – It allows Tosca Commander to capture a screenshot for dialog failure.
- Verification Failure – It allows Tosca Commander to capture a screenshot for verification failure.
- Screen Capture of TestStepValues: Based on the configuration, Tosca is allows to capture the screens for each TestStepValues that uses the action mode as Input during the execution. We can use the same configuration, to check the screens which are captured during test execution.
The option for screen capture of test step values, is available for following Engine 3.0 – DotNet, AnyUI, XBrowser, UIA, and the test automation, done based on the image.
To activate it, we need to change the global setting Screen Flow from path Project->Settings->Engine->Doku Snapper.

Also, the same thing can be achieved by adding the configuration parameter ScreenFlow and ScreenFlowPath in the execution list.

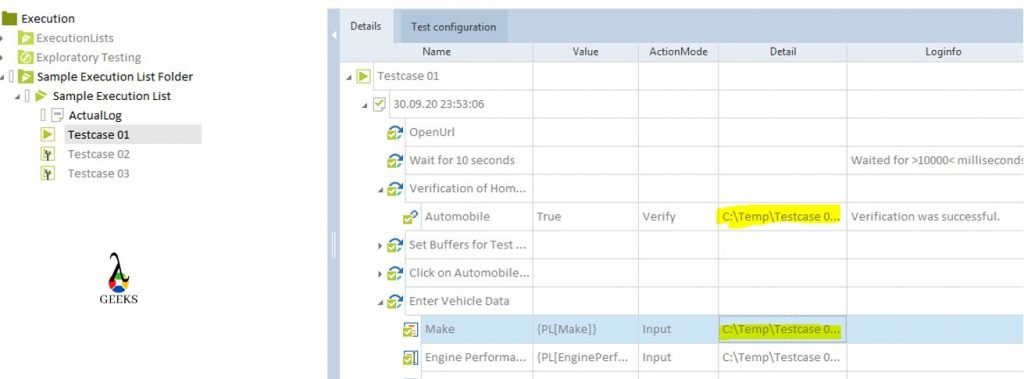
The execution log will be looks like –

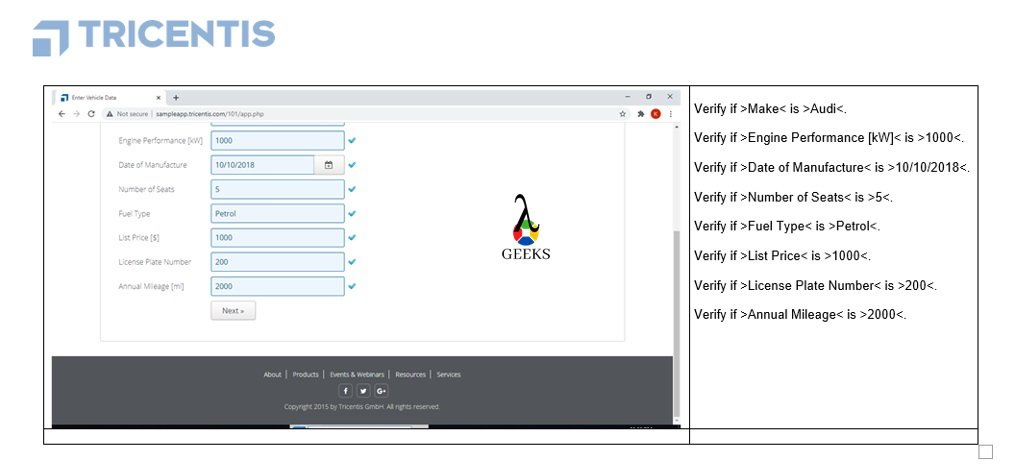
- DokuSnapper: It is used to generate a Microsoft® Word document that contains screenshots and data on all executed TestSteps. Instead of capturing screenshots in every TestStep, DokuSnapper consolidates all data in one word document.
We can enable it by changing the Enable Snapper value to True from the path – Project->Settings->Engine->Doku Snapper.
The generated document will be looks like –
How to execute test cases in Tosca?
Once we are done with the Test Case creation with the Tosca Commander TestCases section, we will follow the below mentioned approaches for further proceedings:
· Execute test cases in ScratchBook
· Execute test cases from Execution List
Execute test cases in ScratchBook:
Tricentis advises using the ScratchBook for a dry run (to check the test case readiness) only, as the results do not store for future reference. We also could perform the execution of individual TestSteps.
Executing the test cases from the list of Execution :
The Execution segments provides a feature of selecting and preparing multiple TestCases for execution. Execution performed in ExecutionList will be available for further future reference.
Step-by-step procedure to prepare and run test cases from Execution Section:
- Step1# Create Execution List Folder in the Executions section by selecting the “Create Execution List Folder” icon after right-clicking on any folder.
- Step2# Similarly, we need to create our execution List component under the newly created execution list folder.
- Step3# We can add the test cases(which are created in the last article) into the execution list from the TestCases section by the drag-drop method. The complete execution list will look like below –

- Step4# Now, we need to configure the execution behavior, such as the screen capture mechanism. For our learning purpose, we have enabled Take screenshots of TestStepValues and DockuSnapper.
- Step5# Now, we can execute the one, multiple, or entire test cases based on the selection. We execute the test case by pressing the F6 key or click on the run button after right-clicking on the selected test cases/ execution list.
- Step6# Understand and process your test results. The execution log is showing below with highlighted screenshot path –
Also, the dokusnapper has been created in the default path “%AppData%\\TRICENTIS\\TOSCA TestSuite\\7.0.0\\dokusnapper\\” with the document name staring with the test case name.
Tosca Issues
Explain the concept of Tosca Issues?
The issue is nothing but the reason for the test failure. The route cause of the issue is a valid valid defect in the application or there is a enhancement in the application (FeatureRequest). During the automation execution, the issue or defect has to be logged and linked to the test case.
- Defect – This is an application issue i.e., the application is not working as per test steps (expectation). The defect has to be fixed by the application developer.
- Feature-request – If the application has been enhanced, the application will not be in synched with test cases which results the failure of the test case. As it’s a valid change in the application, the test case has to be updated based on this. This scenario has to be treated as a feature request.
We can log the issues in the Issues section or in the Execution section.
- Step#1: Navigate to the Issues section.
- Step#2: To create an issue, we need to right-click on Issue folder and select either of the issue type option between Create Defect or Create FeatureRequest which are available in context menu. After selection of type, Tosca Commander creates a new issue and automatically asks to change the name.
- Step#3: In the next step, we can either provide a new name or use the default name by pressing Enter.
- Step#4: Now, we need to enter the below details for the different fields available –
- ID – We can define our own ID standards or use the Ids from any external systems.
- State – The state field explains the current status of the issue. The value range can be customized based on the standards.
- Type – Always two types are available here which can be changed at any time.
- Description – This field represents the problem statements of the issue. Based on the description, developers take the action. The description should contain all the information to recreate the issue.
- Severity – The severity represents the impact of the issue. This field accept the integer value only.
- Priority – It describe the urgency of the issue to get it fixed. This field also accepts the integer values.

Conclusion:
In this article of Tricentis Tosca Tutorial, we have learned about how to perform Tosca Execution and raise Tosca Issues. Please click here to get more information from the support portal.
Please click to read the next article – Overview of Tosca Test Case Design.

