Testing is now the most important part of the software development life cycle to ensure the quality of the product. Also, without testing, we can’t ensure the fulfilment of all the requirements. With the usage of mobile apps, the mobile testing opportunities are getting increased proportionally. There are several mobile testing tools, and labs are available in the market, such as Perfecto, SeeTest etc.
Perfecto Tutorial – Table of Content
Perfecto Tutorial 1# Install Selenium Setup for Web Automation
Perfecto Tutorial 2# Perfecto Selenium Integration for Mobile Automation
Perfecto Tutorial 3# Import Sample Project for Perfecto Automation
This Selenium for Perfecto Tutorial by Lambda Geeks is written to provide a complete and exhaustive overview of Installation of Selenium Perfecto using WebDriver (Java) framework and basic coding for web automation.
Perfecto Automation: Perfecto Selenium Integration
Overview of Perfecto Tutorial:
The Perfecto Automation tool is an entirely web-based SaaS i.e. Software as a Service platform which provides mobile labs with mobile automation capabilities. that allows mobile application designers and QA professionals both work with services The Perfecto can be used by mobile application developers or the QA testers as it allows the services such as manage apps, monitoring, testing services, etc.
The devices available in Perfecto mobile lab, can be accessible by multiple users irrespective of geographical locations for development, testing or monitoring purposes.
The perfecto allows the test automation activities through a web based interface which is designed for automation purposes. This interface enables to design simple test cases with out implementing the complex logics. For complex logical test cases, we can integrate the perfecto with Selenium tool.
The commands i.e. the keywords to perform the different actions for mobile test automation, are available in the Perfecto cloud as widgets. Perfecto only allows the test developer to create test cases, add the keywords with definition of different properties in the user interface as it follows keyword-based scripting approach. The Perfecto as a testing tool is compatible with text and image recognition.
The Perfecto Mobile cloud is compatible with third party tools like Selenium, UFT, TOSCA, etc. So, by integration with those tools, it will be very easy to identify objects (using the object Finder/scan mechanism of the third party tools) and develop the complex test cases. Through out this Perfecto Tutorial, we are going to learn on perfecto selenium integration.
Prerequisites for Perfecto Automation with Selenium:
Here we will discuss the process to execute the Selenium scripts with Java using Eclipse IDE; We consider that the readers
- Are hands-on Selenium
- Have existing scripts for work
There is some mandatory setup need to complete before you get started, make sure you have installed the following:
Java Development Kit – It is required to create the java environment which is required for Perfecto Selenium Integration.
Selenium WebDriver – It’s required to enable the selenium. Click here to download the corresponding jar files.
Chrome Driver – The corresponding Crome Driver has to be downloaded from here, as per the version of chrome installed in mobile device.
IDE – An IDE is required to develop the test cases. The available IDEs are Eclipse or IntelliJ IDEA etc. To work with Eclipse, which a popular IDE, TestNG and Maven plugins are also required.
Selenium for Perfecto Automation
Selenium is free(Open source) test automation tool which is primarily used for automation testing of the web application. But, with the help of third party mobile testing tools, it has the capability to test mobile apps as well. Selenium is supporting programming languages such as Java, C#, Python, etc. Different selenium frameworks available in the market are,
· Selenium IDE
· Selenium RC
In this particular selenium for the perfecto tutorial, we will work with Selenium WebDriver framework with Java language. Also, we are going to use Eclipse IDE for managing the selenium for the Perfecto project.
Step1# Download and install Selenium:
- Install Java: The Selenium WebDriver runs in the Java environment. So, the first step is to install the appropriate JDK from the internet. We can download the JDK from here. After the installation, the system restart is required.
- Install Eclipse IDE: This IDE is required to create workspace and develop the test cases with the help of Selenium. To download the Eclipse IDE, please click here. It should be downloaded based on the operating system’s version. It’s required to write, compile and run the selenium program.
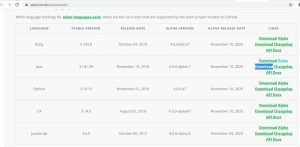
- Download Selenium Java Client Driver: Java Client for Selenium WebDriver can be downloaded from here.
Step2# Configure Eclipse IDE with Selenium:
- Launch the eclipse.exe from the Eclipse folder to open the IDE.
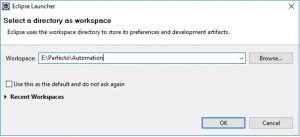
- Select the workspace for the Selenium IDE to start with and click OK.
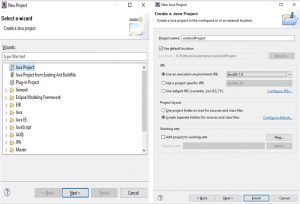
- Now create a Java project from the menu navigation ”File->New->Project” and then select “Java Project” option. We need provide the project related information after clicking on “Next” button. The required details are –
- Project Name – It refers the name of the project. An project folder will be created in the workspace based on the name.
- Use default location – Either we can accept the default location in workspace or save the project in different place.
- Select an execution JRE – If multiple JREs are available, we need to select the correct version.
- Project Layout – We can define the project layout (folder structure) based on this option.
Click on Finish button to create a new project as name “androidProject”.
4. Now we need to create a new package as an android package and a new class as an android class within the newly created package. The packages can be created by right-clicking on the root folder for the newly created project.
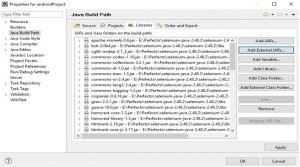
5. Now we need to refer the external selenium Jar files within the project. It can be done by following the navigation – “Right-Click on Project Folder -> Properties -> Java Build Root -> Libraries -> Click on Add External JARs -> Select the selenium Jar Files”. Here we need to select all the jar files available in the “selenium-xxxxx” folder and “selenium-xxxxx\\libs” folders.
Once all the external jar files are selected, we need to click on the Apply button and then OK to close the window.
6. Download and install compatible ChromeDriver version from the web. This is required from mobile web testing using Perfecto.
Step3# Configure testNG in Selenium:
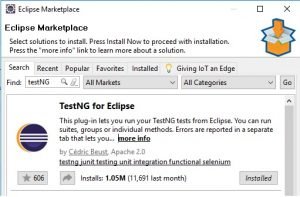
- Install testNG from eclipse marketplace(Help->Eclipse Marketplace->search testNG and install).
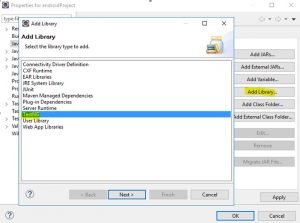
- Add the External library for TestNG. It can be done by following the navigation – “Right-Click on Project Folder -> Properties -> Java Build Root -> Libraries -> Click on Add Library -> Select TestNG option and proceed next to add this library”.
Step4# Create TestNG Class:
Creat TestNG class is a very simple, easy process to perform. We need to follow the below steps to create TestNG class –
- Convert Java project as TestNG Project – Right-click on the src folder under the project root and click on option Convert to TestNG from the navigation “TestNG->Convert to TestNG”. After deletion of “Convert to TestNG” option, a new window will be appeared where we need to lick on “Finish” button to complete the conversion.
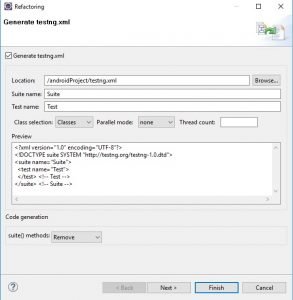
- Create TestNG Class – Right-click on the src folder under the project root and click on option Create TestNG Class from the navigation “TestNG->Create TestNG Class”. A new window will appear. Here, we need to provide basic details such as Source Folder, PackageName, Class Name and Annotations as per below diagram to create TestNG Class. Now, click on FINISH button to create the class.

Step5# First Selenium Test Case using TestNG:
Test Scenario: We will write a basic test case to open google in a chrome session. To automate this scenario, we need to copy the below sample programme into androidTestNGClass.java file.
package androidPackage;
import org.testng.annotations.Test;
import org.testng.annotations.BeforeMethod;
import org.openqa.selenium.WebDriver;
import org.openqa.selenium.chrome.ChromeDriver;
import org.testng.Assert;
import org.testng.annotations.AfterMethod;

public class androidTestNGClass {  \t
  WebDriver driverChrome;  \t
  @Test
  public void f() {
  \t //set the chrome driver and location where we store the chromedriver.exe
         System.setProperty("webdriver.chrome.driver", "C:\\\\Drivers\\\\chromedriver.exe");
  \t
  \t  //Uppdare driverChrome with chrome driver
  \t  driverChrome = new ChromeDriver();
  \t  String url = "https://www.google.com";
  \t  driverChrome.get(url);
  \t  //Capturing the title
  \t  String expectedTitle = "Google";
  \t  String actualTitle = driverChrome.getTitle();
\t  //Validate the title
  \t  Assert.assertEquals(actualTitle, expectedTitle);
    }
  @BeforeMethod
  public void beforeMethod() {
  \t  System.out.println("Starting the browser session");
  }
  @AfterMethod
  public void afterMethod() {
  \t  System.out.println("Closing the browser session");
  \t  driverChrome.quit();
  }
}
We can execute the above test case by clicking on option – “Right-Click on project-> Run As -> TestNG Test”. During the execution, the google website will open in a chrome browser, and the test will verify the title of the web page. At the end of execution, execution log is available in Eclipse Console section.
Step6# Install Maven in Eclipse IDE:
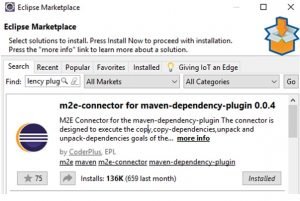
Install Maven plugin from eclipse marketplace(Help->Eclipse Marketplace-> search m2e connector for maven dependency plugin and install). Maven plugin is required while the selenium project is created using Maven Build Tool.
Conclusion:
Till now, we have covered the detailed installation of Selenium for perfecto web automation through Webdriver framework (Java) and basic coding for web automation. In the next topic, I will write about Perfecto Selenium Integration for Mobile Automation.

Hi, I am K. Mondal, I am associated with a leading organization. I am having 12+ years of working experience across domains e.g., application development, automation testing, IT Consultant. I am very much interested in learning different technologies. I am here to fulfill my aspiration and currently contributing as an Author and Website Developer both in LambdaGeeks.
Lets Connect through LinkedIn-