33 QA:Modulation Index,Multiplexing,Modulation & Demodulation

AM Signal 300x190 1

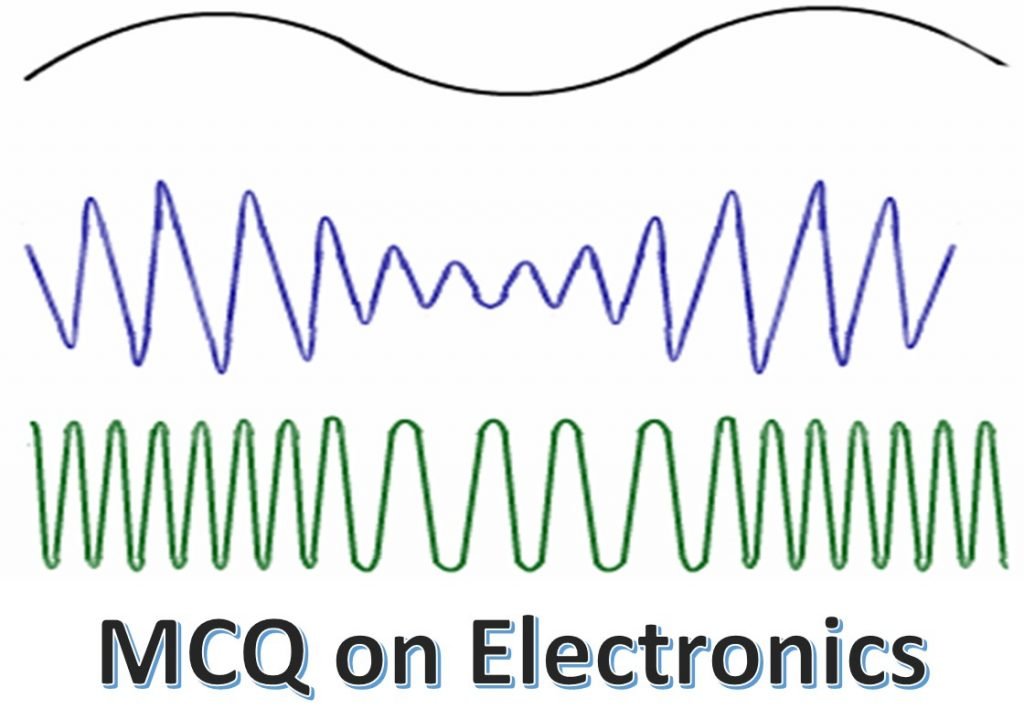
Modulation and demodulation are fundamental concepts in communication systems that play a crucial role in transmitting and receiving information. In this section, we will explore the definitions of modulation and demodulation, as well as the importance of these processes in communication systems.

Definition of Modulation

Modulation is the process of modifying a carrier signal to encode information. In simpler terms, it involves altering certain characteristics of the carrier signal, such as amplitude, frequency, or phase, in order to carry the desired information. By modulating the carrier signal, we can efficiently transmit information over long distances and through various media.

Definition of Demodulation

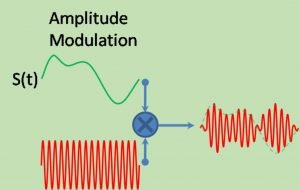
AM Signal
AlmuhammediArabic WikipediaAmplitude ModulationWikimedia Commons

Demodulation, also known as detection or extraction, is the reverse process of modulation. It involves extracting the original information from the modulated carrier signal. Demodulation is necessary at the receiving end to recover the transmitted information accurately. By demodulating the received signal, we can retrieve the original data and make it usable for further processing or interpretation.

Importance of Modulation and Demodulation in Communication Systems

Modulation and demodulation are vital components of communication systems for several reasons. Let’s explore some of their key importance:

  1. Efficient Transmission: Modulation allows us to transmit information efficiently over different types of communication channels. By modifying the carrier signal, we can adapt it to the specific characteristics of the transmission medium, such as bandwidth limitations or noise interference. This enables us to achieve better signal quality and maximize the utilization of available resources.

  2. Compatibility: Modulation techniques enable compatibility between different communication systems. By using standardized modulation schemes, such as amplitude modulation (AM), frequency modulation (FM), or phase modulation (PM), we can ensure that different devices and systems can communicate with each other effectively. This compatibility is crucial in enabling seamless communication across various platforms and technologies.

  3. Signal Integrity: Modulation helps in preserving the integrity of the transmitted signal. By modulating the carrier signal, we can make it less susceptible to noise, interference, and distortion during transmission. This ensures that the received signal retains its quality and fidelity, allowing for accurate demodulation and extraction of the original information.

  4. Multiplexing: Modulation techniques enable the transmission of multiple signals simultaneously over a single communication channel. This is achieved through techniques like frequency division multiplexing (FDM) or time division multiplexing (TDM). By modulating each signal with a unique carrier frequency or time slot, multiple signals can be combined and transmitted together, significantly increasing the efficiency and capacity of the communication system.

Modulation Index

The modulation index is a crucial parameter in the field of communication systems, particularly in the context of modulation and demodulation techniques. It plays a significant role in determining the quality and efficiency of the transmitted signal. In this section, we will explore the definition of modulation index, its explanation in amplitude modulation (AM), the calculation of modulation index, and the effects it has on the transmitted signal.

Definition of Modulation Index

The modulation index, also known as the modulation depth, is a dimensionless quantity that represents the extent of modulation in a communication system. It quantifies the relationship between the amplitude of the modulating signal and the amplitude of the carrier signal. Essentially, it indicates how much the carrier signal is being varied or modulated by the information-bearing signal.

Explanation of Modulation Index in Amplitude Modulation (AM)

In amplitude modulation (AM), the modulation index determines the variation in the amplitude of the carrier signal. It is defined as the ratio of the peak amplitude of the modulating signal to the peak amplitude of the carrier signal. A higher modulation index signifies a greater variation in the amplitude of the carrier signal, resulting in a more significant modulation effect.

When the modulation index is low, the amplitude of the carrier signal remains relatively constant, and the modulating signal has minimal impact on the transmitted signal. On the other hand, a high modulation index leads to a more pronounced variation in the amplitude of the carrier signal, allowing the modulating signal to have a more significant influence on the transmitted signal.

Calculation of Modulation Index

The modulation index can be calculated using the formula:

Modulation Index = (Amplitude of Modulating Signal) / (Amplitude of Carrier Signal)

For example, if the amplitude of the modulating signal is 5 volts and the amplitude of the carrier signal is 10 volts, the modulation index would be 0.5. This indicates that the modulating signal is half the amplitude of the carrier signal.

Effects of Modulation Index on the Transmitted Signal

The modulation index has a direct impact on the characteristics of the transmitted signal. It influences the bandwidth, power efficiency, and quality of the signal. Let’s explore the effects of different modulation index values:

  1. Low Modulation Index: When the modulation index is low (close to zero), the transmitted signal is primarily composed of the carrier signal. The modulating signal has minimal effect on the signal, resulting in a narrow bandwidth. However, the information carried by the modulating signal may be difficult to discern due to the low level of modulation.

  2. Moderate Modulation Index: A moderate modulation index value (between 0.5 and 1) allows for a more significant variation in the amplitude of the carrier signal. This results in a wider bandwidth and improved signal quality. The information carried by the modulating signal is more easily distinguishable.

  3. High Modulation Index: When the modulation index is high (greater than 1), the transmitted signal experiences a substantial variation in amplitude. This leads to an even wider bandwidth and a higher level of modulation. However, excessive modulation can cause distortion and signal degradation, affecting the quality of the transmitted signal.

Phase Modulation

Phase modulation is a modulation technique used in communication systems to transmit information by varying the phase of a carrier wave. It is closely related to frequency modulation (FM) and amplitude modulation (AM), but instead of varying the frequency or amplitude, phase modulation focuses on changing the phase of the carrier wave.

Definition of Phase Modulation

In phase modulation, the phase of the carrier wave is modified in accordance with the input signal. The input signal, also known as the modulating signal, contains the information to be transmitted. By altering the phase of the carrier wave, the modulating signal is effectively encoded onto the carrier wave.

Phase modulation can be mathematically represented as:

s(t) = A * cos(wc * t + β * m(t))

Where:
s(t) is the modulated signal
A is the amplitude of the carrier wave
wc is the angular frequency of the carrier wave
t is the time
β is the modulation index
m(t) is the modulating signal

Comparison of Phase Modulation with Other Modulation Techniques

Phase modulation shares similarities with frequency modulation (FM) and amplitude modulation (AM), but it also has distinct characteristics that set it apart.

Frequency Modulation (FM)

In FM, the frequency of the carrier wave is varied in proportion to the modulating signal. This means that the frequency deviation is directly related to the amplitude of the modulating signal. In contrast, phase modulation focuses on altering the phase of the carrier wave, which is not directly dependent on the amplitude of the modulating signal.

Amplitude Modulation (AM)

AM involves varying the amplitude of the carrier wave in response to the modulating signal. This modulation technique is commonly used in broadcasting, where the amplitude variations carry the audio signal. Phase modulation, on the other hand, does not directly manipulate the amplitude of the carrier wave. Instead, it encodes information by modifying the phase.

Advantages and Disadvantages of Phase Modulation

Like any modulation technique, phase modulation has its own set of advantages and disadvantages.

Advantages

  1. Robustness: Phase modulation is less susceptible to noise and interference compared to amplitude modulation. This makes it a reliable choice for transmitting signals in noisy environments.

  2. Bandwidth Efficiency: Phase modulation offers better bandwidth efficiency compared to amplitude modulation. It allows for the transmission of more information within the same frequency range.

  3. Improved Signal Quality: Phase modulation provides improved signal quality, as it is less affected by variations in amplitude. This results in clearer and more reliable communication.

Disadvantages

  1. Complexity: Phase modulation requires more complex circuitry and processing compared to amplitude modulation. This can increase the cost and complexity of the communication system.

  2. Limited Range: Phase modulation is more sensitive to changes in the carrier wave’s phase. This can limit the range of the transmitted signal, especially in scenarios with high levels of interference.

Effects of Modulation Index on AM Waves

The modulation index plays a crucial role in determining the characteristics of amplitude modulation (AM) waves. It is a measure of how much the amplitude of the carrier wave is varied in response to the modulating signal. In this section, we will explore how the modulation index affects AM waves and the implications of doubling the modulation index.

Explanation of how the modulation index affects AM waves

The modulation index, also known as the modulation depth or modulation factor, is defined as the ratio of the peak amplitude of the modulating signal to the peak amplitude of the carrier wave. It quantifies the extent to which the modulating signal influences the amplitude of the carrier wave.

When the modulation index is low, the amplitude variations in the carrier wave are minimal. This results in a narrow bandwidth and a lower quality of the modulated signal. On the other hand, a high modulation index leads to significant amplitude variations in the carrier wave, resulting in a wider bandwidth and a higher quality of the modulated signal.

To better understand the effects of the modulation index, let’s consider an example. Suppose we have a carrier wave with a peak amplitude of 10 volts and a modulating signal with a peak amplitude of 5 volts. If the modulation index is 0.5, the amplitude of the carrier wave will vary between 7.5 volts and 12.5 volts. As the modulation index increases, the amplitude variations become more pronounced, resulting in a more pronounced modulation of the carrier wave.

Doubling the modulation index of an AM wave

Doubling the modulation index of an AM wave has significant implications for the modulated signal. When the modulation index is doubled, the amplitude variations in the carrier wave become more pronounced. This leads to an increase in the bandwidth of the modulated signal.

A wider bandwidth allows for the transmission of more information, as it accommodates a greater range of frequencies. However, it also requires more resources in terms of transmission power and bandwidth allocation. Therefore, doubling the modulation index should be done with caution, considering the trade-off between increased information transmission and resource utilization.

In addition to the bandwidth implications, doubling the modulation index can also affect the demodulation process. The demodulator, which extracts the original modulating signal from the modulated carrier wave, relies on the modulation index to accurately recover the modulating signal. If the modulation index is too low, the demodulator may struggle to extract the modulating signal accurately. Conversely, if the modulation index is too high, the demodulator may introduce distortion or inaccuracies in the recovered signal.

Why Modulation Index is Less Than 1

In most modulation techniques, the modulation index is typically less than 1. This value plays a crucial role in determining the quality and efficiency of the modulation process. Let’s explore the reasons behind this phenomenon, the relationship between modulation index and signal quality, and the impact it has on the efficiency of modulation.

Reasons for Modulation Index Being Less Than 1 in Most Modulation Techniques
MCQ on Electronics

There are several reasons why the modulation index is generally kept below 1 in most modulation techniques:

  1. Avoiding Overmodulation: Overmodulation occurs when the modulation index exceeds 1. This can lead to distortion and interference in the transmitted signal. By keeping the modulation index below 1, we ensure that the signal remains within the acceptable range and avoids overmodulation.

  2. Preventing Signal Interference: When the modulation index is less than 1, the sidebands produced during modulation are spaced closer together. This reduces the chances of interference with neighboring channels or frequencies, allowing for efficient use of the available bandwidth.

  3. Minimizing Power Consumption: In many modulation techniques, the power required to transmit a signal increases as the modulation index approaches 1. By keeping the modulation index below 1, we can minimize power consumption while still achieving satisfactory signal quality.

Relationship Between Modulation Index and Signal Quality

The modulation index has a direct impact on the quality of the modulated signal. Here’s how it affects signal quality:

  1. Signal Fidelity: The modulation index determines the extent to which the original message signal can be accurately reproduced at the receiver. A higher modulation index allows for better fidelity, as it provides a wider range of amplitudes to represent the message signal. However, if the modulation index is too high, it can lead to distortion and signal degradation.

  2. Signal-to-Noise Ratio (SNR): The modulation index affects the SNR of the modulated signal. A higher modulation index generally results in a higher SNR, as it allows for a larger portion of the transmitted power to be allocated to the signal. This leads to improved signal quality and better reception.

  3. Bandwidth Efficiency: The modulation index also influences the bandwidth efficiency of the modulation technique. By keeping the modulation index below 1, we can ensure that the sidebands are closely spaced, allowing for efficient use of the available bandwidth. This is particularly important in applications where bandwidth is limited or expensive.

Impact of Modulation Index on the Efficiency of the Modulation Process

The modulation index plays a crucial role in determining the efficiency of the modulation process. Here’s how it impacts efficiency:

  1. Power Efficiency: By keeping the modulation index below 1, we can achieve a balance between signal quality and power consumption. Higher modulation indices require more power to transmit the same signal, leading to decreased power efficiency. By optimizing the modulation index, we can maximize power efficiency without compromising signal quality.

  2. Spectral Efficiency: Spectral efficiency refers to the amount of information that can be transmitted per unit of bandwidth. By keeping the modulation index below 1, we can achieve higher spectral efficiency by closely packing the sidebands within the available bandwidth. This allows for more efficient use of the frequency spectrum.

MCQs on Modulation and Demodulation

MCQs related to modulation index

  1. What is the modulation index?
  2. The modulation index is a parameter that determines the extent of modulation in a signal.
  3. It is defined as the ratio of the peak amplitude of the modulating signal to the peak amplitude of the carrier signal.
  4. A higher modulation index indicates a higher degree of modulation.

  5. What is the significance of the modulation index?

  6. The modulation index determines the bandwidth occupied by the modulated signal.
  7. It affects the quality of the demodulated signal and the efficiency of the modulation technique.
  8. A modulation index of 1 is considered optimal for most modulation schemes.

  9. How does the modulation index affect the bandwidth?

  10. The bandwidth of a modulated signal is directly proportional to the modulation index.
  11. A higher modulation index leads to a wider bandwidth.
  12. This is because a higher modulation index introduces more sidebands around the carrier frequency.

MCQs related to modulation and demodulation techniques

  1. What is Amplitude Modulation (AM)?
  2. AM is a modulation technique where the amplitude of the carrier signal varies in accordance with the modulating signal.
  3. It is commonly used in broadcasting and two-way communication systems.
  4. AM signals can be demodulated using envelope detection or synchronous detection techniques.

  5. What is Frequency Modulation (FM)?

  6. FM is a modulation technique where the frequency of the carrier signal varies with the modulating signal.
  7. It is widely used in FM radio broadcasting and high-fidelity audio transmission.
  8. FM signals can be demodulated using frequency discriminators or phase-locked loop (PLL) circuits.

  9. What is Phase Modulation (PM)?

  10. PM is a modulation technique where the phase of the carrier signal is varied in accordance with the modulating signal.
  11. It is commonly used in digital communication systems and satellite communication.
  12. PM signals can be demodulated using phase detectors or Costas loop circuits.

MCQs on the working principles of modulation and demodulation

  1. How does modulation work?
  2. Modulation involves combining a low-frequency information signal (modulating signal) with a high-frequency carrier signal.
  3. The modulating signal alters the characteristics of the carrier signal, such as amplitude, frequency, or phase.
  4. This modulated signal is then transmitted through a communication channel.

  5. How does demodulation work?

  6. Demodulation is the process of extracting the original modulating signal from the modulated carrier signal.
  7. The demodulator circuit or receiver reverses the modulation process to recover the original signal.
  8. The demodulation technique used depends on the modulation scheme employed.

  9. What are the advantages of modulation and demodulation?

  10. Modulation allows multiple signals to be transmitted simultaneously over a shared medium.
  11. It enables long-distance communication and reduces interference between different signals.
  12. Demodulation allows the receiver to extract the original information signal accurately.

How Modulation and Demodulation Work

Modulation and demodulation are fundamental processes in communication systems that allow the transmission and reception of information over long distances. These processes involve the manipulation of a carrier signal to carry the desired information. Let’s explore how modulation and demodulation work in more detail.

Explanation of the Process of Modulation

Modulation is the process of modifying a high-frequency carrier signal with the information to be transmitted. The carrier signal acts as a “vehicle” for the information, allowing it to be efficiently transmitted over long distances. There are several types of modulation techniques, including amplitude modulation (AM), frequency modulation (FM), and phase modulation (PM).

In amplitude modulation, the amplitude of the carrier signal is varied in proportion to the instantaneous amplitude of the modulating signal. This variation in amplitude represents the information being transmitted. For example, in AM radio broadcasting, the audio signal is used to modulate the amplitude of the carrier signal, allowing the transmission of voice or music.

Frequency modulation, on the other hand, involves varying the frequency of the carrier signal based on the instantaneous amplitude of the modulating signal. This variation in frequency represents the information being transmitted. FM is commonly used in radio broadcasting, where the frequency of the carrier signal is modulated to carry audio signals.

Phase modulation, as the name suggests, involves varying the phase of the carrier signal based on the instantaneous amplitude of the modulating signal. This variation in phase represents the information being transmitted. Phase modulation is widely used in digital communication systems, such as satellite communication and wireless networks.

Explanation of the Process of Demodulation

Demodulation, also known as detection or extraction, is the process of recovering the original information from the modulated carrier signal. It is the reverse process of modulation and is essential for receiving and decoding the transmitted signal accurately.

Demodulation involves extracting the original information from the modulated carrier signal by using a demodulator or detector circuit. The demodulator circuit is designed to detect and separate the modulating signal from the carrier signal. The demodulator circuit can be specifically designed based on the modulation technique used.

For example, in AM demodulation, a diode detector circuit can be used to rectify the modulated signal, resulting in the recovery of the original audio signal. In FM demodulation, a frequency discriminator or phase-locked loop (PLL) circuit can be employed to detect the frequency variations and recover the original modulating signal.

Overview of the Components Involved in Modulation and Demodulation

Modulation and demodulation involve several components that work together to ensure the accurate transmission and reception of information. These components include:

  1. Carrier Signal: The high-frequency signal that is modulated to carry the information.

  2. Modulating Signal: The information signal that is used to modulate the carrier signal. This can be an audio signal, video signal, or data signal.

  3. Modulator: The circuit or device that performs the modulation process. It combines the carrier signal and the modulating signal to produce the modulated signal.

  4. Demodulator: The circuit or device that performs the demodulation process. It separates the modulating signal from the modulated carrier signal, allowing the recovery of the original information.

  5. Transmission Medium: The physical medium through which the modulated signal is transmitted. This can be a wired medium, such as coaxial cables or optical fibers, or a wireless medium, such as radio waves or microwaves.

By understanding the process of modulation and demodulation, we can appreciate how information is efficiently transmitted and received in various communication systems. These processes form the backbone of modern telecommunications, enabling us to communicate and exchange information over vast distances.

Modulation Index Calculation

The modulation index is a crucial parameter in modulation and demodulation techniques. It quantifies the extent of modulation applied to a carrier signal. By calculating the modulation index, we can determine the efficiency and quality of the modulation process. In this section, we will explore the step-by-step guide to calculating the modulation index and provide examples for different modulation techniques.

Step-by-step guide to calculating modulation index

To calculate the modulation index, we need to consider the peak amplitude of the modulating signal and the peak amplitude of the carrier signal. The formula for calculating the modulation index varies depending on the modulation technique used. Here is a step-by-step guide to calculating the modulation index for different modulation techniques:

  1. Amplitude Modulation (AM): In AM, the modulation index represents the ratio of the peak amplitude of the modulating signal to the peak amplitude of the carrier signal. The formula for calculating the modulation index in AM is as follows:

Modulation Index (m) = (Amplitude of Modulating Signal) / (Amplitude of Carrier Signal)

For example, if the peak amplitude of the modulating signal is 10 volts and the peak amplitude of the carrier signal is 5 volts, the modulation index would be:

m = 10 V / 5 V = 2

  1. Frequency Modulation (FM): In FM, the modulation index is determined by the ratio of the frequency deviation to the modulating frequency. The formula for calculating the modulation index in FM is as follows:

Modulation Index (m) = (Frequency Deviation) / (Modulating Frequency)

For instance, if the frequency deviation is 50 kHz and the modulating frequency is 10 kHz, the modulation index would be:

m = 50 kHz / 10 kHz = 5

  1. Phase Modulation (PM): In PM, the modulation index is calculated by dividing the phase deviation by the modulating frequency. The formula for calculating the modulation index in PM is as follows:

Modulation Index (m) = (Phase Deviation) / (Modulating Frequency)

For example, if the phase deviation is 30 degrees and the modulating frequency is 1 kHz, the modulation index would be:

m = 30 degrees / 1 kHz = 30 degrees/kHz

Examples of modulation index calculations for different modulation techniques

Let’s consider a few examples to illustrate the calculation of the modulation index for different modulation techniques:

  1. Example 1: AM Modulation

  2. Amplitude of Modulating Signal: 8 V

  3. Amplitude of Carrier Signal: 4 V

Modulation Index (m) = 8 V / 4 V = 2

Therefore, the modulation index for this AM modulation example is 2.

  1. Example 2: FM Modulation

  2. Frequency Deviation: 25 kHz

  3. Modulating Frequency: 5 kHz

Modulation Index (m) = 25 kHz / 5 kHz = 5

Hence, the modulation index for this FM modulation example is 5.

  1. Example 3: PM Modulation

  2. Phase Deviation: 45 degrees

  3. Modulating Frequency: 2 kHz

Modulation Index (m) = 45 degrees / 2 kHz = 45 degrees/kHz

Thus, the modulation index for this PM modulation example is 45 degrees/kHz.

Frequently Asked Questions

1. What is modulation index in phase modulation?

The modulation index in phase modulation refers to the ratio of the maximum phase deviation to the frequency deviation of the carrier signal.

2. What happens when the modulation index of an AM wave is doubled?

When the modulation index of an AM wave is doubled, the amplitude of the sidebands also doubles, resulting in an increase in the bandwidth of the modulated signal.

3. Why is the modulation index less than 1?

The modulation index is typically less than 1 to ensure that the modulation does not cause distortion or overmodulation of the carrier signal. It helps maintain the integrity of the transmitted signal.

4. Are there any MCQs available on modulation index?

Yes, there are multiple-choice questions (MCQs) available on modulation index that can help test your understanding of this concept.

5. Where can I find MCQs on modulation and demodulation?

You can find MCQs on modulation and demodulation in various textbooks, online learning platforms, or educational websites that cover the topic of communication systems.

6. How does modulation and demodulation work?

Modulation is the process of superimposing information signals onto a carrier signal, while demodulation is the process of extracting the original information signals from the modulated carrier signal. This is achieved using modulation and demodulation techniques such as amplitude modulation (AM), frequency modulation (FM), or phase modulation (PM).

7. What does the modulation index indicate?

The modulation index indicates the extent of modulation applied to a carrier signal. It determines the amplitude, frequency, or phase variations of the carrier signal based on the information signal.

8. How is modulation achieved?

Modulation is achieved by varying one or more characteristics of a carrier signal, such as amplitude, frequency, or phase, in accordance with the information signal. This variation allows the information to be transmitted over a communication channel.

9. What happens to the transmitted power when the modulation index of an AM wave is increased from 0.5 to 1?

When the modulation index of an AM wave is increased from 0.5 to 1, the transmitted power remains constant. However, the power distribution between the carrier and the sidebands changes, with the sidebands gaining more power.

10. How is modulation index calculated?

The modulation index can be calculated by dividing the peak amplitude of the modulating signal by the peak amplitude of the carrier signal. It represents the extent of modulation applied to the carrier signal.
Laser Metal Deposition: A Comprehensive Guide for Science Students

laser metal deposition

Laser Metal Deposition (LMD) is an additive manufacturing process that builds up and repairs high-quality metal components by overlapping layers of powder material and melting them with a laser. The process parameters, such as laser power, scanning speed, and powder flow rate, significantly impact the process’s stability, defects, and mechanical properties. Online monitoring of LMD is crucial to ensure a stable process and detect anomalies.

Deposition Rate: Maximizing Productivity

The deposition rate is the volume of material deposited per unit time, typically measured in cm³/s or g/s. It is influenced by the laser power, scanning speed, and powder flow rate. The deposition rate can be calculated using the following formula:

Deposition rate = (Laser power × Powder feed rate) / (Scanning speed × Hatch spacing × Clad height)

Where:
– Laser power is the power of the laser beam, typically measured in watts (W).
– Powder feed rate is the mass of powder fed into the process per unit time, typically measured in g/s.
– Scanning speed is the velocity at which the laser beam moves across the substrate, typically measured in mm/s.
– Hatch spacing is the distance between adjacent laser tracks, typically measured in mm.
– Clad height is the height of the deposited layer, typically measured in mm.

For example, a study on LMD of Inconel 718 demonstrated a deposition rate of 1500 g/h, which is equivalent to 0.42 cm³/s.

Powder Catchment Efficiency: Optimizing Material Utilization

laser metal deposition

Powder catchment efficiency is the ratio of the powder caught by the substrate to the total powder fed into the process. It is a crucial factor in determining the material utilization and process economy. The powder catchment efficiency can be calculated using the following formula:

Powder catchment efficiency = (Mass of powder deposited) / (Mass of powder fed) × 100%

The same Inconel 718 LMD study achieved a powder catchment efficiency of 70%, which means that 70% of the powder fed into the process was successfully deposited on the substrate.

Clad Geometry: Controlling the Deposition Profile

The clad geometry refers to the shape and dimensions of the deposited material, which are critical for the final component’s functionality. The clad geometry is influenced by the following LMD parameters:

  1. Laser power: Higher laser power leads to a wider and taller clad, but excessive power can cause instability and defects.
  2. Scanning speed: Higher scanning speed results in a narrower and shorter clad, but too high a speed can lead to lack of fusion.
  3. Standoff distance: The distance between the laser nozzle and the substrate affects the energy density and powder distribution, influencing the clad geometry.

The clad geometry can be optimized by adjusting these parameters to achieve the desired shape and dimensions for the specific application.

Thermal Features: Monitoring the Process Dynamics

Thermal features, such as temperature distribution and cooling rate, can be used to monitor the LMD process online. These features are influenced by the process parameters and can provide valuable insights into the process dynamics. For example, a study on monitoring the LMD process using infrared thermography demonstrated the possibility of controlling the process by means of thermal features, independent of the position of the region of interest (ROI).

The temperature distribution during LMD can be described by the following heat transfer equation:

∂T/∂t = α∇²T + Q/ρc

Where:
– T is the temperature (K)
– t is the time (s)
– α is the thermal diffusivity (m²/s)
– ρ is the density (kg/m³)
– c is the specific heat capacity (J/kg·K)
– Q is the heat source term (W/m³)

By analyzing the temperature distribution and cooling rate, process parameters can be adjusted to optimize the thermal history and improve the mechanical properties of the deposited material.

Surface Finish: Achieving the Desired Quality

The surface finish of the deposited material is a critical quality attribute that affects the final component’s performance. The surface roughness is influenced by the following LMD parameters:

  1. Laser power: Higher laser power can lead to a rougher surface due to increased melt pool instability and spatter formation.
  2. Scanning speed: Higher scanning speed generally results in a smoother surface, as the melt pool has less time to develop surface irregularities.
  3. Hatch spacing: Smaller hatch spacing can improve the surface finish by reducing the step-like appearance between adjacent tracks.

The surface roughness (Ra) can be measured using a profilometer and is typically reported in micrometers (μm). For example, a study on LMD of Ti–6Al–4V alloy showed that the surface roughness ranged from 10 to 20 μm, depending on the laser power, scanning speed, and hatch spacing.

Defect Detection: Ensuring Process Reliability

Online monitoring of LMD can detect typical defects, such as porosity, cracks, and lack of fusion, by analyzing the thermal features or optical signals. For example, a study on crack detection during LMD using an infrared monochrome pyrometer demonstrated the capability to detect and localize cracks online.

The formation of defects in LMD can be described by the following mechanisms:

  1. Porosity: Caused by gas entrapment, insufficient melting, or lack of fusion between layers.
  2. Cracks: Caused by thermal stresses, phase transformations, or metallurgical defects.
  3. Lack of fusion: Caused by insufficient energy input, leading to incomplete melting and bonding between layers.

By monitoring the process and detecting these defects in real-time, process parameters can be adjusted to mitigate the formation of defects and ensure the production of high-quality components.

Conclusion

Laser Metal Deposition is a versatile additive manufacturing process that offers numerous advantages for the production of high-quality metal components. By understanding and optimizing the key process parameters, such as deposition rate, powder catchment efficiency, clad geometry, thermal features, surface finish, and defect detection, science students can gain a comprehensive understanding of this technology and its practical applications.

References:

  1. Gomez-Omella, M.F., Flores, J., Sierra, B.F., Ferreiro, S., Hascoët, N., and Chinesta, F. (2023). Optimizing porosity detection in wire laser metal deposition processes through data-driven AI classification techniques. ScienceDirect.
  2. Maffia, S., Chiappini, F., Maggiani, G., Furlan, V., Guerrini, M., Previtali, B. (2023). Enhancing productivity and efficiency in conventional laser metal deposition process for Inconel 718 – Part II: advancing the process performance. Int J Adv Manuf Technol.
  3. D’Accardi, E., Chiappini, F., Giannasi, A., Guerrini, M., Maggiani, G., Palumbo, D., Galietti, U. (2023). Online monitoring of direct laser metal deposition process by means of infrared thermography. Prog Addit Manuf.
  4. Monitoring the Laser Metal Deposition (LMD) process by means of thermal methods. (2022). QIRT.
  5. Analysis of In Situ Optical Signals during Laser Metal Deposition of Aluminum Alloys. (2021). Crystals.

A Comprehensive Guide to Motion Sensors: Unlocking the Power of Quantifiable Movement Data

motion sensor

Motion sensors are versatile devices that can detect and measure movement, providing valuable data for a wide range of applications, from scientific research to home automation and security systems. These sensors utilize various technologies, such as ultrasound, infrared, or radar, to capture the motion of objects, people, or even subtle vibrations. By understanding the technical specifications and features of motion sensors, you can unlock their full potential and harness the power of quantifiable movement data.

Understanding the Technical Specifications of Motion Sensors

Range

The range of a motion sensor refers to the distance at which it can detect movement. This is a crucial specification, as it determines the area or volume that the sensor can effectively monitor. For example, the Go! Motion Sensor from Arbor Scientific has a range of 0.15 to 6 meters, allowing it to detect movement within a sizable space.

Resolution

The resolution of a motion sensor is its ability to distinguish between small and large movements. This is typically measured in millimeters (mm) or micrometers (μm), depending on the sensor’s sensitivity. The Go! Motion Sensor has a resolution of 1 mm, meaning it can detect movements as small as 1 millimeter.

Temperature Compensation

Some motion sensors, like the Go! Motion Sensor, feature automatic temperature compensation to ensure accurate readings in different environmental conditions. This is particularly important for applications where temperature fluctuations can affect the sensor’s performance.

Accuracy

The accuracy of a motion sensor refers to how closely it measures the actual movement. This is often expressed as a percentage or in terms of the maximum error. The Go! Motion Sensor has an accuracy of 2 mm, meaning it can measure movement with a maximum error of 2 millimeters.

Ultrasound Frequency

Motion sensors that use ultrasound technology, such as the Go! Motion Sensor, operate at a specific frequency, typically in the range of 40-60 kHz. This frequency is chosen to optimize the sensor’s performance and minimize interference with other electronic devices.

Power Consumption

The power consumption of a motion sensor is an important consideration, especially for battery-powered applications. The Go! Motion Sensor consumes 51 mA of power, which is a relatively low value, making it suitable for portable or wireless setups.

Power Source

Motion sensors can be powered by various sources, including USB, batteries, or external power supplies. The choice of power source will depend on the specific application and the sensor’s power requirements.

Sensitivity

The sensitivity of a motion sensor can be adjusted to detect different levels of movement. This feature allows users to fine-tune the sensor’s responsiveness to their specific needs. The Go! Motion Sensor has an adjustable sensitivity switch, enabling users to customize the sensor’s detection threshold.

Data Collection

Motion sensors can be used in conjunction with data collection software to visualize and analyze the captured movement data. The Go! Motion Sensor, for example, comes bundled with Logger Lite™ software, which allows users to record, graph, and interpret the sensor’s measurements.

Applying Motion Sensors in Scientific Research and Beyond

motion sensor

Motion sensors have a wide range of applications, from scientific research to home automation and security systems. In scientific research, these sensors can be used to measure the motion of objects, quantify physical activity, or detect subtle vibrations.

For example, a study published in the National Center for Biotechnology Information (NCBI) reviewed the use of motion sensors for physical activity data. The researchers found that motion sensors can provide accurate and reliable data on the intensity and duration of physical activity, making them valuable tools for health and fitness studies.

In the field of home automation, motion sensors can be used to detect movement and trigger various actions, such as turning on lights, activating security systems, or adjusting temperature settings. This can improve energy efficiency, enhance security, and provide greater convenience for homeowners.

Choosing the Right Motion Sensor for Your Application

When selecting a motion sensor for your specific application, it is important to consider the technical specifications and features that best suit your needs. Factors such as range, resolution, accuracy, power consumption, and sensitivity should be carefully evaluated to ensure the sensor’s performance meets your requirements.

Additionally, the data collection and analysis methods should be taken into account, as some sensors may come bundled with specialized software or offer integration with existing data management systems.

By understanding the technical details and potential applications of motion sensors, you can make informed decisions and unlock the power of quantifiable movement data in your scientific research, home automation, or security systems.

Conclusion

Motion sensors are versatile and powerful tools that can provide valuable data on movement and physical activity. By delving into the technical specifications and features of these sensors, you can harness their full potential and apply them in a wide range of applications, from scientific research to home automation and beyond.

Whether you’re a researcher, an engineer, or a homeowner, understanding the intricacies of motion sensors can help you make informed decisions and unlock new possibilities in your field of work or personal life.

References

  1. Sensor for motion detection on small scale – Arduino Forum. (2019-11-12). Retrieved from https://forum.arduino.cc/t/sensor-for-motion-detection-on-small-scale/620196
  2. Go! Motion Sensor – Arbor Scientific. Retrieved from https://www.arborsci.com/products/go-motion-sensor
  3. Measuring the “amount of motion” in a room – Arduino Forum. (2018-06-29). Retrieved from https://forum.arduino.cc/t/measuring-the-amount-of-motion-in-a-room/534016
  4. Motion Detector – Vernier. Retrieved from https://www.vernier.com/product/motion-detector/
  5. Motion Sensor Use for Physical Activity Data – NCBI. Retrieved from https://www.ncbi.nlm.nih.gov/pmc/articles/PMC4487413/
  6. McCarthy, M. (n.d.). Motion Sensor Use for Physical Activity Data: Methodological Considerations. Yale University School of Nursing. Retrieved from https://nursing.yale.edu/sites/default/files/files/Motion%20Sensor%20Use%20for%20Physical%20Activity%20Data%20Methodological%20Considerations.pdf

VBScript Variables – An Excellent Introduction Guide for VBScript Tutorial 1

vbscript tutorial Web Browser 300x87 1

VBScript Tutorial – Table of Content

VBScript Tutorial #1: Overview of VBScript Variables 

VBScript Tutorial #2: VBScript Conditional Statements and Loops

VBScript Tutorial #3: VBScript Procedures

VBScript Tutorial #4: VBScript Error Handling and Execute VBScript

VBScript Tutorial #5: VBScript String Functions

VBScript Tutorial #6: VBScript Date Functions

VBScript Tutorial #7: VBScript Time Functions

VBScript Tutorial #8: VBScript Array Functions

In this VBScript Tutorial, we are going to learn VBScript Variables, VBScript Array, VBScript Constants, and Dictionary Object in VBScript.

VBScript Tutorial #1: VBScript Variables

VBScript is the shorter form of Visual Basic Scripting which follows the Visual Basic language. The VBScripting was introduced by Microsoft. It’s a very simple languages to learn which allows to develop server-side as well as client-side scriptings.

VBScript Features:

· It is a simple scripting language.

· It is case insensitive and easy to learn for any entry-level programmer.

· It is an object-based programming language and does not follow the OOPS concept.

· It supports the COM which is a shorter form of Component Object Model (COM) structure. It allows to manage the elements from the environment where it is getting executed.

· The VBScripting which executed in server side, is compatible with hosting platform such as Internet Explorer web browser, Internet Information Services (IIS) as web server and Windows Scripting Host (WSH).

· It can be used to develop both server-side(Classic ASP) and client-side scripting.

· Tools like Excel macro, UFT (Unified Functional Testing) follow the VB Scripting.

VBScript as a client-side scripting:

vbscript tutorial - Web Browser
vbscript tutorial – Web Browser
vbscript tutorial - window scripting
vbscript tutorial – window scripting

· VB Scripts are supported in internet explorer only. The web browsers which are well known in market like Mozila Firefox, google Chrome etc., are not compatible with VBScript.

· It is platform-dependent i.e., only supported by windows environment.

· The debugging of VBScript is challenging as there is non availability of proper development area.

 VBScript Comment:

The purpose of the VBScript comment is to educate the compiler to skip the particular line or lines of code from the execution. Basically, VBScript comments are used to document or write the descriptions/objectives during the scripting. It will help to increase the readability of the code block by writing the description, change the log using the commenting. Two types of VBScript comments are available –

Single line VBScript comment: It’s done by using the single quote ( ‘ ) at the beginning of each line. Example of single-line comment in VBScript –

‘ Single line comment example

Multiple lines VBScript comment: Multiple lines VBScript comment is used to comment on more than one line. This type of VBScript comment can be achieved by putting more lines between “/*” and “*/” symbols. Example of multiple lines VBScript comment –

/*

VB Statement 1

VB Statement 2

….. and so on

*/

VBScript Variables:

The VBScript variables are one kind of placeholders which refer memory locations to store data. During the execution, VBScript allows to modify the variables. The declared name of VBScript variables are used to access the variables for reading or writing purposes. The variables have the ability to interact with any data types such as string, char, number, date, etc. As per the data types, the vbscript variables are changed accordingly. For an example – if we assign a number within double quote, it will be treated as string value.

We can declare VBScript variables in three ways which are explained below –

  • VBScript dim
  • VBScript public
  • VBScript private

VBScript Dim:

Dim stands for declare immediate. It means, VBScript dim allows to declare a variable immediately for any kinds of data types. We can declare multiple variables which are separated by comma, with a single VBScript dim statement. The scope of which are declared using VBScript dim statement, are restricted with in the code block such as functions, sub-procedures, local scripts etc., where it was declared. Below examples has shown the syntax of VBScript dim statement for variable declaration – ,

Dim var1

Dim var1, var2, var3

Using the keyword dim, we can declare the variables immediately with specifying the logical name of the variables. It is mandatory to declare the each of the variables if we specifying the statement “Option Explicit” at the starting of the script. So, if the statement does not specified, the variable declaration is an optional step. In this case, the variables are auto declared while defining the variables.

VBScript Public:

When variables are declared with the keyword public, the variables are accessible from through out the entire script. Basically, public keyword is used to define a variable as global variable.

VBScript Private:

When variables are declared with the keyword private, the scope of the variables are restricted to with in the code block.

Assigning Values to VBScript Variables:

In the below example, we will declare (using VBScript dim satement) assign values such as number and string to the variables with the help of equal(=) symbol,

'''''declare variables using VBScript dim statement
dim numVar
dim strVar
'''''define the variables - number and string
numbVar = 12345667788
strVar = "This is sample variable"

While assigning values to the variable, we need to keep the variable name in the left side of equal symbol and value has to be kept in the right side. For strings or characters, we need to keep the value with in double quote.

Scalar Variables – Defining a variable with single value, is known as scalar variable.

Array Variables – Conceptually an array represents a list of values. In VBScript, when a variable is assigned with multiple same type of values, is know as an array. Array can be declared with parenthesis after the variable name. It can be declared in same way how we declare a variable. The structure to declare an array is shown below –

Dim myArrayName(max index)

Here the index is used to refer the each elements of an array which start from zero. So, the max index denotes the length of array minus one. Values can be assigned to the each array element using the array indexes. In the below example, we will define an array which holds 3 student names –

' Declare an array with VBScript dim statement
Dim arrStudentName(2) 
' Assigning the student names using the index
arrStudentName(0) = "Tom"
arrStudentName(1) = "Jack"
arrStudentName(2) = "Jerry"

VBScript Variables – Naming Convention:

Syntactically, there is no specific naming conventions are available. But it advisable to follow the below guidelines for better readability of scripts,

· The starting character of a variable should be alphabetic.

· Any embedded period should not be kept.

The name of the variable should be logical as per the usage.

Length should not cross the limit of 255 characters.

VBScript Constants:

The value of VBScript constant variable can not be modified after definition. So, the constant variable is basically a read-only variable. It has to defined during the declaration. The VBScript provides default constant variable which can be used during scripts. The example of default constants are – vbOK, vbCancel, vbTrue, vbFalse, etc. The Const keyord is used to declare a constant in VBScripting. Below example, we will see how to define constant variables for number and strings –

Const strConstant= “This is my string.”

Const numConstant = 123

VBScript Array:

Conceptually an array represents a list of values. In VBScript, when a variable is assigned with multiple same type of values such as string, integer, etc., is know as an array. The VBScripts allows to keep the list of same type values in the same memory location(VBScript array). The each array elements can be accessed using the reference numbers which is known as array index. The index is always starts from zero.

Structure wise, VBScript Array has two sections – the logical name of array name and the array subscript that denotes the highest index value. The array subscript is equals to the length of array minus one.

The VBScript array has to be declared first, otherwise it will throw errors. Similar to the variable declaration, we can declare the VBScript array using the dim statement. By considering usage or scope, VBScript two type of arrays –

·     Local VBScript Array – The scope of this type arrays are restricted to the code block (functions or sub procedures) where it was declared.

·     Global VBScript Array – We can use this type of arrays throughout the scripts. This type of arrays should be declare at the beginning of the script.

Static and Dynamic Arrays:

Also, we can declare the VBScript array as static or dynamic while creating the scripts.

A static VBScript array – It has a fixed number of array elements which can not be altered during the script execution.

A dynamic VBScript array – The number of array element can be changed at anytime. When the number of elements are not fixed or pre-defined, we can use this array.

Working with VBScript Arrays:

Syntax for array declaration – Dim myArray(subscript value)

In the below example, we will create an VBScript array of marks of 3 students and store the calculated average marks into a variable –

'Declaration of array and value assignment for three students
dim arrMarks(2)
arrMarks(0) = 10
arrMarks(1) = 15
arrMarks(2) = 20
'Calculate the average and store it in a variable
Dim avgMarks
avgMarks = (arrMarks(0)+arrMarks(1)+arrMarks(2))/3

Dictionary Object in VBScript:

The dictionary object in VBScripts, has the similarity with the VBScript array. Which means, it’s also allowing to store a list of values. But the primary differences of dictionary object in VBScript, are that it can holds different types of data and a key has to be assigned for each data instead of indexes.

The dictionary object in VBScript can be declared for usages with the reference of “Scripting.Dictionary” class. 

Advantages of Dictionary Object in VBScript:

· Different types of data can be stored in a single variable.

· With the help of key, we can access the corresponding elements easily.

· This concept is very flexibles as there is predefined methods are available to manipulate the dictionary object in vbscript.

Example – Dictionary Object in vbscript: 

In the below example, we will see the codes for different operations on dictionary objects –

' **** Create a Dictionary Object in VBScript ****
'Create a variable.
Dim dict
Set dict = CreateObject("Scripting.Dictionary")
'Adding keys and items.
dict.Add "Name", "VBScript"
dict.Add "Id", "1"
dict.Add "Trainer", "K Mondal"
'**** Checking the availability of a Key from the dictionary object in VBScript ****
If dict.Exists("Name") Then
   msg = "The name key exists"
Else
   msg = "The name key does not exists"
End If
'Read an item
dim sName 
sName = dict.Item("Name")
'get the count of element
dim nCount
nCount = dict.count
'Delete single item
dict.Remove("Name")
'Delete All item
dict.RemoveAll

Conclusion:

In this VBScript article, we have learned about the Overview of VBScript Variables, VBscript Array, VBScript Constantsand Dictionary Object in VBScript. For more details on VBScript, please click here.

Mastering Laser: A Comprehensive Guide for Science Students

laser

Lasers are versatile and powerful tools that have revolutionized numerous fields, from scientific research to industrial applications. Understanding the key parameters and performance characteristics of lasers is crucial for any science student or enthusiast looking to delve into the world of laser technology. In this comprehensive guide, we will explore the intricacies of laser performance, providing you with a deep dive into the technical specifications and measurable data points that define the capabilities of these remarkable devices.

Wavelength: The Cornerstone of Laser Performance

The wavelength of a laser, measured in nanometers (nm) or micrometers (μm), is a fundamental parameter that determines the absorption, transmission, and reflection characteristics of materials. This parameter is crucial in various applications, such as:

  • Spectroscopy: The specific wavelength of a laser can be used to excite and study the electronic transitions of atoms and molecules, enabling advanced spectroscopic techniques.
  • Laser Cutting and Welding: The wavelength of a laser affects its interaction with different materials, influencing the efficiency and precision of cutting and welding processes.
  • Laser Printing: The wavelength of the laser in a laser printer determines the size and resolution of the printed image, as it affects the way the toner interacts with the paper.

To understand the significance of wavelength, consider the following equation:

E = h * c / λ

Where:
E is the energy of a photon
h is Planck’s constant (6.626 × 10^-34 J·s)
c is the speed of light (3 × 10^8 m/s)
λ is the wavelength of the photon

This equation demonstrates the inverse relationship between the wavelength and the energy of a photon, highlighting the importance of selecting the appropriate wavelength for specific applications.

Power and Energy: Driving the Laser’s Capabilities

laser

Power, measured in watts (W), is a crucial parameter that determines the laser’s ability to perform various tasks. High-power lasers are often used in industrial processes, such as cutting, welding, and additive manufacturing, where precise power level control is essential.

On the other hand, energy, measured in joules (J), is particularly relevant for pulsed lasers. The energy of a laser pulse is the product of the power and the pulse duration, and it is a critical parameter for applications like laser-induced breakdown spectroscopy (LIBS) and laser-based material processing.

The relationship between power and energy can be expressed as:

Energy (J) = Power (W) × Pulse Duration (s)

Understanding the power and energy requirements of a laser is crucial for selecting the appropriate laser source and ensuring optimal performance in various applications.

Repetition Rate and Pulse Duration: Timing the Laser’s Precision

For pulsed lasers, the repetition rate, measured in hertz (Hz), indicates the number of pulses per second. This parameter is essential in applications where the timing and synchronization of laser pulses are critical, such as in laser-based communication systems or time-resolved spectroscopy.

Pulse duration, or pulse width, is often expressed as a percentage of the period between pulses and can be measured in seconds (s). This parameter is crucial in determining the peak power of a laser pulse, as well as the temporal resolution of the laser’s output. Shorter pulse durations can lead to higher peak powers, enabling applications like laser-induced plasma generation or ultrafast spectroscopy.

The relationship between repetition rate and pulse duration can be expressed as:

Period (s) = 1 / Repetition Rate (Hz)
Pulse Duration (s) = Percentage of Period

Carefully selecting the appropriate repetition rate and pulse duration is essential for achieving the desired performance in various laser-based applications.

Divergence: Controlling the Laser’s Beam Spread

Divergence, measured in milliradians (mrad) or degrees, is a crucial parameter for free-space laser communication and other applications where the laser beam needs to be directed over long distances. Divergence describes the angular spread of the laser beam as it propagates, and it is influenced by factors such as the laser’s wavelength, beam quality, and the design of the optical system.

The divergence of a laser beam can be calculated using the following equation:

Divergence (mrad) = Beam Diameter (mm) / Focal Length (m)

Understanding and controlling the divergence of a laser beam is essential for ensuring efficient energy transfer and maintaining the desired beam size at the target location.

Beam Profile: Visualizing the Laser’s Power Distribution

Beam profile measurement is a crucial step in understanding the power distribution of a laser beam. This analysis reveals whether the beam has a Gaussian or flat-top profile, and it can also identify any hot spots that could lead to overheating or underheating in applications like 3D printing.

One of the key parameters used to quantify beam quality is the M2 factor, which is a measure of how close the laser beam is to an ideal Gaussian beam. The M2 factor ranges from 1 (for a perfect Gaussian beam) to infinity (for a highly multimode beam). A lower M2 value indicates a higher-quality beam, which is essential for applications that require precise control over the laser’s energy distribution.

The M2 factor can be calculated using the following equation:

M2 = (π * Beam Diameter * Divergence) / (4 * λ)

Where:
M2 is the beam quality factor
Beam Diameter is the diameter of the laser beam
Divergence is the angular divergence of the laser beam
λ is the wavelength of the laser

Analyzing the beam profile and understanding the M2 factor are crucial for optimizing the performance of a laser in various applications.

Technical Specifications for a Laser DIY Project

When embarking on a laser DIY project, it is essential to consider the following technical specifications to ensure successful implementation and optimal performance:

  1. Wavelength Range: Ensure that the sensor used for beam profiling is sensitive to the specific wavelength of the laser. If necessary, consider using beam profiling accessories like UV converters or IR adaptors to accommodate different wavelength ranges.

  2. Sensor Dimension and Pixel Pitch: The sensor should be at least three times the largest diameter of the beam, and the smallest beam should fit within at least 10 pixels. This ensures that the beam profile is accurately captured and analyzed.

  3. D4σ (Second Moment Width): This parameter represents the diameter that contains 86.5% of the total beam power. It is calculated from the second moment of the beam profile and is a crucial metric for understanding the power distribution of the laser beam.

  4. Beam Quality (M2): As mentioned earlier, the M2 factor is a measure of the beam quality, with M2=1 indicating the best beam quality. Ensuring a low M2 value is essential for applications that require precise control over the laser’s energy distribution.

  5. Power and Energy Considerations: Carefully select the appropriate laser source based on the power and energy requirements of your project. Consider the specific tasks and applications you intend to use the laser for, and choose a laser that can deliver the necessary performance.

  6. Pulse Duration and Repetition Rate: If your laser is pulsed, ensure that the pulse duration and repetition rate are suitable for your application. Adjust these parameters to achieve the desired peak power and temporal resolution.

  7. Beam Divergence: Understand the divergence characteristics of your laser and how they may impact the beam size and energy distribution at the target location. Adjust the optical system, if necessary, to control the beam divergence.

By carefully considering these technical specifications and understanding the key measurable and quantifiable data points, you can ensure the successful implementation and optimal performance of your laser DIY project.

Conclusion

Mastering the intricacies of laser performance is essential for any science student or enthusiast looking to delve into the world of laser technology. In this comprehensive guide, we have explored the crucial parameters that define the capabilities of lasers, including wavelength, power, energy, repetition rate, pulse duration, divergence, and beam profile.

By understanding the relationships between these parameters and the underlying physics, you can make informed decisions when selecting and configuring laser systems for your specific applications. Whether you’re working on a laser DIY project or conducting advanced scientific research, this guide provides you with the technical knowledge and practical insights to navigate the world of lasers with confidence.

Remember, the journey of mastering lasers is an ongoing one, as new advancements and applications continue to emerge. Stay curious, keep learning, and embrace the ever-evolving landscape of laser technology. Happy exploring!

References

  1. Ophir Photonics. (n.d.). 5 Situations Where Laser Performance Matters. Retrieved from https://www.ophiropt.com/en/n/5-situations-laser-performance
  2. Gentec-EO. (2019, May 23). Spot Size of Laser Beam: What You Need to Know. Retrieved from https://www.gentec-eo.com/blog/spot-size-of-laser-beam
  3. Arroyo Instruments. (2021, April 28). Understanding Laser Power Stability: What You Need to Know. Retrieved from https://www.arroyoinstruments.com/blog/understanding-laser-power-stability-what-you-need-to-know/
  4. Xometry. (n.d.). Laser Beam Quality: What You Need to Know. Retrieved from https://www.xometry.com/resources/sheet/laser-beam-quality/

VHDL Process & Installation Guide: 3 Important Facts

Topics of Discussion

1. VHDL Process using Xilinx

2. Steps to Install Xilinx

3. Step by Step Examples for implementation of Sequential & Combinational Circuits.(VHDL Process)

Tutorial with a step-by-step guide for VHDL Process

VHDL Process Using XILINX

To implement VHDL designs, we will use Xilinx. Xilinx is one of the best providers of programming logic devices. It is a tech company based on states.

Prerequisite for using VHDL:

WHAT IS VHDL ? Check Here!
  • Must have some knowledge of digital electronics. <You can check out some articles here!>
  • It is good if you have an uninterrupted internet connection for downloading the files.
  • Xilinx needs at least 18 GB of space in your PC. So make sure that your disk has enough space to run the application.
  • Make sure you have created a free account with a valid email id in Xilinx before downloading. That will help you in future purposes.
  • We are using windows.

Installation Guide for VHDL Process

  • Step 1: Download the zip file according to your operating system and their versions.

The link to download Xilinx is given below.

https://www.xilinx.com/member/forms/download/xef.html?filename=Xilinx_ISE_DS_Win_14.7_1015_1.tar

It is 6.18 GB free zipped file. We will use this version to demonstrate the tutorial.

You can find other downloadable options from here –

https://www.xilinx.com/support/download/index.html/content/xilinx/en/downloadNav/vivado-design-tools/archive-ise.html

  • Step 2: Unzip the file and store that in a preferred folder. The folder name should be – Xilinx_ISE_DS_Win_14.7_1015_1. Open this folder.
  • Step 3:  Double click on the xsetup file (as shown in the image) and start the installing. Allow all the permissions . The installation may take up to two hours depending on the memory space available and the PC configurations. Nothing to worry, sit tight and get it installed.
IMAGE1 1
Choose the ISE Webpack

Choose the ISE webpack from the list when this pop up appears before final installation. Also, keep the default storage space as it suggests and if that location has enough space.

IMG1 1 1024x576 1
Choose the xsetup file.

 After the installation of the file, there will be two shortcuts appearing in the desktop, and there will be a pop-up regarding the license. Don’t click on the shortcut icons as the installation is not completed and also close the license tab for the time being.

  • Step 4: Now, the software is installed inside your computer. Find out the installed folder which is of around 18 GB of size. By default, it gets stored in C drive if you have not made any changes. Open the folder.

Open Xilinx folder -> 14.7 -> ISE_DS -> lib -> nt64

Path – [C:\\Xilinx\\14.7\\ISE_DS\\ISE\\lib\ t64]

  • Step 5: Now there will be a file named – “libPortability.dll”

Rename that file as – “libPortability.dll.orig”

  • Step 6: Then find out the file named as – “libPortabilityNOSH.dll”. It will be just below the file we worked in step 4. Copy the file and paste it. Now rename that pasted file as – ‘libPortability.dll”. Keep the copied file in the dashboard.

The final outcome will look like the below-given figure.

IMG3 1024x576 1
The final result will be same as the marked ones.
  • Step 7: After that, we have to go to another file-folders.

Open Xilinx folder -> 14.7 -> ISE_DS -> common -> lib -> nt64

Path – [C:\\Xilinx\\14.7\\ISE_DS\\common\\lib\ t64]

There will be a file named as – “libPortability.dll”.

Rename that file as – “libPortability.dll.orig”

  • Step 8: Now, paste the file that we have copied in step 6 and rename that pasted file as – ‘libPortability.dll”.

The final outcome will look like the below-given figure.

IMG4 1024x576 1
Final result for step 8 of VHDL Process
  • Step 9: License: Now double click on the shortcut ISE Design Suite 14.7. There will be a pop-up asking for a license. Just click Okay, and another window will be opened. There will be options for the license. From the “Acquire license”, click on the “Get My Purchased License (s)” and then NEXT.
IMG5 1 1024x529 1
Click on the Get My License in the VHDL Process of Step 9

Then, there will be another pop-up from “Xilinx License Manager”. Click on the connect now option. It will open a tab on the default web browser of your PC.

Log in with your credentials, and there will be options like the below image. You have to choose the 4th or 5th option from the list. Just click on the license you want.

There will be a mail in your email id, containing the license file for Xilinx. Download the license file and store it into the download folder.

IMG6 1 1024x389 1
Select the 4th or 5th option from the list
  • Step 10: Go back to the ISE. There you can see a window remained open. Choose the option load license and locate your license in the download folder to upload.
IMG7 1 1024x535 1
Upload the license which you have downloaded.

After uploading the license, there will be a message showing successfully. Click Ok and then click close in the previous window. Now Xilinx is ready to be used.

IMG8 1024x537 1
Now we are ready for making the first project using VHDL Process

Creating your first project in XILINX (VHDL Process)

We will implement a simple AND gate dataflow modelling using Xilinx.  AND gate is represented as – Y= AB. The truth table is shown below.

ABY =AB
000
010
100
111
Truth Table for AND Gate
  • Step 1: Open the project navigator by double-clicking the icon on the desktop.
  • Step 2: Go to File and then New Project. File -> New Project
IMG9 1
Choose the New Project from File, VHDL Process ,Step 2
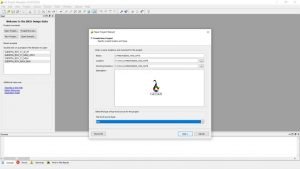
  • Step 3:  Give a name to your project and select the location to store the project. Never uses basic gate names. Then click on the next. Copy the name, and it will help later.
IMG10 1024x576 1
Give a name to your project, VHDL Process, Step -3
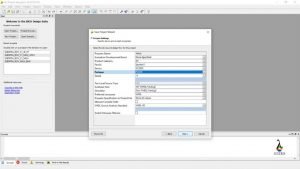
  • Step 4: Now set up the values as mentioned below. Do the setup carefully. Any mistake will lead to failure.
img 10 a 1024x596 1
Edit and fill up the details, VHDL Process, Step -4

Click on the NEXT and then click on ‘Finish’ For the next pop-up.

IMG11 1024x576 1
VHDL Process, Step -4
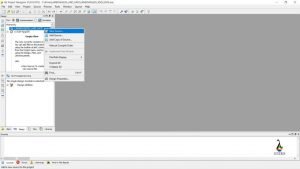
  • Step 5: Now, in the editor section, you can see your model at the left top corner, inside the design tab and under the Hierarchy bar. Place your cursor on the folder named by you and do a right-click. Then Choose the New Source from the menu.
IMG12 1024x576 1
VHDL Process, Step – 5
  • Step 6: In the new window, choose the VHDL Module and paste the same name that you have copied in step 3, or you can get the name from the location tab. Click on next.
IMG13 1
VHDL Process, Step – 6
  • Step 7: In the define module pop-up,
  • Change the Architecture from ‘Behavioral’ to ‘Dataflow’.
  • In the Port Name, Write A, B, and Y in the consecutive rows. Now for The Y marked row, Choose the direction as ‘out’ as it will be the output. You can change the direction from the down arrow associated with it.
  • There will be another pop-up. Check if the porta is okay or not. Then click finish.
IMG14 1
Defining Ports, VHDL Process, Step 7
  • Step 8: RTL SCHEMATIC CREATION

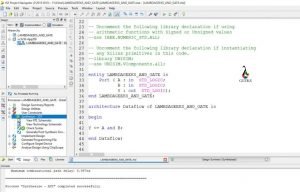
Now a code editor will be opened.

A. In the 40th line, you can ‘begin’. From that place, you have to write the dataflow code. The Code for our program will be –

Y <= A and B;

B. Save the code using Ctrl + S.

C. Now, on the left side of the window, under the design bar, you can see a tab named ‘process < model_name>’.

D. Expand the ‘Synthesis – XST’ from there.

E. Double click on the ‘Check Syntax’. It will show a green tick, denoting success.

F. Then, Double click on the ‘Synthesis – XST’. A green tick will have appeared here too.

IMG15 1024x655 1
Synthesis Check, VHDL Process, Step – 8

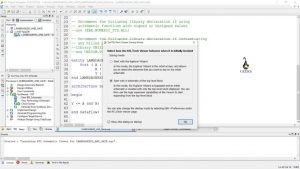
G. Now click on the ‘View RTL Schematic’ to view the RTL implementation. A pop up will appear. Choose the second option and click on the next.

IMG16 1024x576 1
Selection of the second option

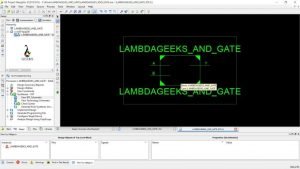
H. A diagram segment will be opened up.

IMG17 1024x576 1
RTL Schematic – 1

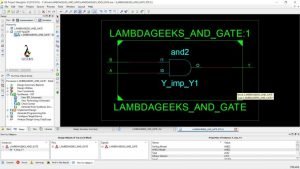
I. Double click on the box to show the inside structure.

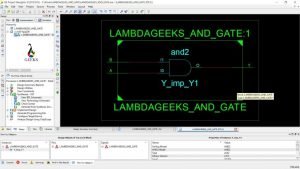
IMG18 1 1024x576 1
Final RTL Schematic
  • Step 9: TEST BENCH CREATION
  1. Change the tab from Implementation to Simulation.
IMG19 1
The default option is Implementation- click on simulation
  1. Again, right-click on the first folder and choose the new source.
IMG20 1
Choose the new source
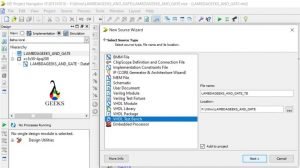
  1. Choose the ‘VHDL Test Bench’ and give a new file name. Click on the next.
IMG21 1024x574 1
Choose the VHDL Test Bench And give a name to the test bench file
  1. After that, a window named Associate Source will be popped up to link your dataflow model with the test bench. Click on the model and click NEXT. Click on ‘Finish’ for the next window.
IMG22 1
Link the existing dataflow model
  1. A new code editor will be opened up.

Now, for an AND gate, we don’t need clock pulses. To delete or comment all the clock signals.

The clock signals are at line no. – 60, 72 to 78 and line no. 87.

Test bench code is written in the ‘Stimulus process section’.

You can start from the 90th line.

 The code for test bench of AND gate is –

A <= ‘0’;

               B <= ‘0’;

               wait for 100 ns;

               A <= ‘0’;

               B <= ‘1’;

               wait for 100 ns;

               A <= ‘1’;

               B <= ‘0’;

               wait for 100 ns;

               A <= ‘1’;

               B <= ‘1’;

               wait for 100 ns;

6. Now from the left side option, expand the Isim Simulator, and then double click on the ‘Behavioral Check Syntax’. A green tick will appear.

IMG23 1
Click on the Behavioral check syntax for the final outcome

7. Now double-click on the ‘Simulate Behavioral Model’.

A window will be popped up. allow the software to access.

On the toolbar at the top, find out the option of zooming. Click on the third option to see the full view.

VHDL Process
Final waveform, Last step of VHDL Process

Click Here to Know About the VHDL CODING PROCESS!

VHDL Tutorials: 13 Important Concepts

vlsi vhdl tutorials design principle 0

In this VHDL Tutorial, we will discuss some of the basic concepts related to VHDL technology and few example with coding. VHDL Tutorial is segmented as follows :

TOPICS OF DISCUSSION

A. What is VHDL?

B. History and Standardization

C. VHDL Design Procedures

D. Some rules and basic information about VHDL

E. Syntaxes & Some important concepts for writing VHDL Codes

F. VHDL Simulators for VHDL Tutorial

VHDL || What is VHDL?

The full form of VHDL stands for Very High Speed Integrated Circuit Hardware Description Language (VHSIC-HDL).

As the name suggests, VHDL is a hardware description language or a special type of programming language which describes the hardware implementations of digital system and circuits.  It is a strongly typed language and points to be remembered that it is not a programming language.  

History and Standardization

US Defense Department has a significant contribution to the modern technological field. It has given birth too many great ideas and innovations. US Defense also developed VHDL in the year 1983. It was developed for documentation of behavior of the application specific integrated circuits.

Later, some ideas were implemented from Ada programming languages. VHDL got standardized for the first time in the year 1987. It was added up with several data types of several types, including strings and numeric and logical.

Standardization

VHDL or for Very High Speed Integrated Circuit Hardware Description Language (VHSIC-HDL) is standardized by IEEE 1076 standard. It is being updated from its birth and has undergone many revisions. Let us look at some of the standard revisions and major updates.

RevisionsUpdates
IEEE 1076 – 1987Revision and standardization from US Defense.
IEEE 1076 – 1993Came up with the greatest release, and it is the most widely used version.
IEC 61691 -1 – 1- 1: 2004IEC adopted IEEE 1076-2002 Version
IEEE 1076 -2008Updated with some major changes like – Introduction of generics on packages and use of external names
IEC 61691 -1 – 1- 1: 2011IEC adopted IEEE 1076-2008 Version
Check the standardization here, VHDL Tutorial Table – 1

Design of VHDL

VHDL design has some design units. They are known as – Entity, Architecture, Configuration, and Package.

Entity: Entity defines external views of a model that is a symbol.

Architecture: Architecture defines the functionality of a model that is schematic.

Configuration: Configuration is used for associating architecture with an entity.

Package: Package is the collection of information which can be referenced by VHDL modules. A VHDL package consists of two part. They are – package declaration and package body.

1200px Vhdl signed adder source.svg
A basic code designed in VHDL Tutorial, Image Credit – Vhdl_signed_adder.pngRevRagnarok derivative work: Bernard LadenthinVhdl signed adder sourceCC BY-SA 3.0

Entity Declaration

The general structure of entity declaration is given below –

ENTITY < entity_name > IS

          Generic declarations

          Port declarations

END ENTITY <entity_name>;

  • <entity_name> can be alphabetic/ numerical or alpha-numerical.
  • Generic Declarations is for passing information into a model.
  • Port Declarations is for describing the inputs and outputs pins.
  • An entity can be closed in several ways.
    • END ENTITY <entity_name>;
    • END ENTITY;
    • END;

Port Declarations

A general structure for port declarations is given below –

ENTITY < entity_name > IS

          Generic declarations

          — Port Declarations:

PORT (

          SIGNAL CLK, CLR: IN BIT;

          q: OUT BIT

          — note that there is no semicolon in the last line of declarations.

          );

END ENTITY <entity_name>;

The structure of port declaration: <class> object_name : <mode> <type>;

  • Class: Class is what can be done to an object. Here class is signal. A point to be remembered that the SIGNAL is not written while writing program; rather, it is assumed and not required.

  • Object_name: It is the identifier.
  • Mode: It specifies the direction.

IN – Input

OUT – Output

INPUT – Bidirectional

BUFFER – Output with internal feedback

  • Type: Type specifies what can be contained inside an object.

Generic Declarations

A general structure of generic declarations is given below –

ENTITY <entity_name> IS

          GENERIC (

                    CONSTANT tplh, tphl : time := 5 ns;

                    tphz, tplz : TIME := 3ns;

                    default_value : INTEGER := 1;

                    cnt_dir : STRING := “UP”

                    — note that there is no semicolon in the last line of declarations.

                    );

          Port declarations

          END ENTITY <entity_name>;

  • Generic values can be overwritten during compilation.
  • Generic must possess the tenacity to a constant during the compilation of a program.  

Note that CONSTANT keyword is assumed and not required to write.

Architecture

  • Analogy-schematic: Analogy schematic gives the description of the functionality of a model and the timing associated with it.  
  • The architecture of a model should be associated with an ENTITY.
  • An Entity may have many architectures associated with it.
  • Architecture statements execute concurrently.
  • Some styles of architecture –
  • Behavioural: Behavioural model describes how designs operate.

RTL: RTL describes how designs can be implemented using registers.

Functional: It includes no timing.

  • Structural: Implementation of gate level structure.
  • Dataflow: Implementation of the truth table.
  • Architecture is ended with –
    • END ARCHITECTURE <architecture_name>;
    • END ARCHITECTURE
    • END;

A general structure of writing an architecture:

ARCHITECTURE <identifier> OF <entity_identifier> IS

          SIGNAL signal_1 : INTEGER := 1;

          CONSTANT cnst := BOOLEAN := true;

          TYPE process IS (W, X, Y, Z);

          — Attribute declarations

          — Attribute specifications

          — Subprogram declarations

          — Subprogram body

BEGIN

          Process statements

          Concurrent procedural calls

          Signal assignment

          Generate statements

END ARCHITECTURE <identifier>;

IMG18 1024x576 1
RTL Schematic of an AND Gate, from VHDL Tutorial

Configuration     

As discussed, an earlier configuration is used for associating architecture with an entity. Associating or combining is necessary because An ENTITY can not work until the architecture is associated with it.  A general structure of configuration is given below.

CONFIGURATION  < identifier > OF < entity_name > IS

          FOR < architecture_name >

                    FOR < instance_name > : < component_name > USE < entity >(< architecture >)

                    END FOR;

                    FOR < instance_name > : < component_name > USE < configuration_name >

                    END FOR;

          END FOR;

END CONFIGURATION < identifier >;

Packages

VHDL packages are one whole unit of an entire system. It is the main aim of the implementation of VHDL. A package has two parts. As said earlier, package declarations and package body make a complete package.

VHDL delivers two in-built packages.

Some rules and basic information about VHDL Tutorial

Let us discuss about have a glance at some basic information before we dive to explore the VHDL tutorial.

1. Reserved Keywords: VHDL has some keywords as reserved (that cannot be used for declaring a variable).

2. Parts: VHDL has two steps or parts for the creation of a model. One is Simulation, and the other is synthesis and simulation.

3. Case sensitive language: VHDL is not a case sensitive language (for the most of the part).

4. Commenting: To comment a statement in the VHDL code editor, start the sentence with –, for an example:

— This is a comment in VHDL.

5. Termination: VHDL codes and each single lines of codes are terminated using a semicolon (whenever needed). 

6. Space Sensitivity: VHDL is not white space sensitive.

Syntaxes and Some important VHDL Tutorial concepts for writing a VHDL Codes

  1. Array with examples
  2. Process with examples
  3. IF – THEN – ELSIF implementation with examples.
  4. CASE statement
  5. FOR LOOP

A. Array

Array stores value. It is a user-defined data type to store value. An array may contain variables of signal, constants type.

A general structure to declare an array is given below:

TYPE array_name IS ARRAY (range) OF data_type;

For an example,

TYPE lambdageeks IS ARRAY (0 to 9) OF std_logic_vector (0 UPTO 9);

B. Process Statement

Process is a simultaneous and synchronized statement. It introduces the chronological statements. Multiple processes run parallelly if the model needed.

A process consists of two parts. They are the execution of the process and then wait for the next condition.

SYNTAX:

process sensitivity_list

          declarations

begin

          chronological_statements;

end process;

C. IF – THEN – ELSIF implementation

These statements are used for implementing a condition and for their result.

An if condition can have an infinite number of branches as per the requirement. A considerable number of elsif condition is also possible. But, in an, if loop, there can be only one else condition. An if loop is terminated by the end if statement. If the condition is given is true, then it will enter the loop and will execute the statement. If it fails, then go for else or elsif statement.

The syntax of the statements is given below.

SYNTAX

          if conditional_boolean_expression then

                    statement1

          elsif conditional_boolean_expression then

                    statement2

          . . .

          else

                    statement3

          end if;

D. CASE Statement

Case statement finds out which statement will be executed. A case statement can also be branched as IF-ELSE loops.

SYNTAX

[label]: case < conditional-expression > is

          when < choice> = >

                    statement1

          when <choice> = >

                    statement2

          …

          when <choice> = >

                    statement

end case [label];

E. FOR Loop

A for loop is a continuous execution of statements according to the bounding conditions.

For each FOR loop, we need an iterator which will perform the operations in the for a loop. It is also known as an identifier. It is an integer by default and no need to declare the iterator. It is one of the most commonly used loops for making complex models. It is more familiar than while loops.

SYNTAX

[label]: for iterator in range loop

          Statement1

          Statement2

          …

          Statement n

end loop [label];

VHDL Simulators for VHDL Tutorial

Some of the famous VHDL simulators used for the implementation of VHDL are listed below.

  1. Xilinx Vivado: The most famous simulator for VHDL is Xilinx Vivado. Xilinx provides programmable logic devices. We will use this simulator for the next part of the VHDL Tutorial. 
  2. Cadence Incisive: The previous version was known as NC-VHDL.
  3. VHDL Simili: Symphony EDA develops it. It is free for consumers. 
  4. GHDL: One of the famous free VHDL simulator. 
  5. Boot: Freerangefactory organization developed the simulator. 
  6. NVC: Nick Gasson developed the opensource VHDL compiler. 
  7. EDA Playground: Another free version based on web-browser. 
  8. Synopsis VCS-MX.
Simulators for VHDL, We will use XILINX for our VHDL Tutorial Image Credit – ™/®Xilinx, Inc., Xilinx logo, marked as public domain, more details on Wikimedia Commons

Make your first project using VHDL. Check out the next part of VHDL Tutorial.

For more electronics related article, Click here!

What Is Raspberry Pi Drone: 11 Facts You Should Know

Raspberry Pi Rover 300x169 1

Points for Discussion

A. Application in Education

B. Application in Home Automation

C. Application in Industrial Automation

D. Pi as AI Assistant (Raspberry Pi Alexa)

E. Photography Applications

F. Raspberry pi drone and Raspberry pi drone peripherals

G. Raspberry Pi camera

H. Octoprint Raspberry Pi

Various Applications of Raspberry Pi

Raspberry pi is considered as one of the greatest inventions. It is one of the hot-selling electronics devices in today’s world. From taking images of planets in night using raspberry pi cameras to controlling the washing machine in your home , Raspberry pi drone is using in advanced drones also. Do. Raspberry pi is now literally the ‘Jack of all trade’. But the tiny computer is not trying to replace the conventional computing machines but assisting the machines like never before!

It’s versatility of shape and size and dynamic nature of operation helps to implement innovative ideas in a simple way and through shorter process. Out of in numerous numbers of applications, we will discuss about some common applications which are appreciated and adapted by tons of people (the range of people lies from – 8th standard student to NASA scientists!). At first, we will discuss about the uses of raspberry pi by dividing its uses in separate fields then we will be more specific.

Raspberry Pi Rover
Raspberry Models Used By Nasa for their ROVER, Image Source – NASA/JPL-Caltech, NASAJPLOpenSourceRover, marked as public domain, more details on Wikimedia Commons

What is Raspberry Pi? How it works? Read Here

A. Education

Raspberry pi helps the students to grow interest in the modern technological domains. They come up with different innovative ideas and some of them are just mind blowing. There are various communities to teach the students the use of raspberry pi, about the workings, about the effectiveness of raspberry pi. As a result of these communities, report says there are growing interests inside students of various schools in States and Britain.

Raspberry Pi foundation has taken steps to accumulate software developers and teachers to give free training for the enthusiasts. The foundation has also started with their teacher training organizations to train the teachers in a more precise way. The course is aimed to update the teachers with the modern curriculums. It is known as ‘Picademy’.

Drawing of Raspberry Pi model B rev2
RaspberryPi Model, Image Credit – Efa at English WikipediaDrawing of Raspberry Pi model B rev2CC BY-SA 3.0

National Aeronautics and Space Administration (NASA) has also joined the campaign by launching an open source project. It is known as JPL Open Source Project and it is the miniature version of curiosity rover placed in mars. Raspberry pi controllers control the small model and inspires and encourages students to contribute to the project. Raspberry pi sensors also got involved in the project. It is one of the best examples of raspberry pi robot.

B. Home automation

Home automation is basically smart home which is controlled by automation system. Home automation can control and monitor raspberry pi security cameras, security systems of vaults, climate inside different rooms, power supply, all the home appliances (refrigerators, washing machines, microwave ovens, etc.) present inside the household, home theatres and all the entertainment system and what not! Raspberry pi is the heart behind the automation system and it controls the whole system. The economical cost has increased the demand for raspberry pi for the automation systems. There are developers and scientists researching to make more affordable automation system using raspberry pi.

C. Industrial automation

Raspberry pi models are cheaper for making automations systems. That is why many industrial companies have started with raspberry pi for their automation systems. Implementation of IoT is quite simpler using raspberry pi models. Networking and controlling of sensors, software and hardware can be efficiently done by raspberry pi. That is how modern industrial automation is becoming more advance and more secure. On the other hand, the controlling became easier than before.

In the year 2014, Mod Berry was released. Mod berry was released by TECHBASE (a famous automation builder company of Poland). It is a computer for industrial uses and it is built using raspberry pi compute model. This device has some added advantages like- RS-485/232 serial ports, 1 wire buses, etc. The computer got popularity as soon as it came into market.

Raspberry pi has also come up with different products of great usability. Raspberry pi camera or OTTO camera is a digital camera which was made by Next Thing Co. comes with some great features. It has a raspberry pi compute module to run the camera in efficient and desired way.

There are media player or raspberry pi media player developed by Slice. The digital player uses raspberry pi module as the core of the media player.

D. AI Assistant

Raspberry pi has recently tied knot with google to come up with hardware kits that will use Google’s cloud speech API and assistant software development kit for interpreting natural language or voices. That will not only make the devices more advanced but also will help the user to do certain tasks. That is how a raspberry pi will work as intelligent assistant or it can be called as raspberry pi Alexa. 

E. Photography

Raspberry pi module can help to capture some long-desired shots of many photographers. Raspberry pi No-IR camera works as artificially intelligent camera. A good quality camera with the no-IR filter camera of raspberry pi can be used to take some snaps from the night sky. The results will be much better than normal camera. Researches are still in progress to get more clarified results.

We have discussed some field related uses of the Raspberry Pi module. Let us be more specific and continue the discussion with some fantastic and cool science projects and ideas using raspberry pi module.

F. Raspberry pi web server

Raspberry pi can be used as webserver for the customers who needs it. However, raspberry pi cannot host a website with large base and high visitor counts but it’s perfect for new websites with low visitor counts. Three are web servers such as Apache, nginx and others for hosting large extensive websites. You will need a raspberry pi monitor for sure.

G. Raspberry pi drone

Emild has come out with a special structure using raspberry pi to control flight for new a Raspberry pi drone . To make a raspberry pi drone, one need to write the framework for autopilot. The job for Raspberry pi drone is now easily done by most of the raspberry pi model. The updated model of Raspberry pi by Emild has made it easier as it does not require to recreate the model. You can implement the innovative ideas in most of the Raspberry pi drone nowadays. Now raspberry pi drone can be used for most of the drone based operations and list is increasing daily.

Raspberry pi drone equipment’s

Tools need to make a raspberry pi drone are given in the below list.

640px Parrot Bebop Drone under
Raspberry pi drone, Image by – Maurizio Pesce from Milan, Italia, Parrot Bebop Drone (under)CC BY 2.0
  • Raspberry pi 4
  • NAVIO Kit (Built by Emild)
  • Motors
  • RC Controller
  • Raspberry pi battery
  • Adaptors
  • Micro SD Cards
  • USB cords
  • GPS system
  • 1045 props
  • PPM Encoders

H. Raspberry pi security camera

Earlier we have discussed home automation system using raspberry pi. Security camera is one of the most important parts of the system. This is not only for homes but also for industrial uses. A security camera is necessary for everywhere. Installing the system will allow you to watch live streams from the cameras and you can monitor the situations. It also records the video, so you can watch them latter too.

The list of tools needed for installing security camera using raspberry pi is given in the below list.

  • Raspberry Pi Module version – 3 and above
  • Raspberry pi camera (separately built for connecting with raspberry pi module)
  • Power supply
  • Micro SD card
  • Wi – fi module
  • Ethernet cable to connect the network

The steps for setup are as follow –

  1. Install the raspberry pi operating system using the micro SD card.
  2. Connect the Secure Shell or SSH (your local network).
  3. Connect the raspberry pi camera.
  4. Give access to Wi – Fi.
  5. Set up all your hardware components.
  6. Motion detection installation.
  7. Set up your pc for saving the videos in a particular folder and make sure the machine has space to store.
  8. Fix the motion AutoStart.
  9. Fix the camera at the desired place.
  10. Access the live stream.

I. Octoprint Raspberry pi

Octoprint is the web interface for 3D printers. Raspberry pi helps Octoprint to control and monitor the printing process with its own controller. Raspberry pi camera can help Octoprint in this matter.

Tools needed for the projects are –

  • Raspberry pi module version – 3 and above.
  • Micro Sd Cards.
  • USB cables.
  • Raspberry pi camera
  • 3d printed camera mount.

J. Coffee machine controllers using raspberry pi

There is n need to talk about the demand and popularity of a modern coffee machine in today’s era. Using an raspberry pi just add some more control and need less human interaction with the machine. It will set up warning when resource fell short, will give warnings for too much use, will give you estimation for bulky orders etc. The equipment needed to modify the coffee machine are noted below.

  • Raspberry pi module version 3 and above.
  •  Ultrasonic sensor
  • Cloud4Rpi software
  • Coffee Machine

K. LED controllers for raspberry pi

One of the very common yet popular project using raspberry pi is LED controllers. One can control and design LEDs with raspberry pi according their choices and requirements. One can select which light will be on for how much amount of time, or which light will be blinking using a simple raspberry pi module. The needed components are listed below.

  • Raspberry pi module of any version
  • LEDs
  • Resistors.
  • Breadboard
  • Jumper Wires.

What Is Raspberry Pi: 7 Answers You Should Know

ba9da4b0 0237 430e ae26 8270a09b083f CM4onWhite removebg preview 300x200 1

Topics of Discussion

  • Overview Of Raspberry Pi
  • Raspberry Pi Logo
  • Raspberry Pi Accessories & Hardware
  • Raspberry Pi Fan
  • Raspberry Pi Battery
  • Raspberry Pi Power Buttons
  • Raspberry Pi Shut Down Command

Overview

Raspberry pi is a small digital computer which has a wide range of applications in the field of modern technologies. It is a programmable device which can work as per requirement. The hardware ( main raspberry pi accessories) is implemented in a single board, and that is why the demand for it increasing exponentially. 

Raspberry Pi in the United Kingdom develops raspberry pi, and it is one of the bestselling computers in the world.

ba9da4b0 0237 430e ae26 8270a09b083f CM4onWhite removebg preview
A Raspberry Pi Model, Table – raspberry pi accessories, Image Source – Raspberry Organization

What is Raspberry Pi Drone? Check out other Raspberry Pi Applications!

Raspberry Pi accessories and Hardware

A typical raspberry pi accessories and important hardware are combination of a RAM, A CPU, GPU, USB hub, Ethernet chip, and the input-output port.

Processor

The microprocessor is the heart of the raspberry pi. First-generation raspberry pi uses BCM2835 SoC processor which has an s-processor, a GPU and a RAM unit. It has two cache level – primary and secondary level. The primary level cache has 16 KiB memory, and the second-level cache has 128 KiB memory. The secondary cache or the level 2 cache is associated with the GPU. The operational frequency of the processor stands at 700Mhz.

The preliminary version of Raspberry Pi 2, has a quad-core ARM cortex processor with a speed of 900 MHz. The level 2 cache memory limit is increased to 256KiB. The second version of Raspberry pi is updated with 1.2 GHz and 64-bit processor. The Broadcom BCM2836 Soc was brought back. The production of BCM2836 Soc was stopped before in 2016.

The raspberry pi 3 uses Broadcom BCM2837 Soc, and raspberry pi 4 uses Broadcom BCM2711 Soc. The speed of raspberry pi 3 stands at 1.2 GHz as it uses ARM Cortex – A53 processor and the rate of raspberry pi 4 stands at 1.5 GHz as it comes with ARM Cortex A72 processor.

The specification of processors for different versions, shown in the below table.

Model & versionProcessorBroadcom SocSpeedCache
Raspberry Pi ARM1176JZF-SBCM2835700 MHzL1 – 16 KiB L2 – 128 KiB
Raspberry Pi 2 V1.1ARM CORTEX-A7 (32 bit)BCM2836900 MHzL2 – 256KiB
Raspberry Pi 2 V1.2ARM CORTEX-A53 (64 bit)BCM28371.2 GHz 
Raspberry Pi 3 Model – BARM CORTEX-A53 (64 bit)BCM28371.2 GHz A+, B+ – 1.4 GHzL2 – 512 KiB
Raspberry Pi 4  ARM CORTEX-A72 (64 bit)BCM27111.5 GHzL2 – 1 MiB
Raspberry Pi accessories and Hardware

Know about microprocessors Here!

Raspberry Pi accessories
A detailed Image of Raspberry Pi and Hardware Image Source – raspberrypi.org

RAM

RAM is the main memory segment for raspberry pi. First generations of raspberry pi have RAM of 256 MiB- 128 MiB was for GPU and 128 MiB for CPU. The primary releases of the Raspberry pi RAM were separate able. 192 MiB memory was set for CPU. That much memory is enough for high-quality video decoding, 3D image processing. The 224 MiB was for the operating system that is Linux processing. Then another 128 MiB was for high load processing like – 3D processing.

Later there was a new model of ram size 512 MiB. It has specific split files.

The Raspberry Pi consists of 1 GiB Ram while Raspberry Pi 4 has RAM of 2, 4, 8 GiB of RAMS according to various model.

Networking

To connect with the internet, the ethernet port is there for Raspberry Pi 4 models. Previously there were no ethernet ports; instead, there were USB ethernet or Wi-Fi connectivity. Bluetooth connection is available for Raspberry Pi 3 and Pi Zero W., The version of the Bluetooth, is 4.1. The wi-Fi versions for those models are – 802.11n with 2.4 GHz bandgap.

Shape, Size & Weights

The increasing demand for Raspberry Pi is for its flexible size and small weight. It has a variety of sizes and can be easily fit into various electronics circuits. Raspberry Pi models are generally rectangular. A logo of raspberry pi is printed on the board. Weights and shapes of different Raspberry pi models are shown in the following table.

ModelR Pi 1 AR Pi 1 A+R Pi 3 A+R Pi 2 BR Pi 3 BR Pi 4 B  
Size85.6 mm X  56.5 mm65mm X 56.5 mm X 10 mm  65 mm X 56.5mm85.60 mm X 56.5 mm85.60 mm X 56.5 mm X 17 mm85.60 mm X 56.5 mm X 17 mm
Weight31 g23 g45 g45 g45 g46 g
Table2 – raspberry pi accessories

General Purpose Input- Output (GPIO) connector

One of the main features that have made Raspberry Pi so popular is the input-output pins. Almost every model of raspberry pi has the input-output pins. Raspberry Pi 1 models have 26 pins for both models A and model B. Models like A+ and B+ of version 1 have 40 pins. Raspberry pi 2 model B and all models of raspberry pi 3 has 40 pinouts. The specification table for the input-output pins is given below for further clarification.

PINGPIOFUNCTION
1 + 3.3 V
2 + 5 V
32SDA1 (I2C)
4 +5V
53SCL1 (I2C)
6 GND
74GCLK
814TXD0 (UART)
9 GND
1015RXD0 (UART)
1117GEN0
1218GEN1
1327GEN2
14 GND
1522GEN3
1623GEN4
17 + 3.3 V
1824GEN5
1910MOSI (SPI)
20 GND
219MISO (SPI)
2225GND
2311SCLK (SPI)
248CEO_N (SPI)
25 GND
267CE1_N (SPI)
270ID_SD (I2C)
281ID_SC (I2C)
295N/A
30 GND
316N/A
3212 
3313N/A
34 GND
3519N/A
3616N/A
3726N/A
3820DIGITAL IN
39 GND
4021DIGITAL OUT
Table3 – raspberry pi accessories

Raspberry pi fan

Raspberry pi model 4 comes with a case fan for its subsidiary models. It is specially designed for over clockers and other power consumers. It controls the temperature of the raspberry pi and thus made it more user friendly. The specifications of the fan are –

Input Voltage: 5V DC supplied via a general-purpose input-output header.

The fan speed is changeable.

Maximum airflow is 1.4 CFM.

CASE FAN007 800x533 removebg preview
Raspberry fans, Image Source – raspberrypi.org

Raspberry Pi battery

Raspberry pi models are fed into powers via an external cable which is connected with some power source. There is no in-built connection to place a battery inside the raspberry pi model. But now, there are several vendors for raspberry pi batteries. You just need to pick up the correct product for the model and connect it properly. It will be placed externally.

Raspberry Pi Power Buttons

There are no in-build power buttons for raspberry pi models. But there are ways to solve the problem. External power buttons can be added with the raspberry pi board to switch on and off the raspberry pi. Switching off the raspberry pi indicates that the model goes into HALT state for operation.

Note that raspberry pi accessories are necessary to build the power button externally.

Raspberry pi shutdown command

The raspberry pi model can be turned off (goes to halt state) using a specific command. If someone s using the command line or terminal windows, then type the following command –

sudo shutdown -h now.

Raspberry Pi Operating Systems

Raspberry pi runs using Linux Operating Systems. The specific version is known as ‘Raspbian’. It is a 32-bit operating system. Other types of OS can be operated using Micro or Mini SD cards.

Python and Scratch can be used as programming language though other languages have a scope too. The firmware (it is a software class which can control hardware of a specific device) is a closed structure, but there are unofficial opens sources available as well.

There are some other operating systems which are available in official websites. They include Ubuntu MATE, Windows 10 IoT Core, etc.

Some examples of Linux based OS and not Linux based OS are given in the below table.

Linux BasedNot Linux Based
Android ThingsRISC OS
Arch Linux ARM2.  FREEBSD
OpenSUSE3. NetBSD
SUSE Linux Enterprise (Server 12 SP2)4. Plan 9 from Bell Labs
Gentoo Linux5. Windows 10 IoT Core
Lubuntu6. Haiku
Xubuntu7. Helen OS
Devuan8. Broadcom VCOS
Kali Linux 
 Ark OS 
Tiny Core Linux 
Void Linux 
Fedora 
OpenWrt 
RetroPie 
 Postmarket OS 
 Alpine OS 
Table4 – raspberry pi accessories OS

APIS

API is a software known as Application Programming Interface. It is the link between two applications. It is a computing interface.

Video Core IV GPU can be used via binary blob for Raspberry Pi. The GPU code does the main work for the driver.

The firmware used by Raspberry Pi is a binary blob, and it is free of license.

There are also different third-part application software like – Astro Print, C/C++ Interpreter Ch, Mathematica, Minecraft, Real VNC, User Gate Web Filter, Steam link, etc.

The software inside the raspberry pi can be developed using various tools and raspberry pi accessories. Some of the tools are – Arduino IDE (Arduino programming),  BlueJ (Java beginners), Lazarus (Pascal IDE), Ninja IDE (python), TensorFlow (Machine learning and Deep learning framework developed by Google). etc.

Know More About APIs, Click Here!

Raspberry Pi Accessories

To operate a raspberry pi, there are specific devices that one need to use. Some of the raspberry pi accessories for beginners are –

  • DC motor,
  • motor driver,
  • LCD and Segment display,
  • light sensor,
  • temperature sensor,
  • Extra general-purpose input and output pins,
  • resistors,
  • rheostats,
  • capacitors,
  • transformers,
  • breadboard,
  • potentiometer,
  • jumper wires for connections, etc.

These raspberry pi accessories will help to use raspberry Pi to perform better in multiple real time applications.

Raspberry Pi Logo

The raspberry pi foundation organized a logo making competition for their product. On the 7th of October 2011, they declared the result. Paul Beech got the highest numbers of votes from the judges and won the competition. He makes the current logo.

Raspberry Pi Logo
Logo of R Pi, Image Credit: raspberrypi.org

Learn Data Structures From Scratch: 9 Complete Quick Facts

image1 300x179 1

In this tutorial, we will discuss about data structures from the basics. We will understand the different types of data structures and their uses and how we can implement them.

What is data structure?

A data structure is a collection of data that can be stored in an organised manner so that the data can be accessed, modified efficiently.

Data Structures usages

  1. Data structures are used in different kinds of applications like relational databases, which use B-tree indexes to retrieve the data.
  2. Hash table is used in compiler design.
  3. These are used in different algorithms like searching, sorting.
  4. Internet indexing service uses data structures.

Types of the Data structures

Types of DSSub type
LinearArray
Linked List
Stack
Queue
TreeBinary Tree
Binary Search Tree
Heap
HashingHash Table
Hash Tree
GraphDecision Graph
Directed graph
Matrix

What is Linear data structure ?

A linear data structure is a type of data structure where data can be traversed sequentially. Array, Linked list, stack, queue are examples of linear data structure. Please go through below image for the details:

Linear data structures

What is Tree Data Structure

A tree data structure is a hierarchical data structure. It has nodes that are connected by edges.Please go through below image for the details:

image1
Example of tree

What is hashing

Hashing is a data structure which uses a hash function to map the data in a key-value pair to retrieve the data faster. Examples of Hashing are Hash table, Hash tree. Please go through below image for the details:

image4
Example of Hashing

What is graph

A Graph is a non-linear, pictorial representation of data consisting of edges and vertices. Please go through below image for the details:

image5
example of graph

Difference between linear and non-linear data structure

Sl NoKey pointsLinear data structureNon-linear data structure
1Data alignmentData gets stored  sequentially Data gets stored in hierarchy form
2LevelsSingle level involvedMultiple level involved
3ComplexityEasy to implementImplementation is complex
4TraversalData can be traversed in single runData cannot be traversed in a single run rather need multiple runs
5Utilisation of memoryNot efficientEfficient
6ExamplesArray, Linked list, stack, queueGraph, tree
7ApplicationUsed in software developmentUsed in Image Processing, Voice Processing, Artificial Intelligence 
image3
DS flowchart

Some import Questions and Answers on Data Structure

Qn 1. What do you mean by ADT in Data structure?

Ans: ADT means Abstract Data type. Class or Objects are an example of ADT. When We use and Class or Object, we define the behavior by a set of values and a set of operations. ADT only tells us what operation has to perform. It does not tell us how the operation has been internally implemented.

For Example :

  • List
    • size() -> Size gives us the number of elements, but it does not show how internally it calculates to give the result.
    • insert(x) -> insert helps us to insert the element but does not tell how the logic is written.
    • remove(x) -> Similarly remove method is used to remove the elements without telling the implementation.
    • get(i) -> get is used to access the elements.

Qn 2. What are the advantages of data structure?

  1. Ans:
  2. Using Data Structure, we can efficiently store data in a storage device.
  3. Data structure gives an easy option to retrieve the data from a storage device.
  4. It can process small as well as large numbers of data efficiently
  5. Using data structures like graph we can solve real-life problems
  6. Database systems uses indexing using a hash table and array to retrieve the data efficiently.

Qn 3. What is primitive data structure?

Ans: Primitive data structures are system-defined data types supported by different programming languages. Example: int, double, float, boolean, character.

Qn 4. What is a Complex Data structure?

Ans: Data structures like Hash table, Tree, Heap, Graph are called a complex data structure. The implementation of these data structures is complex in nature.

Qn 5. What are the two main types of data structure?

Ans: Mainly, data structures are divided into two parts:

  1. Linear Data structure: Stack, Queue, Array, Linked List
  2. Non-linear Data Structure: Tree, Graph

Conclusion

Till now, We have covered the basics of Data Structure. In the next topic, we will write about the Array. For more details for this section, please refer to this link.