How to write Appium testing code-your complete guide 2023-24

App package 1 1024x535 1

Appium is an open-source automation tool that allows you to write scripts to test mobile applications on different platforms such as Android and iOS. With Appium, you can automate the testing process, ensuring that your mobile app functions as intended across various devices and operating systems.

Overview of Appium Testing

Appium testing is a popular choice among developers and testers due to its flexibility and ease of use. It supports multiple programming languages, including Java, Python, Ruby, and C#, making it accessible to a wide range of developers.

Appium works by interacting with the application under test, just like a real user would. It uses the WebDriver protocol to communicate with the mobile device or emulator, allowing you to perform actions such as tapping buttons, entering text, and swiping gestures.

One of the key advantages of Appium is its cross-platform support. It allows you to write a single test script that can be executed on both Android and iOS devices, saving time and effort. This cross-platform capability makes Appium a valuable tool for organizations that develop mobile applications for multiple platforms.

Supported Platforms (Android and iOS)

Appium supports both Android and iOS platforms, making it a versatile choice for mobile app testing.

Android Testing

When it comes to testing Android applications with Appium, you can write your test scripts using any programming language that Appium supports. You can use popular frameworks such as JUnit or TestNG to structure your tests and make assertions about the behavior of your app.

To automate Android testing, you need to set up the necessary tools and dependencies. This includes installing the Android SDK, setting up the Android Virtual Device (AVD) emulator, and configuring the Appium server.

Once the setup is complete, you can start writing your test scripts. Appium provides a wide range of APIs and methods that allow you to interact with the Android application under test. You can perform actions like tapping buttons, entering text, verifying text content, and validating UI elements.

iOS Testing

Appium also supports testing iOS applications, allowing you to write test scripts using the same programming languages and frameworks as Android testing.

To automate iOS testing, you need to set up the necessary tools and dependencies. This includes installing Xcode, which includes the necessary iOS simulator for testing. You also need to configure the Appium server and set up the desired capabilities for your iOS device.

Once the setup is complete, you can start writing your test scripts. Appium provides APIs and methods specifically designed for iOS testing. You can interact with UI elements, perform gestures, validate text content, and navigate through different screens of your iOS application.

How to Find App Package and Activity in Android
App package 1

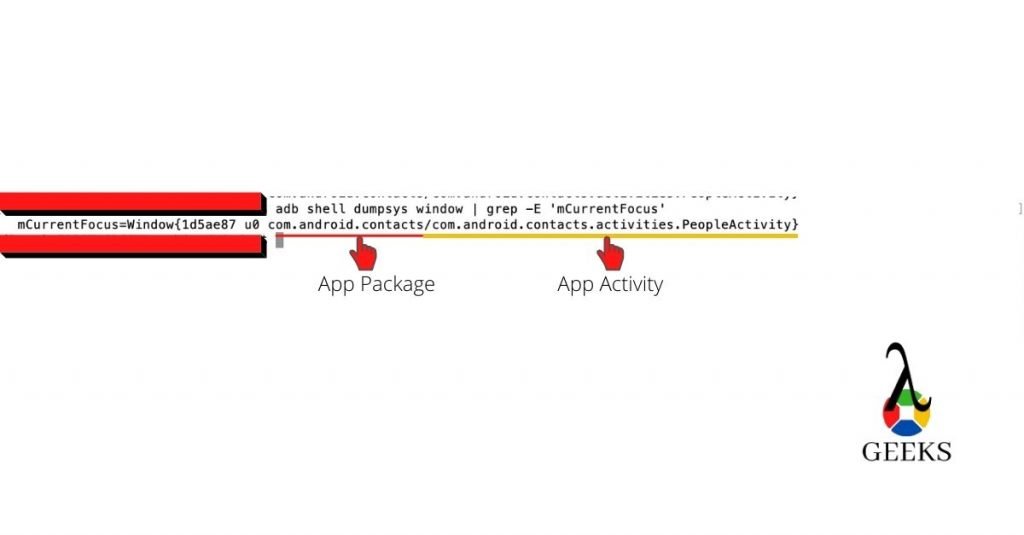
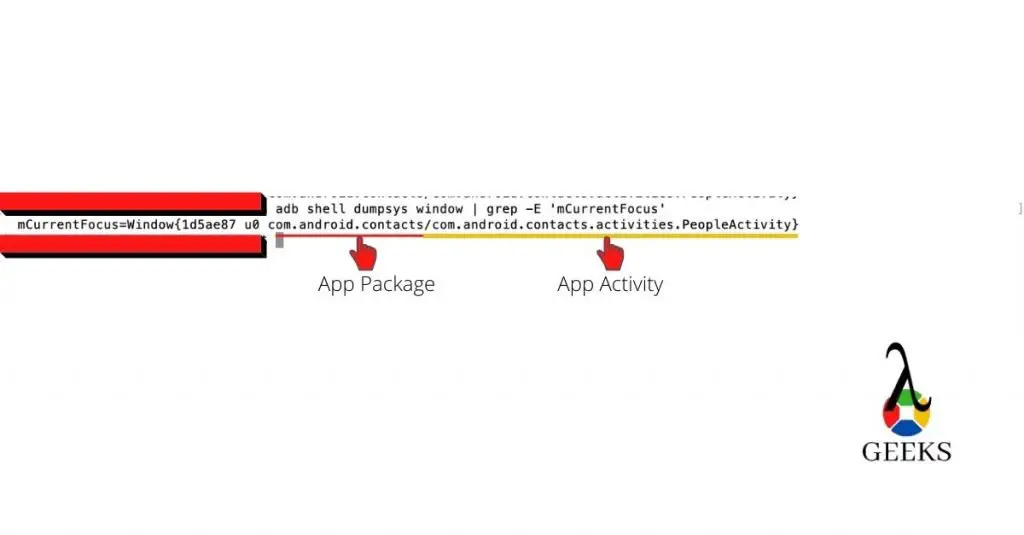
To write effective scripts in Appium testing, it is crucial to identify the app package and activity of the Android application you want to automate. The app package represents the unique identifier of the application, while the activity refers to the specific screen or functionality within the app. In this section, we will explore the steps to find the app package and activity in Android, along with the commands for both Windows and Mac/Linux platforms.

Steps to Find App Package and Activity

  1. Enable Developer Options: Before proceeding, ensure that the Developer Options are enabled on your Android device. To do this, go to the device settings, scroll down to the “About phone” section, and tap on the “Build number” multiple times until you see a message indicating that you are now a developer.
  2. Access Developer Options: Once you have enabled the Developer Options, go back to the main settings menu and look for the newly unlocked “Developer options” entry. Tap on it to access the developer settings.
  3. Enable USB Debugging: Within the Developer Options, locate the “USB debugging” option and enable it. This will allow your computer to communicate with the Android device over a USB connection.
  4. Connect Android Device to Computer: Connect your Android device to your computer using a USB cable. Make sure to authorize the computer‘s RSA key fingerprint on your device if prompted.
  5. Open Command Prompt or Terminal: On Windows, open the Command Prompt by pressing the Windows key + R, typing “cmd,” and hitting Enter. On Mac/Linux, open the Terminal by searching for it in the applications or using the keyboard shortcut Command + Space and typing “Terminal.”
  6. Navigate to Android SDK Tools: In the Command Prompt or Terminal, navigate to the directory where you have installed the Android SDK tools. This is typically located in the “platform-tools” folder within the Android SDK installation directory.
  7. Execute ADB Commands: Once you are in the Android SDK tools directory, execute the following command to list all the connected devices:

adb devices

This will display the device ID of your connected Android device.

  1. Find App Package and Activity: To find the app package and activity, execute the following command:

adb shell dumpsys window windows | grep -E 'mCurrentFocus|mFocusedApp'

This command will provide you with the current app package and activity details.

Commands for Windows and Mac/Linux

Here are the commands for finding the app package and activity in Android using Appium on both Windows and Mac/Linux platforms:

Windows:

  1. Enable Developer Options on your Android device.
  2. Connect your Android device to your computer via USB.
  3. Open the Command Prompt by pressing the Windows key + R, typing “cmd,” and hitting Enter.
  4. Navigate to the Android SDK tools directory using the cd command.
  5. Execute the command adb devices to list the connected devices.
  6. Execute the command adb shell dumpsys window windows | grep -E 'mCurrentFocus|mFocusedApp' to find the app package and activity.

Mac/Linux:

  1. Enable Developer Options on your Android device.
  2. Connect your Android device to your computer via USB.
  3. Open the Terminal by searching for it in the applications or using the keyboard shortcut Command + Space and typing “Terminal.”
  4. Navigate to the Android SDK tools directory using the cd command.
  5. Execute the command ./adb devices to list the connected devices.
  6. Execute the command ./adb shell dumpsys window windows | grep -E 'mCurrentFocus|mFocusedApp' to find the app package and activity.

By following these steps and executing the appropriate commands, you can easily find the app package and activity of an Android application. This information is essential for writing effective scripts in Appium testing, as it allows you to interact with specific screens and functionalities within the app.

How to Create a Maven Project for Appium Testing
Untitled design3

Appium is an open-source automation tool used for testing mobile applications. It allows you to write scripts in various programming languages to automate the testing process. In this section, we will discuss how to create a Maven project for Appium testing, which will help you manage dependencies and build your project more efficiently.

Prerequisites for Creating a Maven Project

Before we dive into creating a Maven project for Appium testing, let’s ensure we have the necessary prerequisites in place. Here are a few things you’ll need:

  1. Java Development Kit (JDK): Make sure you have the latest version of JDK installed on your system. Maven requires JDK to compile and run your code.
  2. Maven: Install Maven on your machine. You can download the latest version of Maven from the official Apache Maven website.
  3. Integrated Development Environment (IDE): Choose an IDE of your preference. Popular choices include Eclipse, IntelliJ IDEA, and Visual Studio Code. Install the necessary plugins for Maven integration.
  4. Appium Server: Download and install the Appium server on your machine. Appium server acts as a bridge between your test scripts and the mobile device or emulator.

Steps to Create a Maven Project

Now that we have the prerequisites sorted, let’s move on to creating a Maven project for Appium testing. Follow these steps:

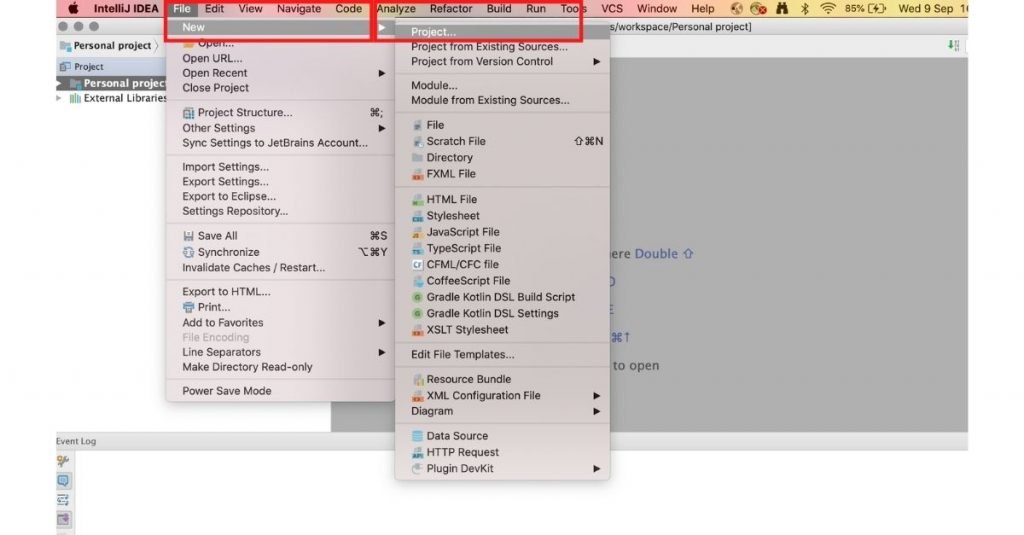
  1. Open your IDE: Launch your preferred IDE and create a new Maven project. Choose the appropriate Maven archetype for your project. For Appium testing, the “maven-archetype-quickstart” archetype is commonly used.
  2. Configure project details: Provide the necessary details such as Group Id and Artifact Id for your project. These details will be used to identify your project within the Maven ecosystem.
  3. Project structure: Once the project is created, you will see a predefined project structure. The main source code files will be located under the “src/main/java” directory.
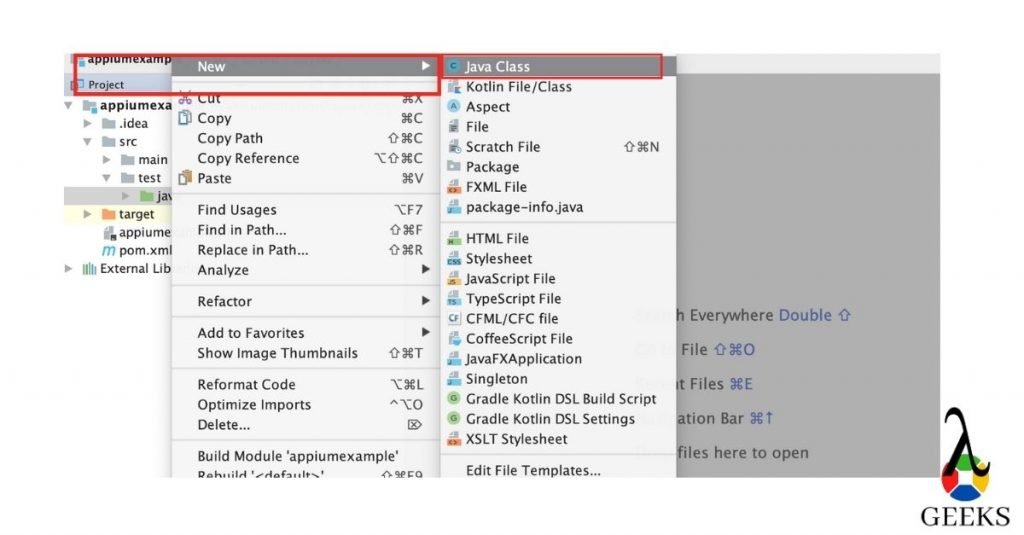
  4. Create a test class: Inside the “src/main/java” directory, create a new package for your test scripts. Create a new Java class within this package to write your Appium test scripts.
  5. Configure dependencies: We will now add the necessary dependencies to the project’s pom.xml file. This file is located in the root directory of your project. Open the pom.xml file and add the required dependencies for Appium testing.

Adding Dependencies to the pom.xml File

To successfully run Appium tests, we need to add the required dependencies to the pom.xml file. These dependencies will be downloaded by Maven and included in your project’s classpath. Here are a few commonly used dependencies for Appium testing:

Dependency Description
io.appium Contains the core classes and methods for interacting with the Appium server.
org.testng Provides the TestNG framework for writing and executing test cases.
org.seleniumhq.selenium Includes the Selenium WebDriver, which is used for automating browser interactions.
org.apache.commons Offers utility classes and methods that can be helpful in your test scripts.

To add these dependencies, open the pom.xml file and locate the <dependencies> section. Add the necessary dependencies within the <dependencies> tags. Here’s an example:

xml
<dependencies>
<dependency>
<groupId>io.appium</groupId>
<artifactId>java-client</artifactId>
<version>7.5.1</version>
</dependency>
<dependency>
<groupId>org.testng</groupId>
<artifactId>testng</artifactId>
<version>7.4.0</version>
</dependency>
<dependency>
<groupId>org.seleniumhq.selenium</groupId>
<artifactId>selenium-java</artifactId>
<version>3.141.59</version>
</dependency>
<dependency>
<groupId>org.apache.commons</groupId>
<artifactId>commons-lang3</artifactId>
<version>3.12.0</version>
</dependency>
</dependencies>

Once you have added the dependencies, save the pom.xml file. Maven will automatically download the required dependencies and make them available in your project.

Congratulations! You have successfully created a Maven project for Appium testing and added the necessary dependencies. Now you can start writing your Appium test scripts and execute them using Maven.

In the next section, we will explore how to write effective test scripts in Appium and discuss best practices for script development. Stay tuned!

Desired Capabilities in Appium Testing
Untitled design8

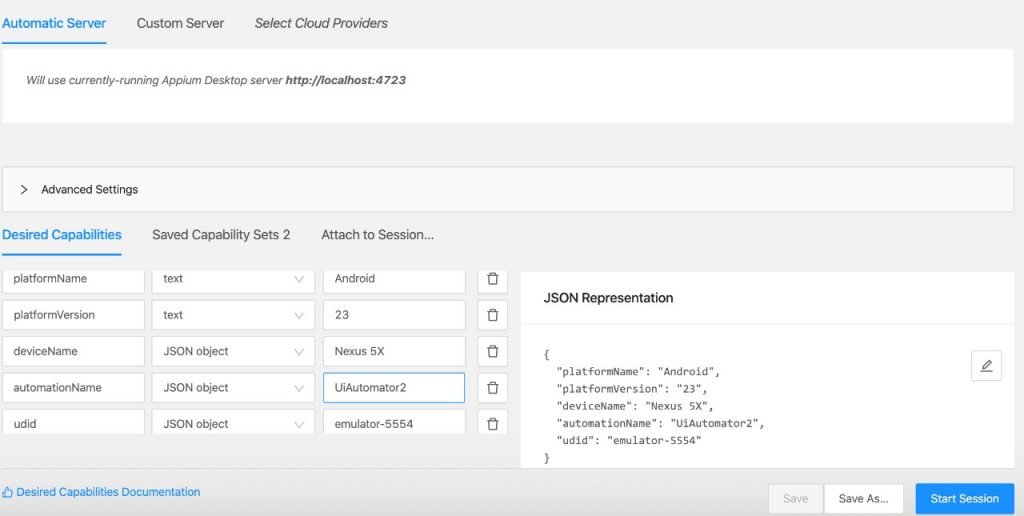
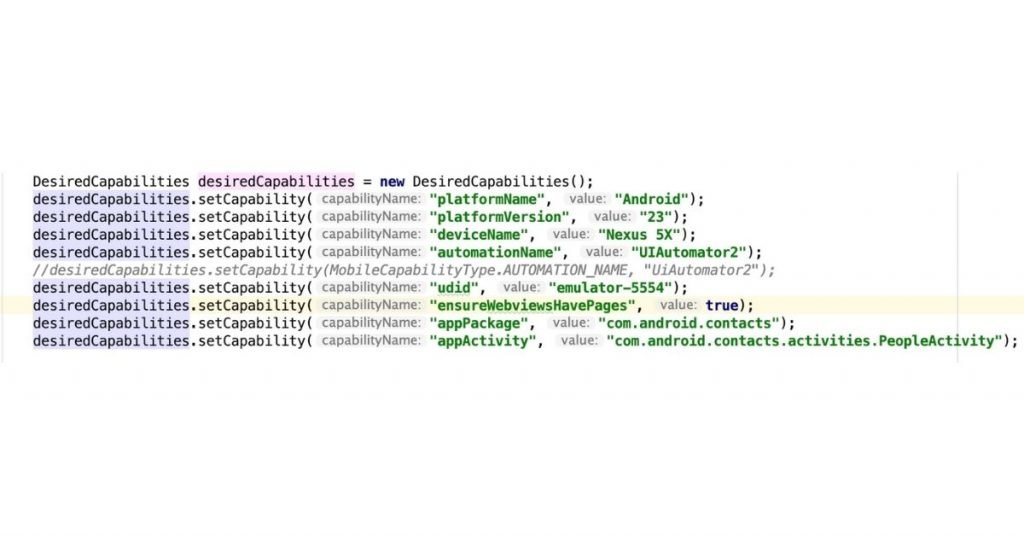
In Appium testing, desired capabilities play a crucial role in configuring and customizing the test automation process. Desired capabilities are a set of key-value pairs that define the characteristics of the test environment, such as the platform, device, and application settings. By specifying these capabilities, testers can ensure that their Appium scripts run on the desired target device or emulator.

When writing scripts in Appium, it is essential to understand how to set the desired capabilities correctly. Let’s explore the desired capabilities for Android and iPhone devices.

Desired Capabilities for Android

When testing Android applications with Appium, there are several desired capabilities that you can set to configure the test environment. Here are some commonly used desired capabilities for Android:

  1. platformName: Specifies the platform on which the test will run, such as “Android” or “iOS.”
  2. deviceName: Specifies the name of the Android device or emulator on which the test will execute.
  3. app: Specifies the path to the APK file or the package name of the application under test.
  4. automationName: Specifies the automation engine to be used, such as “UiAutomator2” or “Espresso.”
  5. appPackage and appActivity: Specifies the package name and activity name of the application under test, respectively.
  6. udid: Specifies the unique device identifier (UDID) of the Android device.

By setting these desired capabilities, you can configure the test environment to match your specific requirements for Android testing.

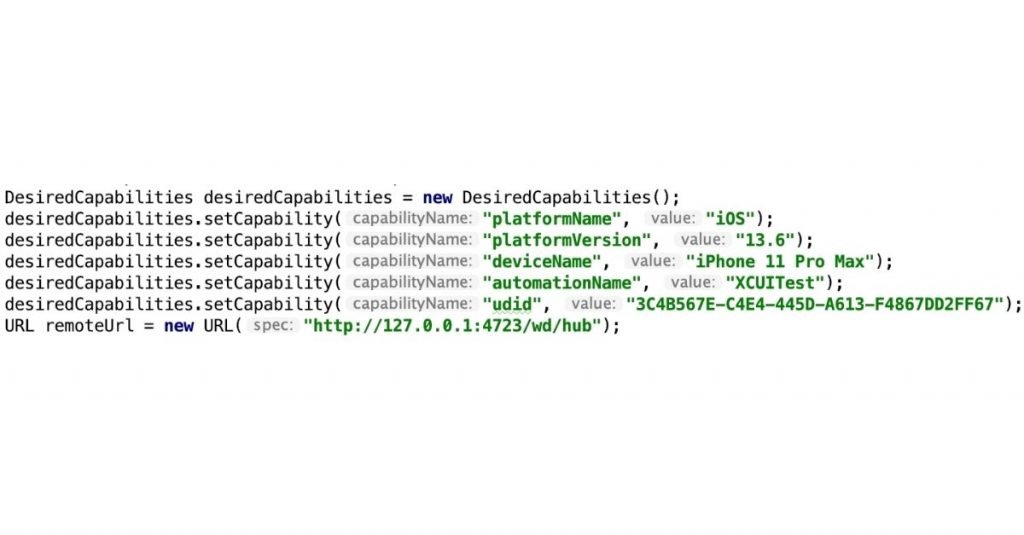
Desired Capabilities for iPhone
Untitled design9

Similar to Android, when testing iPhone applications with Appium, you can set desired capabilities to customize the test environment. Here are some commonly used desired capabilities for iPhone:

  1. platformName: Specifies the platform on which the test will run, such as “Android” or “iOS.”
  2. deviceName: Specifies the name of the iPhone device or simulator on which the test will execute.
  3. app: Specifies the path to the .app file or the bundle identifier of the application under test.
  4. automationName: Specifies the automation engine to be used, such as “XCUITest” or “UIAutomation.”
  5. bundleId: Specifies the bundle identifier of the application under test.
  6. udid: Specifies the unique device identifier (UDID) of the iPhone device.

By setting these desired capabilities, you can configure the test environment to match your specific requirements for iPhone testing.

How to Write an Appium Testing Script for Android
App package1

Appium is an open-source automation tool that enables you to write and execute tests for mobile applications. It supports both Android and iOS platforms, making it a popular choice among developers and testers. In this section, we will discuss the steps involved in writing an Appium testing script for Android and provide a sample code for reference.

Steps to Write an Appium Testing Script

Writing an Appium testing script requires a systematic approach to ensure accurate and efficient test execution. Here are the steps you can follow to write an Appium testing script for Android:

  1. Set up the development environment: Before you begin writing the script, you need to set up the development environment. This includes installing the necessary software, such as Java Development Kit (JDK), Android SDK, and Appium server. Make sure to configure the environment variables properly.
  2. Identify the test scenarios: Determine the test scenarios you want to cover in your script. This involves understanding the functionality of the application and identifying the key features that need to be tested. It is important to have a clear understanding of the expected behavior of the application under different conditions.
  3. Inspect the application: Use the Appium Inspector tool to inspect the elements of the application. This tool allows you to identify the unique identifiers (such as resource-id, class name, or xpath) for the elements you want to interact with during the test. Inspecting the application helps you in locating the elements accurately in your script.
  4. Write the test script: Once you have identified the test scenarios and inspected the application, you can start writing the test script. The script should be written in a programming language that is supported by Appium, such as Java, Python, or JavaScript. You can use any Integrated Development Environment (IDE) of your choice to write the script.
  5. Configure the desired capabilities: Before executing the test script, you need to configure the desired capabilities. Desired capabilities are a set of key-value pairs that define the characteristics of the test environment, such as the device name, platform name, and application package name. These capabilities help Appium in establishing a connection with the device and launching the application.
  6. Implement test actions: In the test script, you need to implement the test actions that simulate user interactions with the application. These actions can include tapping on elements, entering text, swiping, scrolling, or any other action that you want to perform during the test. You can use the element locators identified during the inspection phase to interact with the elements.
  7. Add assertions: Assertions are used to verify the expected behavior of the application. You can add assertions in your test script to check if the application is behaving as expected. For example, you can assert that a certain element is present on the screen, or the text entered in a text field is displayed correctly.
  8. Execute the test script: Once you have written the test script, you can execute it using the Appium server. Make sure to connect the device or emulator to the computer and start the Appium server before executing the script. The server will establish a connection with the device and execute the test script, providing you with the test results.

Sample Code for Reference

Here is a sample code snippet in Java that demonstrates how to write an Appium testing script for Android:

“`java
import
io.appium.java_client.android.AndroidDriver;
import io.appium.java_client.android.AndroidElement;
import org.openqa.selenium.remote.DesiredCapabilities;
import java.net.URL;

public class AppiumTestScript {
public static void main(String[] args) throws Exception {
// Set the desired capabilities
DesiredCapabilities caps = new DesiredCapabilities();
caps.setCapability(“deviceName”, “Android Device”);
caps.setCapability(“platformName”, “Android”);
caps.setCapability(“appPackage”, “com.example.app”);
caps.setCapability(“appActivity”, “com.example.app.MainActivity”);

    // Create a new instance of the AndroidDriver
    AndroidDriver<AndroidElement> driver = new AndroidDriver<>(new URL("http://localhost:4723/wd/hub"), caps);

    // Perform test actions
    // ...

    // Add assertions
    // ...

    // Close the driver
    driver.quit();
}

}
“`

This code sets the desired capabilities, creates an instance of the AndroidDriver, performs test actions, adds assertions, and finally closes the driver. You can customize the code according to your test scenarios and application.

Writing an Appium testing script for Android requires a combination of technical skills and understanding of the application under test. By following the steps mentioned above and referring to the sample code, you can create effective and reliable test scripts for your Android applications using Appium.

How to Write an Appium Testing Script for iPhone

Appium is an open-source automation tool that allows you to automate mobile app testing across different platforms, including iOS. In this section, we will explore the steps to write an Appium testing script for iPhone and provide a sample code for reference.

Steps to Write an Appium Testing Script

Writing an Appium testing script for iPhone involves several steps. Let’s walk through them one by one:

  1. Set up the environment: Before you start writing the script, ensure that you have the necessary tools installed. This includes Appium, Xcode, and the iOS Simulator. You can install these tools by following the official documentation provided by Appium and Apple.
  2. Create a new project: Once your environment is set up, create a new project in your preferred programming language. Appium supports multiple programming languages, such as Java, Python, and JavaScript. Choose the language you are comfortable with and create a new project.
  3. Import the necessary libraries: In your project, import the necessary libraries or dependencies required for Appium. These libraries provide the functions and methods needed to interact with the Appium server and control the iOS Simulator.
  4. Set desired capabilities: Before launching the Appium server, set the desired capabilities for your iPhone device. These capabilities include the device name, platform version, and app package name. You can find the desired capabilities specific to your device in the Appium documentation.
  5. Start the Appium server: Launch the Appium server using the desired capabilities you set in the previous step. The Appium server acts as a bridge between your script and the iOS Simulator, allowing you to interact with the app.
  6. Write test cases: Now it’s time to write the actual test cases in your script. Test cases are a set of instructions that simulate user interactions with the app. For example, you can write test cases to tap on a button, enter text in a text field, or verify the presence of an element on the screen.
  7. Execute the script: Once you have written the test cases, execute the script. The script will communicate with the Appium server, which in turn interacts with the iOS Simulator and performs the actions specified in the test cases.

Sample Code for Reference

Here’s a sample code snippet in Java that demonstrates how to write an Appium testing script for iPhone:

“`java
import
io.appium.java_client.MobileElement;
import io.appium.java_client.ios.IOSDriver;
import org.openqa.selenium.remote.DesiredCapabilities;

public class AppiumTest {
public static void main(String[] args) {
// Set desired capabilities
DesiredCapabilities caps = new DesiredCapabilities();
caps.setCapability(“platformName”, “iOS”);
caps.setCapability(“platformVersion”, “14.5”);
caps.setCapability(“deviceName”, “iPhone 12”);
caps.setCapability(“app”, “path/to/your/app”);

    // Create driver instance
    IOSDriver<MobileElement> driver = new IOSDriver<>("http://localhost:4723/wd/hub", caps);

    // Write test cases
    // ...

    // Execute the script
    // ...

    // Quit the driver
    driver.quit();
}

}
“`

In this code snippet, we import the necessary libraries, set the desired capabilities for the iPhone device, create an instance of the driver, write test cases, execute the script, and finally quit the driver.

Feel free to modify and customize this sample code according to your specific testing requirements.

By following these steps and referring to the sample code, you can start writing your own Appium testing script for iPhone. Remember to explore the Appium documentation and experiment with different test cases to ensure comprehensive test coverage for your mobile app.

TestNG Assert in Appium Testing

Explanation of TestNG Assert

When it comes to appium testing, one of the essential aspects is the ability to verify whether the expected behavior of the application is met. This is where TestNG Assert comes into play. TestNG is a testing framework that provides a set of assertion methods to validate the expected outcomes of your test cases.

TestNG Assert allows you to check if a particular condition is true and throws an exception if it is not. It helps in ensuring that the app is functioning as expected and helps identify any discrepancies or bugs in the application.

Usage of TestNG Assert in the code

To understand the usage of TestNG Assert in appium testing, let’s consider an example scenario. Suppose we have an app that has a login functionality, and we want to verify if the login is successful.

Here’s how you can use TestNG Assert in your appium test script:

  1. Import the necessary TestNG and appium libraries:

java
import org.testng.Assert;
import io.appium.java_client.MobileElement;
import io.appium.java_client.android.AndroidDriver;

  1. Set up the desired capabilities and initialize the appium driver:

“`java
DesiredCapabilities
caps = new DesiredCapabilities();
caps.setCapability(“deviceName”, “Your_Device_Name”);
caps.setCapability(“platformName”, “Android”);
caps.setCapability(“appPackage”, “com.example.app”);
caps.setCapability(“appActivity”, “com.example.app.MainActivity”);

AndroidDriver driver = new AndroidDriver(new URL(“http://127.0.0.1:4723/wd/hub”), caps);
“`

  1. Write the test case to verify the login functionality:

“`java
@Test
public void testLogin
() {
// Perform actions to navigate to the login screen

// Enter valid credentials
driver.findElement(By.id("username")).sendKeys("testuser");
driver.findElement(By.id("password")).sendKeys("password");

// Click on the login button
driver.findElement(By.id("loginButton")).click();

// Verify if the login is successful
Assert.assertTrue(driver.findElement(By.id("welcomeMessage")).isDisplayed(), "Login failed!");

}
“`

In the above code snippet, we first navigate to the login screen and enter valid credentials. Then, we click on the login button. Finally, we use TestNG Assert to check if the welcome message is displayed after a successful login. If the welcome message is not displayed, the assertion will fail, and the specified error message “Login failed!” will be shown.

By using TestNG Assert, you can easily validate various aspects of your app‘s functionality, such as checking if elements are present, verifying text values, or validating expected behaviors.

Summary

References

Here are some valuable resources that can help you in writing scripts for Appium testing:

  1. Maven documentation: Maven is a popular build automation tool used in Java projects. It simplifies the process of managing dependencies and building projects. The Maven documentation provides detailed information on how to set up Maven for your Appium testing project, including the necessary configurations and dependencies. It also offers guidance on how to structure your project and manage its lifecycle. You can find the official Maven documentation here.
  2. TestNG documentation: TestNG is a testing framework that can be integrated with Appium to create robust and scalable test scripts. It provides advanced features such as parallel test execution, data-driven testing, and test configuration through XML files. The TestNG documentation offers comprehensive guidance on how to write test scripts using TestNG annotations, assertions, and other features. It also covers topics like test configuration, test suites, and reporting. You can access the official TestNG documentation here.

By referring to these resources, you can enhance your understanding of Appium testing and improve your script writing skills. These documentation sources provide step-by-step instructions, code examples, and best practices to help you write efficient and maintainable test scripts.

Additionally, you can explore online forums, blogs, and tutorials dedicated to Appium testing. These platforms often provide practical examples, tips, and tricks shared by experienced professionals in the field. Engaging with the Appium testing community can further expand your knowledge and help you stay up-to-date with the latest developments in the field.

Remember, writing effective scripts requires a combination of technical knowledge, understanding of the application under test, and a systematic approach. By leveraging the resources mentioned above and continuously practicing and refining your skills, you can become proficient in writing scripts for Appium testing.

Frequently Asked Questions

How to write appium tests?

To write appium tests, you need to follow these steps:
1. Set up the necessary environment for appium.
2. Write the test script using the appium scripting language.
3. Use the appropriate appium commands to interact with the mobile application.
4. Run the test script and analyze the results.

How to write a test script for software testing?

To write a test script for software testing, you can follow these guidelines:
1. Identify the test scenario and the expected outcome.
2. Define the necessary test data and test environment.
3. Write the test steps in a clear and concise manner.
4. Include assertions to validate the expected results.
5. Consider error handling and exception scenarios.
6. Execute the test script and analyze the test results.

How to run appium scripts in Jenkins?

To run appium scripts in Jenkins, you can follow these steps:
1. Install the necessary plugins for appium integration in Jenkins.
2. Set up the Jenkins job to execute the appium script.
3. Configure the job to use the appropriate appium server and device configurations.
4. Schedule the job to run at the desired frequency or trigger it manually.
5. Monitor the Jenkins console output for the test execution results.

How to write automated test scripts?

To write automated test scripts, you can follow these steps:
1. Identify the test scenarios that can be automated.
2. Choose an appropriate automation framework or tool.
3. Set up the necessary environment for test automation.
4. Write the test scripts using the chosen automation tool or programming language.
5. Include assertions and validations to verify the expected results.
6. Execute the automated test scripts and analyze the test results.

How to write appium code in Eclipse?

To write appium code in Eclipse, you can follow these steps:
1. Install the necessary plugins for appium integration in Eclipse.
2. Set up the project and configure the build path.
3. Create a new class or package to hold the appium code.
4. Write the appium script using the appium scripting language.
5. Use the appropriate appium commands to interact with the mobile application.
6. Run the appium script from Eclipse and analyze the results.

What is a test script in software testing with example?

A test script in software testing is a set of instructions or commands that define the steps to be executed to validate the functionality of a software application. It typically includes the input data, the expected output, and any assertions or validations to be performed.

For example, a test script for a login functionality may include steps like entering valid credentials, clicking the login button, and verifying that the user is successfully logged in.

How to write appium test script example?

To write an appium test script example, you can follow these steps:
1. Set up the necessary environment for appium.
2. Write the test script using the appium scripting language.
3. Use appium commands to interact with the mobile application.
4. Include assertions or validations to verify the expected results.
5. Run the test script and analyze the results.

What are the best practices for appium script development?

Some best practices for appium script development include:
1. Using descriptive and meaningful variable and method names.
2. Organizing the code into reusable functions or modules.
3. Implementing proper error handling and exception handling.
4. Using appropriate waits and synchronization techniques.
5. Implementing logging and reporting mechanisms.
6. Regularly reviewing and refactoring the code for better maintainability.

How to debug appium scripts?

To debug appium scripts, you can follow these steps:
1. Enable the debugging mode in your appium setup.
2. Use breakpoints or logging statements in your script to identify the issue.
3. Analyze the logs and error messages to pinpoint the problem.
4. Use the appium inspector or other debugging tools to inspect the application state during script execution.
5. Make necessary changes to the script and re-run it to verify the fix.

What are some tips for writing appium scripts?

Here are some tips for writing appium scripts:
1. Plan and design your test scenarios before writing the script.
2. Use descriptive and meaningful names for elements and variables.
3. Implement proper error handling and exception handling.
4. Use appropriate waits and synchronization techniques.
5. Include assertions or validations to verify the expected results.
6. Regularly review and refactor your script for better maintainability.
Perfecto Tutorial:Features,Services,Advantages,Disadvantages

Through out this Perfecto Tutorial, we will provide complete overview of Perfecto as mobile test automation tool. We will do an in-depth exploration of all the major segments.

The Perfecto Automation tool is an entirely web-based SaaS (Software as a Service) a platform that allows mobile application designers and QA professionals both work with services like advanced automation, monitoring and testing services. It is the perfect tool for a mobile application tester to automate testing for mobile phone devices associated with diverse mobile networks spread across different geographic locations.

The automated testing is done using an in-built web-based user interface design, which permits the conception of tests scripts which are easy to design and easy to use without any code. The commands containing the hands are readily available on the websites in the form of widgets. Test developers just right to click on the authorities to add to the scripts and define its properties in the user interface. Keyword-based Script Once technology permit engineers to create test scripts. Perfecto Mobile testing tool works on both image & text recognition. The formation of these scripts can be watched in the following videos.

Test developers can freely install third-party applications or APK files on the remote devices using their Install widget. Upon formation, the application will be visible in the Application list of the device. The automation tools work based on OCR based text and image recognition mechanism that enables the device to analyze and test the applications’ user interface without any limitation. From native apps, web-based apps, or hybrid apps tools it can try anything. As far as Flash content is designed, the sales team are not sure whether the devices can check this or not.

For both the tools, Technical support remains if the user requires them.

Perfecto Mobile Cloud provides Hybrid objects progress, which contains both Visual based objects & native objects for iOS/Android applications, as well as real DOM objects for Web/Hybrid based programs. It offers both HP UFT or an automation framework, an object finder tool which allows easy object filtering and identification and easy scripting.

They also provide three different cloud-based deployment

option: public cloud, Private cloud and Local solution – called Mobile Cloud.

Early in the mobile app, development progress usually senses to conduct manual testing while the test strategy is being refined. Then once the testing processes are standardized, automated testing starts to deliver significant benefits.

Table of Content

We will talk about the below topics in on Perfecto tutorial.

Features of Perfecto:

The features of Perfecto are explained below –

Script Editor:

  • 1. It allows an interface to design the test scripts for test automation.
  • 2. An executable file can be created which can be executed with out referring any external dll files.
  • 3. Perfecto provides many commands (keywords) and methods to perform the test automation activities.
  • 4. It allows users to add their graphic orders. Source code of the authorities is available.
  • 5. The basics of Perfecto can be learned quickly for the entry level software testers.

Keyboard & Mouse Recorder feature:

  • 1. We can generate executable files through the recording features of Perfecto.
  • 2. The macro files can be created which can be executed as stand-alone file or can be used from the script editor interface.
  • 3. The recorder has the ability to memorize the the active windows which can be activated again during the playback.

Launcher:

  • 1. Any files or applications including website’s URL, document, programs etc., can be launched using the Perfecto.
  • 2. It is an easy-to-use shortcut manager.
  • 3. Allows us to execute any application which are available in system tray menu.
  • 4. There is no restriction to create user-defined sub folders.

Scheduler:

  • 1. It allows to schedule any programs to execute for a predefined times.
  • 2. It can be integrated with Launcher. The scheduler can be configured based on the items available in the launcher.
  • 3. Task execution can be done through hotkeys.

Codeless Automation:

The codeless means the scripting can be done based on configuration changes with drag-drop facility. The Perfect Codeless feature allows to design test cases with out writing the scripts.

Real User Simulation:

The user application may work in ideal conditions. But, while working on test automation, testers has to be ready to consider any unexpected situations. So, before testing in the real devices, the app testing need to be done through the simulator with different types of configurations for different platforms. The simulators are very useful due to low cost, easy to setup and fast processing. The Perfecto is well compatible with simulators to perform the app testing initially.

Remote Device Access:

Perfecto’s Remote Device Access feature gives the ability to debug iOS mobile apps on ideal devices under experimental conditions which speed the process of justifying new features and fixing bugs that only show up under specific environments or situations.

AI-Driven Analytics:

The Perfecto codeless testing approach allows to create automated test cases based on Artificial Intelligence approach. The AI Approach helps to create stable and robust test cases which will improve the testing in unstable environment. This feature also helps to design the automated test suites which requires minimum maintenance.

Perfecto Services:

Continuous Testing:

The continuous testing is an approach to test the application after each of the application build in a unattended manner. This approach reduces the testing cycle drastically. The perfecto provides the continuous testing approach in mobile devices in a efficient way.

Automated Testing:

The Perfecto allows the test automation in both the android and iOS devices effectively using the codeless testing approach. It also has the ability to participate on continuous testing approach to support the DevOps.

Web Testing:

It can support the testing on web application as well through the Perfecto Cloud based solution. Please click to get more details on Perfecto Web App testing.

Find Bugs Faster:

At the end of the test cycle, this tool helps the user to identify ideal failures instantly with false negative clarify. Below features helps the user to make the testing better.

  1. Adjust platform scenario test report with your actual users.
  2. Test failure analysis gives ideal test failure reasons.
  3. We can get fast feedback on testing with the help of test reports, CI dashboards, heat maps.
  4. It will also provides a detailed comparisons of test results for different platforms.
  5. It helps to save the time for reproduction of bugs as the defects can be created from the IDE.
  6. It allows the integration with JIRA tool with minimum customization. It will be required for full test management.
  7. The most useful testing artifacts such as logs, screenshots, testing reports, etc. are available with the solution.

Reduce Defects:

  1. Reduce risks with complete test analysis, ideal device sensor testing, and global reach.
  2. Network virtualization provides users to test like real users.
  3. Get same-day access to modern devices and releases.
  4. Automate testing for advanced features, like biometrics, GPS, camera, and more.

Test Analytics:

The Perfecto Test Analysis report helps to identify the test failure reason with route cause analysis easily. Also, the test analytics provides a high-level actionable steps to fix the route cause issue of the failure. It saves the reproduction efforts of the issue.

Functional Testing:     

It is an approach to validate the each of the functionalities which are developed based on the requirements. The functional testing is also known as the UI testing of the software product which ensure the overall quality. The perfecto has the ability to perform in-depth functional testing in mobile devices through the mobile cloud.

Interactive Testing:

Interactive testing means to perform the testing by interacting with the real device keeping in hands. The Perfecto Mobile cloud allows to connect the real devices and browsers quickly and do the testing by interacting just like own device.

Advantages of Perfecto

  1. Ever-changing mobile and browser releases need an up-to-date testing atmosphere. It enables immediate connection to the most recent Android and iOS platforms. It also supports the latest Chrome/Firefox/Safari browsers. 
  2. Mocking location for iOS is supported by Perfecto.
  3. Parallel execution supported by Perfecto.
  4. Network virtualization is a very good feature for Performance testing.
  5. Perfecto supports Mobile setting accessibility.
  6. Unlimited applications installation supported by Perfecto.
  7. SIM service supported for Cloud devices.
  8. IMEI number can be fixed for cloud devices.
  9. OTP generate feature is supported by Perfecto cloud.
  10. Most of the ADB command is supported by Perfecto.
  11. JIRA integration supported by Perfecto.
  12. To stop the security breach Perfecto support one to one tunnelling with Clint’s private cloud.
  13. The test automation can be done for native, web and hybrid applications through the Perfecto solution.
  14. The cross-platform testing is possible with the Perfecto. It means, we can execute the same test cases in different version of mobile operating systems which included android and iOS. It will help to crease the script reusability and reduces the maintenance efforts.

Disadvantages of Perfecto:

  1. It is a paid tool. Nobody can install it and start working freely. But for a demo or PoC kind of things the user can get 14 days trial license version.
  2. Software updating is very slow by Perfecto organization. Needs to be done promptly.
  3. Performance slow response. The Perfecto environment is considerably slow, and the mobile device response time is quiet.
  4. Perfecto does not support on premises Cloud services.

Till now We have covered the basics of Perfecto automation testing in this Perfecto Tutorial. In the upcoming articles on Perfecto, we will explain the test automation steps and integration with Selenium. Please refer to this link, to get more information.

51 Appium Interview Questions(Most Beginner’s Don’t Know!)

App package7 1024x535 1

In this tutorial, we will discuss the top 50 Appium interview questions and Answers. It will help you to prepare for the interview and crack it.

We will divide the questions and answers into three parts:

Basic Appium interview Questions

What is Appium?

Ans: Appium is an open-source freely distributed mobile UI testing framework.

What types of application can we automate with Appium?

Ans: Appium supports native application, Hybrid applications and Web-views.

List out the Appium abilities?

Ans: For this answer please refer to this Link.

List out the prerequisite to use Appium?

Ans: We need below tools/jar/plugins to work with Appium

  1. JDK
  2. ANDROID studio
  3. IntelliJ/Eclipse
  4. TestNG plugin or dependency if you use Maven
  5. Appium java client

Mention the disadvantages or limitations of Appium?

Ans: Like every tool, Appium also has certain limitations. Please check the answer here.

What are the native Apps?

Ans: Please check the answer from here.

What are hybrid apps?

Ans: Please check the answer from here

What do you understand by M-Web or Mobile Web Apps?

Ans: Please check the answer from here.

What are the supported languages in Appium??

Ans: Appium allows clients to interact with Appium based on sessions. Clients send session requests as a form of POST and pass desired capabilities as a parameter. There are multiple clients like Java, JavaScript, PHP, Ruby, Python, and C#.

Mention the advantages or benefits of using Appium.

Ans: The answer is the same as Question 3. You will find the answer here

List out the Appium supported Automation and Unit Test Framework ?

Ans: We can use all type of test frameworks with Appium. For example, java unit, java TestNG, NUnit etc as unit test framework . Appium test implements the Selenium webDriver to interact with Android or iOS devices.

Mention the limitations or disadvantages of Appium?

Ans: The answer is the same as Question 5. You will find the answer here

How can you verify elements on the iOS app?

Ans: For the iOS app, we can verify the elements using Appium inspector. It is an excellent tool to identify the elements’ id, XPath etc. It can also perform to perform user actions.

What is the Appium inspector?

Ans: Appium inspector is used to inspecting DOM to find out the elements both in Android and iOS. We can record the actions we perform in the inspector. It can generate the scripts in different languages like Java/JUnit, python etc. For a complete guide on Appium inspector, please click here.

How to inspect the DOM element or XPath for mobile application?

Ans: You can find the DOM element or XPath in Couple of ways. Either you can use “UIAuteviewer/UIAutomateviewer2”, or you can use Appium inspector for Android. For iOS, you can use Appium inspector. To learn how to inspect element, please refer to this link.

What’s the difference between simulator with emulator ?

Ans: Emulator and simulator both are visual devices. The emulator is a virtual device for Android, and simulator is a virtual device for iOS launched from Xcode.

How much time does Appium take to automate a test?

Ans: It depends on the scenario you are testing. If you are verifying multiple flows in a single method, it is likely to take more time. But it is always better to make the test cases precise and straightforward so that if any issue occurs in between your execution, you can have the recovery mechanism.

When should we use Appium?

Ans: Appium supports native, mobile web app and hybrid app. It supports cross-platform testing. If you have running on Android or iOS and want to verify it, you can use Appium.

What’s the best approach while Testing is it on real devices or emulators/simulators?

Ans: Again, this is depending on your test scenarios, application behaviours. If it is a straightforward application, you can test both on real devices or simulator/emulator. But if your application has complex logic, it is always better to go for real devices. Generally, we should use these to automate because it is ultimately the end-user who is going to use these applications. Real devices also have issues when connecting to the computer for a long time. ADB connections get lost, and it will show devices not attached, which will fail your test cases.

How to identify M-Web or Mobile Browser objects using Appium?

Ans: UserAgent can be used to identify objects in a M-Web or Mobile Browser. It provides you an way to alter the browser by using mobile proxy to resolve the issue.
Or we can use ChromeCasting for object identification in a Mobile Browser. Using Chromecast, your mobile to the system connection could be established and then you could do inspect elements on mobile from the chrome casting system.

What approach to take to identify the unique object in Appium while same class name having multiple objects

Ans: driver.findElements(By.className) gives the lists off elements. Once we get the lists, we need to traverse through the indexes to handle the elements uniquely with the same class name.

Perform the comparison among Appium and Selenium ?

Ans: As we know Selenium is an open-source tool. It helps to automate web application.On the other hand Appium is also an open-source tool. It uses to automate mobile application( Native, Hybrid, Web-apps). Appium implements Selenium Webdriver to interact with the devices.

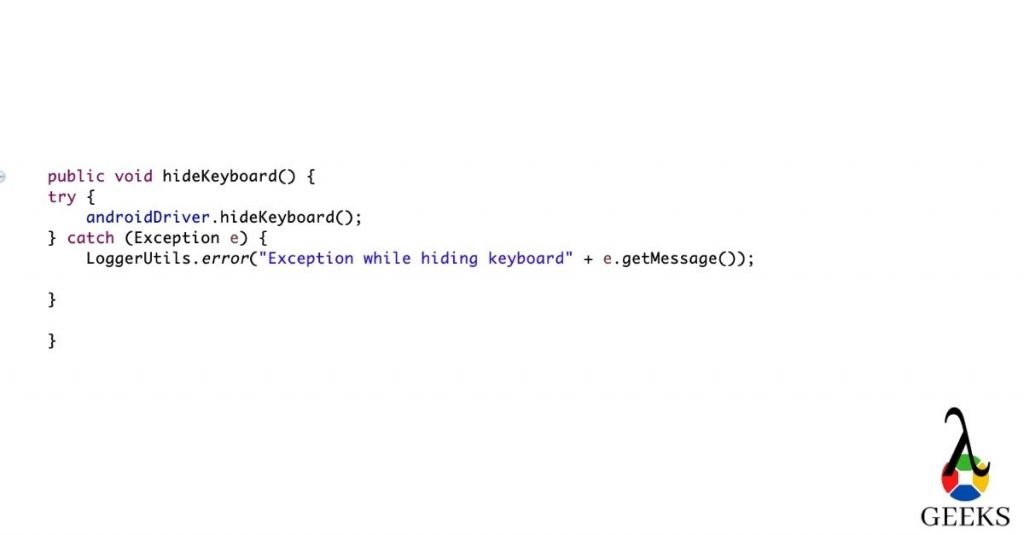
How to hide the keyboard in Appium?

how to hide keyboard
Appium interview questions: How to hide keyboard

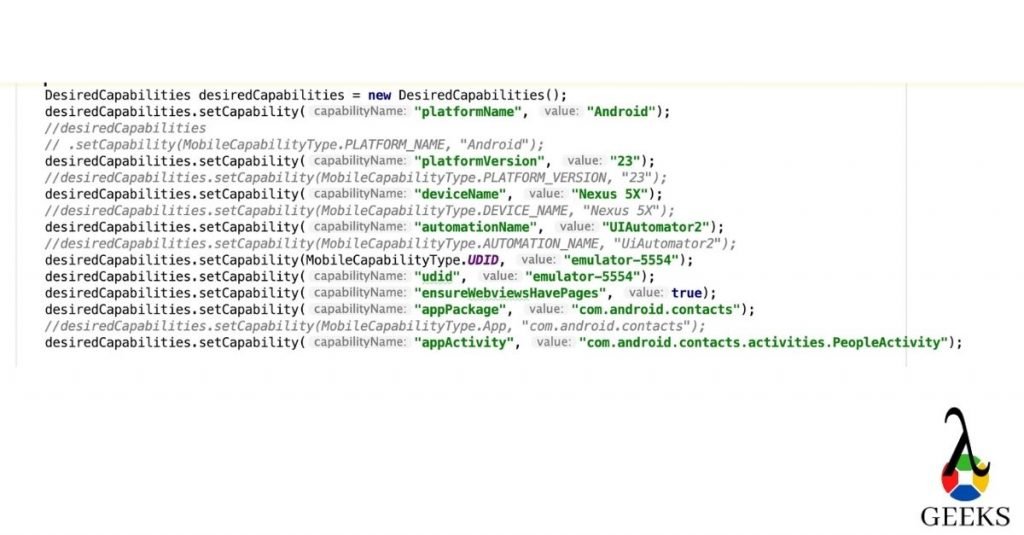
What are the desired capabilities required for Android?

desired capabilities for android
Appium interview questions: desired capabilities for android

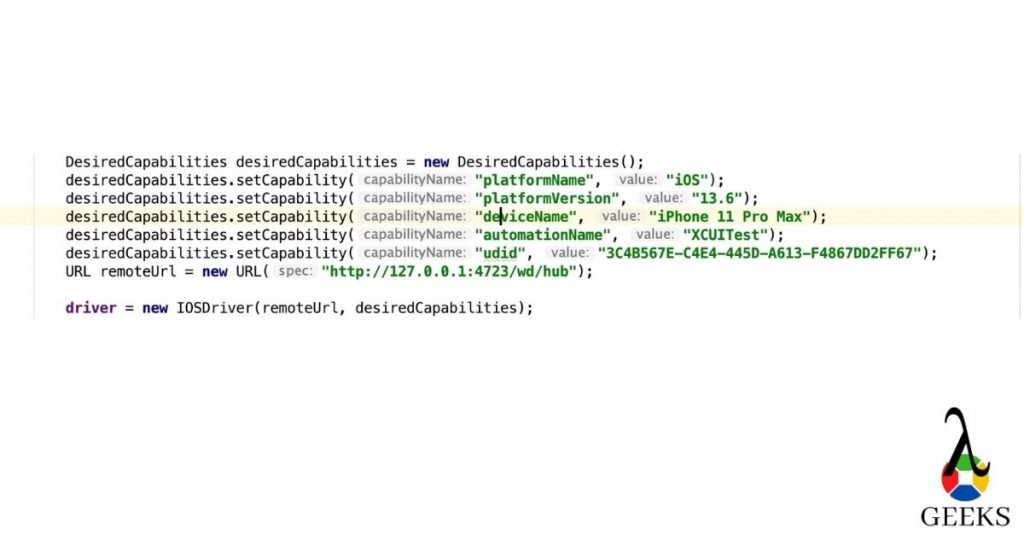
What are the required desired capabilities for iOS?

desired capabilities for iOS
Appium interview questions: desired capabilities for iOS

Intermediate Appium Interview Questions

What Data Exchange is when you do testing on Mobile devices?

Ans: Data exchange in Appium exchange the data hosted by complex objects which actually are being stored in different components of Web-view based app. One example can be the window object.

What are the errors you face in Appium?

Ans:

  • “The following desired capabilities are needed but not provided: Device Name, platformNameError.”
  • “Could not find adb. Please set the ANDROID_HOME environment variable with the Android SDK root directory pathError.”
  • “openqa.selenium.SessionNotCreatedException: A new session could not be createdError.”

What are the conditions to write Appium tests?

To write an Appium test, we must follow the below points:

Appium client: This is an Appium client written in a different language which connects to the Appium server. For example, Appium Java client. 

Appium Session: Appium interacts with mobile devices based on sessions. We need to create a session with the help of Appium client. 

Desired Capabilities: Desired Capabilities are like parameters which we pass while creating the session. It helps the Appium server to identify the devices uniquely.

Driver command: Driver command is nothing but the user actions we perform in devices. For example click() or sendKeys().

How can you verify elements in the Android Native Application?

Ans: You can use “UIAuteviewer/UIAutomateviewer2”, or you can use Appium inspector for Android.

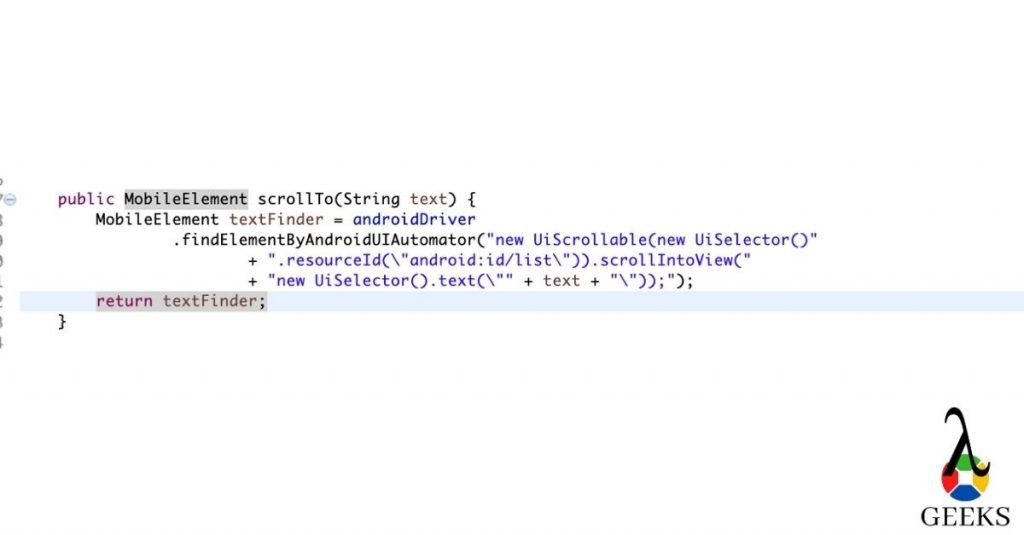
How to scroll down in an App?

how to scroll down
Appium interview Questions: how to scroll down

Is it possible to start the Appium server programmatically?

Ans: Yes, we can programmatically initiate the Appium server session. As Appium uses node.js, we can create .bat file(for Windows) or shell file/command(Linux/Mac) to start the Appium server passing bootstrap port, hub IP and port.

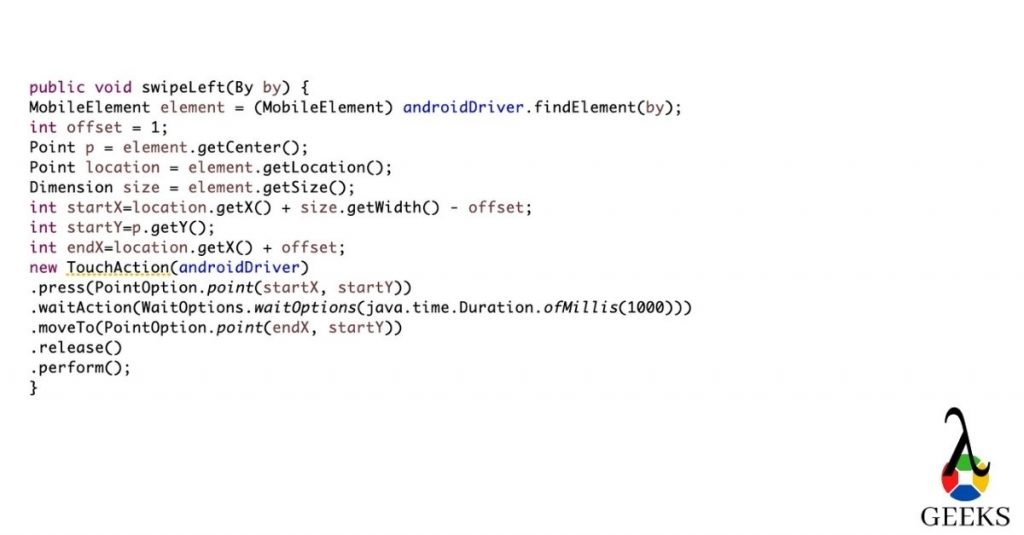
How to swipe left in Appium?

how to swipe left
Appium interview questions: how to swipe left

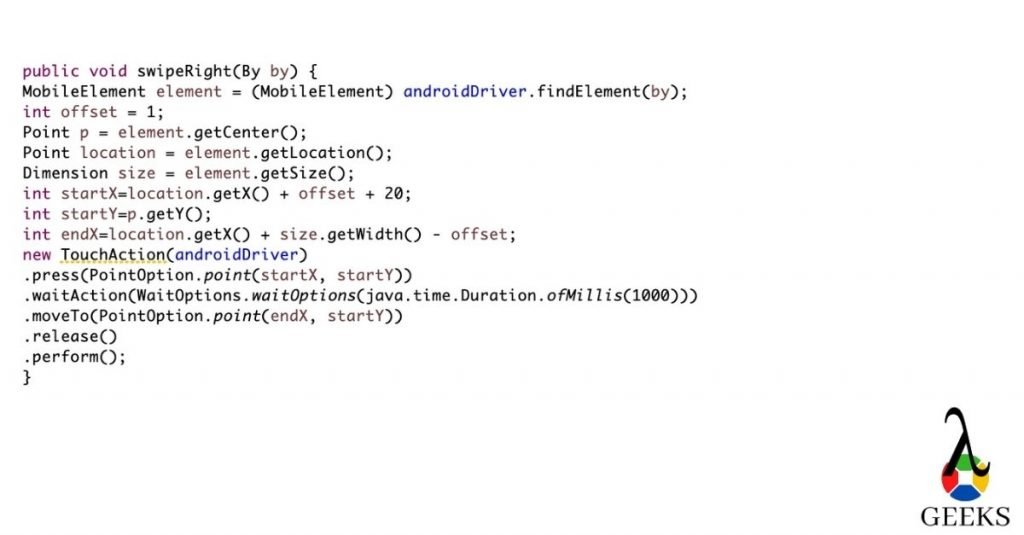
How to swipe right in Appium?

how to swipe right
Appium interview questions: how to swipe right

Is it possible to run a parallel/multithreaded test in Appium?

Ans: Yes we can run tests on the multithreaded environment, but the condition is to make sure that same Appium server should not used to parallelize the two tests.

Mention the Parallel Testing approach in IOS using Appium?

Ans: Appium has given an option to run iOS tests in parallel from Xcode version 9 and above. There are a couple of prerequisites we need to follow.

  1. “UDID” should be unique.
  2. “wdaLocalPort” should be unique
  3. derivedDataPath root should be unique for each driver instance. 
  4. Sauce Labs gives an option to run iOS tests parallel. We have to upload our Appium test to sauce labs. After that, it will run in multiple iOS tests in parallel.

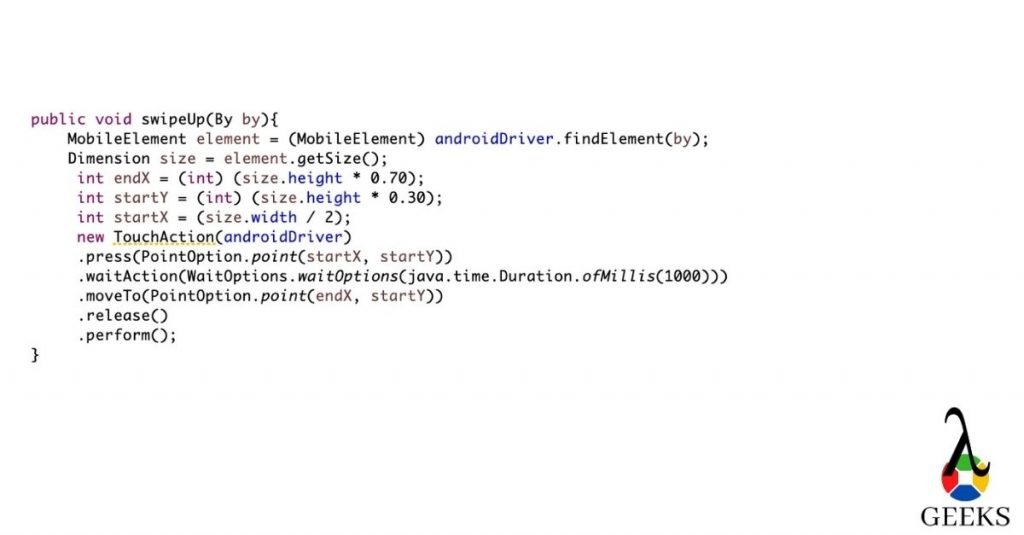
How to swipe up in Appium?

how to swipe up
Appium interview questions: how to swipe up

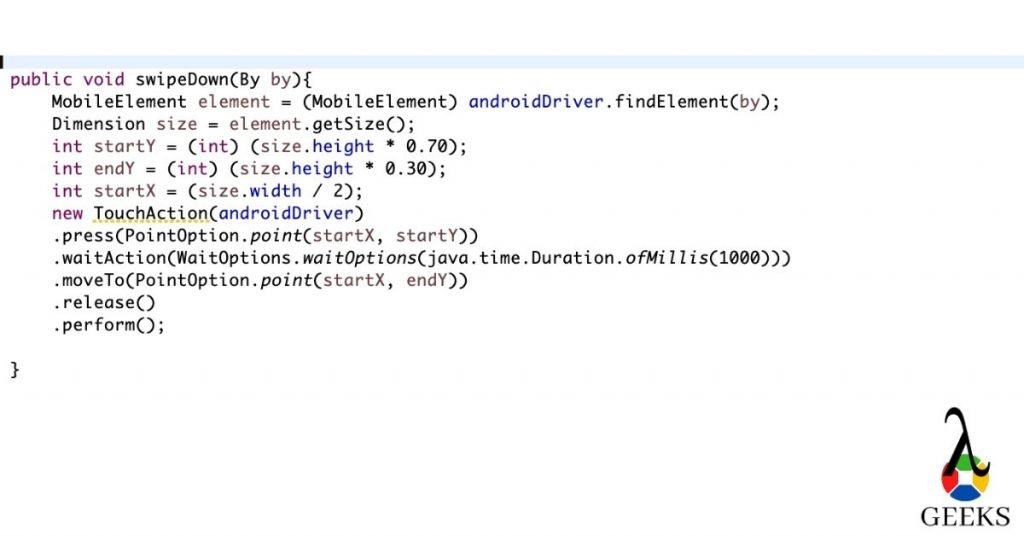
How to swipe down in Appium?

how to swipe down
Appium interview questions: how to swipe down

Advanced Appium Interview Questions

What are the selenium commands works with Appium?

Ans: Appium implements Selenium WebDriver. That’s why almost all the WebDriver commands work with Appium. Few examples are mentioned below:

  • Click() command for clicking/tapping the button/links.
  • sendKeys() command to send the value.
  • It supports java scripts commands.
  • Handles alerts.
  • It can switch between the context in web-views.

What are the advantages of Real devices over emulator/Simulator?

 There are a couple of advantages using real devices over emulator/Simulator

  1. We can check low battery scenarios with real devices.
  2. How fast battery gets drained out during testing.
  3. We can check the actual performance of the devices and do app profiling.
  4. We can check Bluetooth related scenarios.
  5. We can check messages and phone calls.

What are the different tools for debugging in Android and iPhone?

Ans: We verify the logs to debug the issues occur in the devices. For Android we can check Monitor, “adb logcat” or “dumpsys” . For the iPhone, we can use iPhone configuration utility.

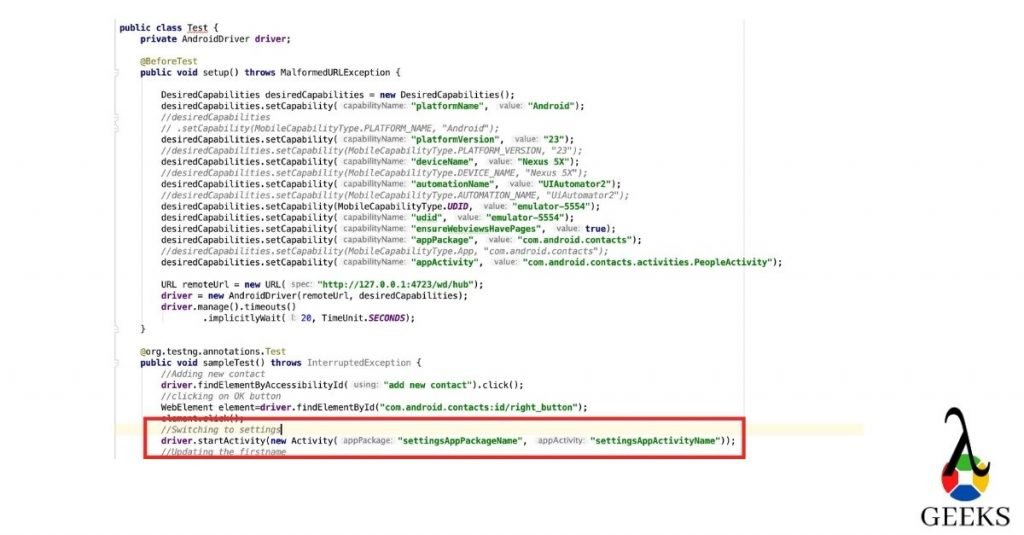
How can you switch between Android applications?

switch between Android app
Appium interview questions: Switching between android app

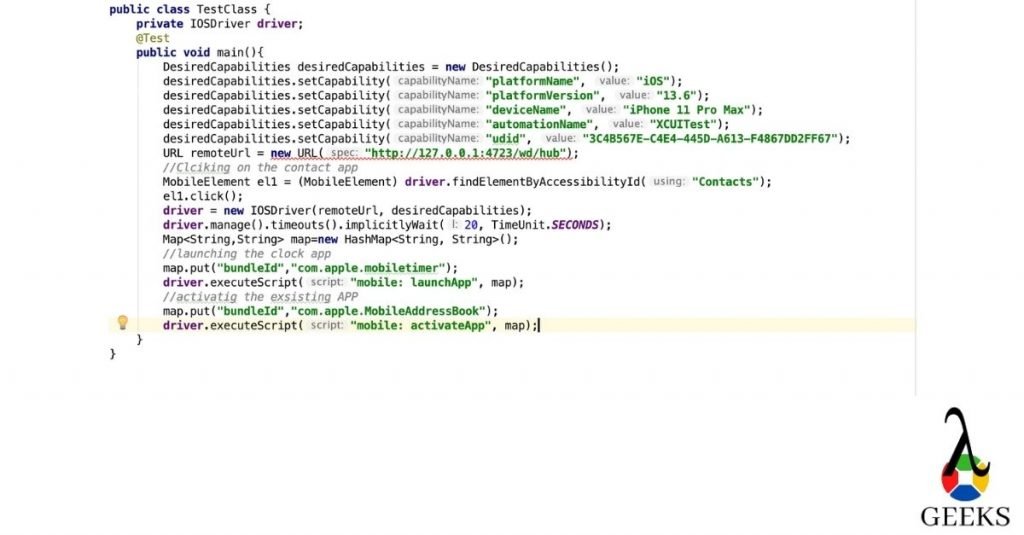
How can you switch between iOS applications?

how to switch between iOS app
Appium interview questions: Switching between iOS app

How can you find bundle id in iOS?

  • Copy the .ipa file to your systems and change the extension to .zip file
  • Now unzip the folder and search for iTunesMetadata.plist file
  • Once you get the file, open it in an editor and search for softwareVersionBundleId. It will give you the bundle id.

How can you enable the wifi while the phone is in Airplane mode?

ConnectionStateBuilder connection = 
new ConnectionStateBuilder();
driver.setConnection
(connection.withWiFiEnabled()
.build());));

How can you enable unicode keyboard ?

Ans: We need add below desired capabilities:

desiredCapabilities.setCapability("unicodeKeyboard", true);

How can you copy-paste in Appium?

Ans: Well, no direct method is there to do it. However you can get the value using getText() or getAttributes() methods and pass the same value to the sendKeys().

How to handle WebDriverAgentRunner-Runner.app encountered an error (Failed to install or launch the test runner issue?

rm '/usr/local/bin/carthage' 
brew install carthage 
brew link carthage

There might be other possible solutions to this problem. You can refer this link for other solutions.

When will choose automation testing over manual testing?

Ans: Automation testing will help during regression testing. If you have any complex scenarios or repetitive scenarios, you should automate it.

When will you choose manual testing over automation testing?

When you have new applications, you should test it manually first and probably then automate it. There are specific scenarios where you have to verify from logs/events; we should verify those manually. Scenarios where we don’t need frequent testings, we should not automate those.

How Appium works?

  • We have covered this part in our initial post. Please see the answer here.

How to double click in Appium?

double clicking
Appium interview questions: How to double click

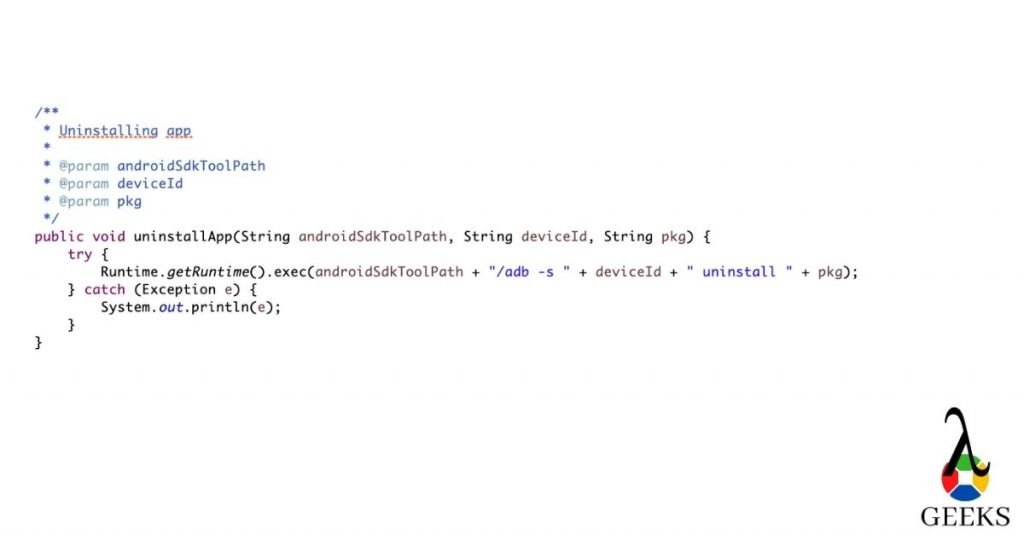
How to uninstall the app in Android?

Unistalling the app
Appium interview questions: How to uninstall the app

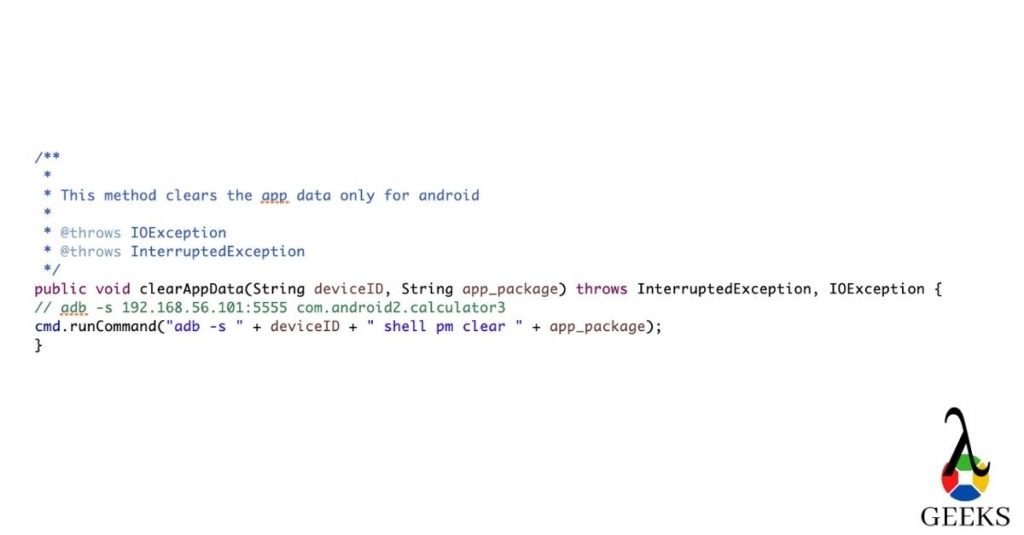
How to clear the app data in Android?

App package14
Appium interview questions: How to clear the app data

How will you handle failure cases in Appium ?

Ans: It depends upon the scenarios. If any test cases get failed, we need to restore the app state in order to execute the  next test cases. You can do it either in @AfterMethod or using listeners.

How to make your pass percentage higher in Appium?

Ans: Automating app using Appium sometimes makes the scrips inconsistent. If you run the test cases for longer times or may be due to network issues you can face the inconsistency issue. To make the script more robust we can take the following approach.

Is there any EventListeners in Appium?

Ans: yes, you can use AppiumWebDriverEventListener . You need to implement this interface .

Example:

public class AppiumListener implements AppiumWebDriverEventListener {
   public void beforeChangeValueOf(WebElement webElement, WebDriver webDriver) {
   }
   public void afterChangeValueOf(WebElement webElement, WebDriver webDriver) {
   }
   public void beforeAlertAccept(WebDriver webDriver) {
   }
   public void afterAlertAccept(WebDriver webDriver) {
   }
   public void afterAlertDismiss(WebDriver webDriver) {
   }
   public void beforeAlertDismiss(WebDriver webDriver) {
   }
   public void beforeNavigateTo(String s, WebDriver webDriver) {
   }
   public void afterNavigateTo(String s, WebDriver webDriver) {
   }
   public void beforeNavigateBack(WebDriver webDriver) {
   }
   public void afterNavigateBack(WebDriver webDriver) {
   }
   public void beforeNavigateForward(WebDriver webDriver) {
   }
   public void afterNavigateForward(WebDriver webDriver) {
   }
   public void beforeNavigateRefresh(WebDriver webDriver) {
   }
   public void afterNavigateRefresh(WebDriver webDriver) {
   }
   public void beforeFindBy(By by, WebElement webElement, WebDriver webDriver) {
   }
   public void afterFindBy(By by, WebElement webElement, WebDriver webDriver) {
   }
   public void beforeClickOn(WebElement webElement, WebDriver webDriver) {
   }
   public void afterClickOn(WebElement webElement, WebDriver webDriver) {
   }
   public void beforeChangeValueOf(WebElement webElement, WebDriver webDriver, CharSequence[] charSequences) {
   }
   public void afterChangeValueOf(WebElement webElement, WebDriver webDriver, CharSequence[] charSequences) {
   }
   public void beforeScript(String s, WebDriver webDriver) {
   }
   public void afterScript(String s, WebDriver webDriver) {
   }
   public void beforeSwitchToWindow(String s, WebDriver webDriver) {
   }
   public void afterSwitchToWindow(String s, WebDriver webDriver) {
   }
   /**
    * will work if there is any exception found in the scripts
    * @param throwable
    * @param webDriver
    */
   public void onException(Throwable throwable, WebDriver webDriver) {
       System.out.println("Execute Exception");
   }
   public <X> void beforeGetScreenshotAs(OutputType<X> outputType) {
   }
   public <X> void afterGetScreenshotAs(OutputType<X> outputType, X x) {
   }
   public void beforeGetText(WebElement webElement, WebDriver webDriver) {
   }
   public void afterGetText(WebElement webElement, WebDriver webDriver, String s) {
   }
}

Till now, we have covered three types of Appium interview questions. These are Basic Appium interview questions, Intermediate Appium interview questions and Advanced level of Appium interview questions. This tutorial will help you to prepare for Appium interview questions and give you the confidence to crack it. To learn in-depth on Appium, you can refer to this link.

Reference: Appium

How to successfully inspect element android | IOS with Appium Inspector-2021

Using Appium Inspector, we will learn how to inspect element android and how to inspect element on the iPhone in this Appium tutorial. Appium provides the capability to inspect elements both in android and iOS.

How to inspect element on iPhone using Appium inspector

Step 1 →Opening iOS simulator

In this tutorial, for all the examples we have covered with the iOS simulator. To open the iOS simulator, follow the below process:

Step 2 →Getting “udid.”

To connect the Appium inspector with the Simulator, we need udid. To get the 

booted udid, please run below command

  • xcrun simctl list | egrep ‘(Booted)’

it will list down the device id and name of the Simulator booted up recently

Step 3→ Getting OS version

Now we need the OS version of the Simulator. To get the OS version, please run the below command

  • instruments -s devices |grep “iPhone SE” [please replace the device name with the device name you got from above command]

Step 4→ Opening Appium Inspector

Now we have the device id and os version with us. Please click on the button highlighted in the below image. It will open the New Inspector.

Click on search
Click on search

Step 5→ Connecting Appium inspector with Simulator

Now add all the desired capabilities required to start the session. Please follow the below image for the required desired capabilities and start the session.

If you want to verify with a specific app, you can add an app path. In this tutorial, W have worked with the existing “Contact” app in the Simulator.

Add desiredCapabilities
Start the session
Start the session

Step 6→ Getting the default screen.

Once the session is started, you can see the Simulator’s home screen image and the XML hierarchy. Please look at the below image for more details.

Appium inspector
Appium inspector

Step 7→Inspect and clicking on the contact.

Now click on the Simulator’s contact button to reflect the inspector’s screen and click on refresh. Alternatively, you can find the Xpath of the contact and click on Tap. Please see the image below.

How to inspect element on iPhone

Step 8→ How to start recording?

After clicking on Contacts, we will see the image below. Now click on “Start recording” to capture all the actions. It will help to generate the Appium scripts in the desired language. 

Start recording
Start recording

Step 9→Inspect the element and clicking on tap.

Please follow the highlighted portion in the below image. First, find the XPath of the “Add” button, and after that, click on the Tap button.

Perform actions from inspector

Step 10→Sending keys.

After tapping on the Add button below screen will appear. Please follow the highlighted part to send the value from the Appium Inspector itself.

Use sendKeys
Use sendKeys

Step 11→Typing hello.

Please write any value to update the “First Name” value and click on “Send keys.”

Type hello
Type hello

Step 12→Value reflected in both the app.

The value will be reflected in both places, like in the image below. Appium inspector 

as well as Simulator 

value reflected in both app

Step 13→generating code.

Now click on the link shown below in the image. It will generate Automation scripts in the preferred language. Here language has been selected as Python. You can view this in the below image.

click to generate the code

Step 14→Sample code.

Below are the sample scripts generated by the Appium inspector. Here language has been selected as Java-Junit.
import io.appium.java_client.MobileElement;
import io.appium.java_client.ios.IOSDriver;
import junit.framework.TestCase;
import org.junit.After;
import org.junit.Before;
import org.junit.Test;
import java.net.MalformedURLException;
import java.net.URL;
import org.openqa.selenium.
remote.DesiredCapabilities;
public class SampleTest {
  private IOSDriver driver;
  @Before
  public void setUp() throws MalformedURLException {
    DesiredCapabilities desiredCapabilities = new DesiredCapabilities();
    desiredCapabilities
.setCapability("platformName", "iOS");
    desiredCapabilities
.setCapability("platformVersion", "13.6");
    desiredCapabilities
.setCapability("deviceName", "iPhone SE");
    desiredCapabilities
.setCapability("automationName", "XCUITest");
    desiredCapabilities
.setCapability("udid", "B5FDD9EB-05C6-4F3B-9DFE-1A4EC3E06A7F");
    URL remoteUrl = new URL("http://localhost:4723/wd/hub");
    driver = new IOSDriver(remoteUrl, desiredCapabilities);
  }
  @Test
  public void sampleTest() {
    MobileElement el1 = (MobileElement) driver
.findElementByAccessibilityId
("Contacts");
    el1.click();
    MobileElement el2 = (MobileElement) driver
.findElementByAccessibilityId("Add");
    el2.click();
    MobileElement el3 = (MobileElement) driver
.findElementByAccessibilityId("First name");
    el3.sendKeys("Hello");
  }
  @After
  public void tearDown() {
    driver.quit();
  }
}

Issues faced opening the Appium Inspector in Mac. 

How will you solve issues like “Encountered internal error running the command: Error: Unknown device or simulator UDID?”

You need to install "libimobiledevice."
Please use command → brew install libimobiledevice --HEAD. 

 How will you solve it if you get “WebDriverAgent because of xcodebuild failure: not found: carthage” issue?

You need to install the carthage
Please use command→ brew install carthage.

How to inspect element on android using Appium inspector

Step 1 → Opening emulator

In this tutorial, for all the examples we have covered with the Android emulator. To open the Android emulator, follow the below mentioned process:

Step 2→ Opening the Appium inspector.

Now we have the device id and os version with us. Please click on the button highlighted in the below image. It will open the New Inspector.

Opening Appium inspector

Step 3→ Connecting Appium inspector with Simulator

Now add all the desired capabilities required to start the session. Please follow the below image for the required desired capabilities and start the session.
If you want to verify with a specific app, you can add an app path. In this tutorial, we have worked with the existing “Contact” app in the emulator.

Adding desiredCapabilities

Step 4→ Opening home screen

Once the session is started, you can see the emulator’s home screen image and the XML hierarchy. Please refer to the below image for details.

Opening Home screen
Opening Home screen

Step 5→Inspect element and start recording.

Now click on the contact button from the emulator. Please see the below image for more details.

how to inspect element on android

Step 6→Clicking add button

After clicking on Contacts, we will see the image below(Here we have chosen the favorite tab and refresh the page from the inspector). Now click on “Start recording” to capture all the actions. It will help to generate the Appium scripts in the desired language. Please click on the tap button highlighted below.

Perform actions
Perform actions

Step 7→ Clicking on send keys.

After tapping on the Add button below screen will appear. Please follow the highlighted part to send the value from the Appium inspector itself.

click on sendKeys
click on sendKeys

Step 8→Typing Hello

Please write any value to update the “First Name” value and click on “Send keys.”

typing hello
typing hello

Step 9→Generating code

The value will be reflected in the edit box, like in the image below. Appium inspector,
as well as an emulator. To generate the code, click on the highlighted arrow.

click to generate code

Step 10→ Sample code

It will generate below scripts:
import io.appium.java_client.MobileElement;
import io.appium.java_client
.android.AndroidDriver;
import junit.framework.TestCase;
import org.junit.After;
import org.junit.Before;
import org.junit.Test;
import java.net.MalformedURLException;
import java.net.URL;
import org.openqa.selenium
.remote.DesiredCapabilities;
public class SampleTest {
  private AndroidDriver driver;
  @Before
  public void setUp() throws MalformedURLException {
    DesiredCapabilities desiredCapabilities = new DesiredCapabilities();
    desiredCapabilities
.setCapability("platformName", "Android");
    desiredCapabilities
.setCapability("platformVersion", "23");
    desiredCapabilities
.setCapability("deviceName", "Nexus 5X");
    desiredCapabilities
.setCapability("automationName", "UIAutomator2");
    desiredCapabilities
.setCapability("udid", "emulator-5554");
    desiredCapabilities
.setCapability
("ensureWebviewsHavePages", true);
    URL remoteUrl = new URL("http://localhost:4723/wd/hub");
    driver = new AndroidDriver(remoteUrl, desiredCapabilities);
  }
  @Test
  public void sampleTest() {
    MobileElement el1 = (MobileElement) driver
.findElementByAccessibilityId
("Contacts");
    el1.click();
    MobileElement el2 = (MobileElement) driver
.findElementById
("com.android.contacts:"+
"id/contact_tile_list");
    el2.click();
    MobileElement el3 = (MobileElement)
 driver.findElementByAccessibilityId
("add new contact");
    el3.click();
    MobileElement el4 = (MobileElement) 
driver
.findElementByXPath("/hierarchy+
"/android"+
".widget." +
"FrameLayout/android"+
".view.ViewGroup/android.widget" +
".FrameLayout[2]/android.widget"+
".FrameLayout/android.widget" +
".ScrollView/android.widget"+
".LinearLayout/android.widget" +
".LinearLayout[2]/android"+
".widget.LinearLayout/android
.widget" +
".LinearLayout/android.widget"
".LinearLayout/android"+
".widget.EditText")
                .sendKeys("Hello");
    el4.sendKeys("Hello");
  }
  @After
  public void tearDown() {
    driver.quit();
  }
}

Please Note:

Conclusion

Till now, we have discussed how to inspect element android and how to inspect element on iPhone. In the next topic, we will write about how to write the first script in Appium. To start the subject from the beginning, please click here. For more details for this section, please refer to this link.

21 Appium Methods:How To Use Guide(With Code !)

We will discuss how to use Appium methods in this Appium tutorial. Appium is a wrapper on top of Selenium webDriver. All the Selenium methods are already present in Appium. Apart from that, Appium provides a good number of ways to interact with native applications.

How to use the pressKey code using Appium methods?

 public void pressKeyCode(AndroidKey code) {
\tandroidDriver.pressKey(new KeyEvent(code));
   \t }
Here you can pass keyEvent like AndroidKey.ENTER to enter or AndroidKey.BACK to tap 
on 
back button Similarly, users can use this for long key presses like:
public void longPressKeyCode(AndroidKey code) {
    \tandroidDriver.longPressKey(new KeyEvent(code));
        \t}

How to get the current activity using Appium commands?

To get the current activity, we can use the current Activity method.
For Example:
public String currentActivity() {
\treturn androidDriver.currentActivity();
   \t }

How to check if the app is installed or not?

To check if the app is installed or not we can use:
public boolean isAppInstalled(String bundleId) {
return androidDriver
.isAppInstalled(bundleId);
}

How to start activity in Android using Appium methods?

Please follow the below method to start the activity:
public void startActivity(String packageName, String activity) {
try {
  androidDriver.startActivity(new Activity(packageName, activity));
} catch (Exception e) {
\t    e.printStackTrace();
}

How to scroll to a particular text using Appium methods?

public MobileElement scrollTo(String text) {
MobileElement textFinder = androidDriver
.findElementByAndroidUIAutomator
("new UiScrollable(new UiSelector()"
+ ".resourceId(\\"android:id/list\\"))
.scrollIntoView("
+ "new UiSelector().text(\\"" + text + "\\"));");
\t    return textFinder;
}

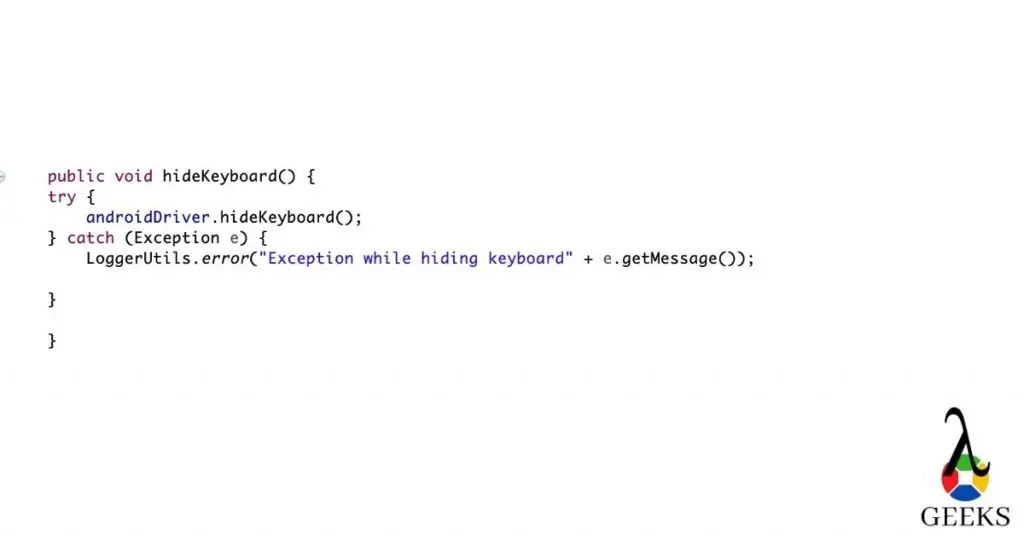
How to hide the keyboard using Appium methods?

public void hideKeyboard() {
try {
androidDriver.hideKeyboard();
} catch (Exception e) {
LoggerUtils.error("Exception in hiding keyboard" + e.getMessage());
}

How to get progress dialog using Appium methods?

public MobileElement getProgressDialog() {
return androidDriver
.findElementById
("android:id/progress");
}

How to swipe left using Appium methods??

public void swipeLeft(By by) {
\tMobileElement element = (MobileElement) androidDriver.findElement(by);
\tint offset = 1;
\tPoint p = element.getCenter();
\tPoint location = element.getLocation();
\tDimension size = element.getSize();
\tint startX=location.getX() + size.getWidth() - offset;
\tint startY=p.getY();
\tint endX=location.getX() + offset;
\tnew TouchAction(androidDriver)
    .press(PointOption.point(startX, startY))
    .waitAction(WaitOptions.
waitOptions(java.time
.Duration.ofMillis(1000)))
    .moveTo(PointOption.point(endX, startY))
    .release()
    .perform();
    }

How to swipe right using Appium methods?

public void swipeRight(By by) {
\tMobileElement element = (MobileElement) androidDriver.findElement(by);
\tint offset = 1;
\tPoint p = element.getCenter();
\tPoint location = element.getLocation();
\tDimension size = element.getSize();
\tint startX=location.getX() + offset + 20;
\tint startY=p.getY();
\tint endX=location.getX() + size.getWidth() - offset;
\tnew TouchAction(androidDriver)
    .press(PointOption.point(startX, startY))
    .waitAction(WaitOptions.
waitOptions(java.time
.Duration.ofMillis(1000)))
    .moveTo(PointOption.point(endX, startY))
    .release()
    .perform();
    }

How to swipe up using Appium methods?

MobileElement element = (MobileElement) androidDriver.findElement(by);
    \tDimension size = element.getSize();
    \t int endX = (int) (size.height * 0.70);
         int startY = (int) (size.height * 0.30);
         int startX = (size.width / 2);
         new TouchAction(androidDriver)
         .press(PointOption.point(startX, startY))
         .waitAction(WaitOptions.
waitOptions(java.time
.Duration.ofMillis(1000)))
         .moveTo(PointOption.point(endX, startY))
         .release()
         .perform();
        
    }

How to swipe down using Appium methods?

public void swipeDown(By by){
    \tMobileElement element = (MobileElement) androidDriver.findElement(by);
    \tDimension size = element.getSize();
    \tint startY = (int) (size.height * 0.70);
        int endY = (int) (size.height * 0.30);
        int startX = (size.width / 2);
        new TouchAction(androidDriver)
        .press(PointOption.point(startX, startY))
        .waitAction(WaitOptions.
waitOptions(java.time
.Duration.ofMillis(1000)))
        .moveTo(PointOption.point(startX, endY))
        .release()
        .perform();
        
    }

How to double click in Appium using Appium commands?

public void doubleClick(WebElement element) {
TouchActions action = new TouchActions(androidDriver);
action.doubleClick(element);
action.perform();
}

How to switch off GPS in Android?

public static void swicthOffGPSConnection(String androidSdkToolPath, String 
deviceId) {
\ttry {
\t    Runtime.getRuntime().
exec(androidSdkToolPath 
+ "/adb -s" + deviceId
+ " shell settings put secure location_providers_allowed ' '");
\t} catch (Exception e) {
\t    
\t    e.printStackTrace();
}

How to switch on GPS in Android?

public static void swicthONGPSConnection(String androidSdkToolPath, String deviceId) {
\ttry {
\t    Runtime.getRuntime()
.exec(androidSdkToolPath + "/adb -s" + deviceId
\t\t    + " shell settings put secure location_providers_allowed gps ");
\t} catch (Exception e) {
\t  
\t    e.printStackTrace();
\t}
    }

How to switch off Wifi in Android?

public void switchOFFWifiConnection(String androidSdkToolPath,String deviceId) {
\t\t
try {
Runtime.getRuntime()
.exec(androidSdkToolPath+
"/adb -s"+deviceId
+" shell am start -n io.appium.settings/.Settings -e wifi off");
} catch (IOException e) {
\t\t\t
e.printStackTrace();
}
}

How to switch on Wifi in Android?

public void switchONWifiConnection(String androidSdkToolPath,String deviceId) {
try {
Runtime.getRuntime()
.exec(androidSdkToolPath
+ "/adb -s"+deviceId+" shell am start -n io.appium.settings/.Settings -e wifi on");
} catch (IOException e) {
\t\t\t
e.printStackTrace();
}
}

How to switch off data in Android?

public void switchOFFDataConnection(String androidSdkToolPath,String deviceId) {
try {
Runtime.getRuntime()
.exec(androidSdkToolPath
+ "/adb -s"+deviceId+" shell am start -n io.appium.settings/.Settings -e data off");
System.out.println("************** Wifi off *******");
} catch (IOException e) {
// TODO Auto-generated catch block
e.printStackTrace();
}
}

How to switch on data in Android?

public void switchONDataConnection(String androidSdkToolPath,String deviceId) {
try {
Runtime.getRuntime()
.exec(androidSdkToolPath
+ "/adb -s"+deviceId+" shell am start -n io.appium.settings/.Settings -e data on");
} catch (IOException e) {
// TODO Auto-generated catch block
e.printStackTrace();
}
}

How to uninstall the app in Android?

public void uninstallTheApp(String androidSdkToolPath, String deviceId, String pkg) {
try {
Runtime.getRuntime()
.exec(androidSdkToolPath + "/adb -s " + deviceId + " uninstall " + pkg);
} catch (Exception e) {
System.out.println(e);
}
}

How to toggle flight mode in iOS?

public void toggleFlightMode() {
\tDimension window = iosDriver.
manage().window().getSize();
\ttry {
\tint startX = window.width / 2;
\t\tint startY = window.height;
\t\tint endY = window.height / 10;
\t\tnew TouchAction(iosDriver)
\t\t.press(PointOption.point(startX, startY))
\t\t.waitAction(WaitOptions
\t\t.waitOptions(java.time
.Duration.ofMillis(1000)))
\t\t.moveTo(PointOption
\t\t.point(startX, endY)).release().perform();\t\t\t\t\t\t\t\t\t\t\t\t\t\t
\t\t} catch (Exception e) {
\t\tSystem.out.println("\
Could not swipe to top.\
");
\t\te.printStackTrace();
\t\t}
\t\tMobileElement flight = null;
\t\tif ((flight = iosDriver
\t\t\t.findElement(By
\t\t\t.name("Airplane Mode"))).isDisplayed()) {
\t\t\tflight.click();
\t\t\tnew TouchAction(iosDriver)
\t\t\t\t\t.tap(TapOptions
\t\t\t.tapOptions()
.withPosition(PointOption
\t\t\t.point(window.width / 2, 10))).perform();
\t\t} else {
\t\t\tthrow new RuntimeException("Flight mode button not found.");
\t\t}
\t}

Conclusion

Till now, We have discussed about the top 20 most used Appium methods. In the next topic, We will write about the Appium Inspector for Android and iOS. For more details for this section, please refer to this link.

Appium Tutorial for Mobile Automation- The Comprehensive guide-20-21

We have written this Appium tutorial to give  a complete picture of Appium mobile automation. We will discuss all the major topics here.

Introduction

It is an open-source tool. It supports  Android, iOS, windows OS. We can execute same code in different os versions like Android, iOS.It reduces redundant code and helps to increase code reusability. It has implemented the Selenium webDriver, which connects through Apple’s XCUITest(iOS 9.3 and above) or UIAutomation(iOS 9.3 and lower) or UiAutomator/UiAutomator2 (Android) or WinAppDriver(Windows) dependent on the type of devices.

We will cover the below topics in this Appium tutorial:

Advantages of Appium

Disadvantages of Appium

Types of Mobile applications

There are three types of applications supported :

Native Application

Native applications are written using Windows, Android, iOS SDKs.

Hybrid Application

Hybrid applications are a mix of web and native applications. Here native applications have control, and it interacts with mobile web applications.

Mobile Application

Mobile web applications are web-based applications. These are accessible using chrome(Android), Safari(iOS) browser. We can develop this type of application by HTML, CSS, JavaScript, AngularJS.

Appium Architecture :

How It works on the iOS platform

How It works on the Android platform

Prerequisite for setup

Appium tutorial for installing Appium Desktop on Windows

  • Please go to http://appium.io/, and you will see the below screen. Please click on the below-highlighted button. 
Please click on the Appium Download button
Please click on the download button
  • Once you have clicked the above button, you will see the below page. Please click on the highlighted .exe file or .zip file to get it downloaded in your system.
Please download the .exe file or .zip file or windows
Please Download the .zip or exe file
  • Here We have taken the .zip file to install it. Please unzip the file. After that, you will see the image below. Please click on Appium.exe.
Please unzip the file and click on Appium.exe
Unzip the file
  • Now you can see the image below, and you are ready to start your server.
Start The Server
Please start the server
  • Now you can see the image below, and your server is ready.
Server started
Server has started

Appium tutorial for installing Appium Desktop on Mac

  • Please go to http://appium.io/, and you will see the below screen. Please click on the highlighted button shown below.
Download Appium
Please click on download button
  • Once you have clicked the above button, you will see the below page. Please click on the highlighted dmg file to get it downloaded in your system.
Please download the dmg file
  • Please click on the dmg file, which got downloaded recently, and you will see the below screen. Please the instruction mentioned in the below image.
Drag Appium to Application folder
Please drag to Application folder
  • It will start copying in the Application folder.
Copying started
Copying started
  • Suppose you have already installed another version in your system. You will get below pop up. It is your choice to keep both or replace the older one.
You can replace or keep both version
You cab keep both or replace one
  • Once it is installed in your system, you can go to the launchpad and search with Appium, and you will get below icon and click on the icon. Alternatively, you can go to the Application folder and click on the icon.
Please search Appium, and click on the icon
Please search for the icon
  • Many times after launching it, you can get below error messages. No need to worry; we can solve this issue.
Security error
Security error
  • To solve the above issue, you have to go to system preference from the apple icon shown on the top left corner and then click on Security and privacy. You will see the screen below. Please click on “Open Anyway.”
Please go to privacy settings, and click
Please go to privacy settings, and click on Open Anyway
  • Now click on the icon once again and this time, choose to open it. Please follow the below image.
Please Click on Open
  • Now you can see the image below, and you are ready to start your server.
Please start the server
  • Please click on the start server to start the server. Your screen will look like below.
Appium Server Started
Server Started

conclusion

Till now We have covered the basics of Appium mobile testing in this Appium Tutorial. In the next topic, We will write about top 20 most used methods to automate native application. For more details on this topic, please refer to this link.