The scope of software testing is leading the IT industries now to ensure the quality of the product. Apart from regular web application testing, the scope for mobile testing is also rapidly increasing. The mobile devices can be tested either manually or through the mobile automation tools. Many mobile test automation tools are available in the market which provides mobile labs and the automation capabilities as well. The well known tools are Perfecto, SeeTest, Mobile Lab, etc.
Perfecto Tutorial – Table of Content
Perfecto Tutorial 1# Install Selenium Setup for Web Automation
Perfecto Tutorial 2# Perfecto Selenium Integration for Mobile Automation
Perfecto Tutorial 3# Import Sample Project for Perfecto Automation
Through this, “Selenium for Perfecto” article, we will provides a complete and detailed overview of Perfecto Selenium Integration using Selenium WebDriver (Java). Also, we will execute a sample project for Perfecto automation with the help of Perfecto mobile lab and automation capabilities.
Perfecto Selenium Integration for Mobile Automation
In this section, we will explain the step by step approach to execute selenium webdriver test cases using the Perfecto mobile lab and automation capabilities. The pre-requisites assumptions to start with this article, are mentioned below –
- Basic knowledge in Selenium WebDriver.
- Developed a Selenium test case which will be used here.
- New to the Perfecto.
Configuration details for Perfecto Automation:
Here we will update the pom.xml file with the necessary Perfecto dependencies and edit the codes from Step 1 to add them in the security data, the Perfecto cloud name, driver details, smart test data update.
The modified code is called PerfectoSelenium.java. The below process walks the users through the configuration.
- Copy the dependencies
- Supply the security token
- Select a device
- Supply the URL to connect to the Perfecto cloud
- Create an instance of the reporting client
- Execute the test
Step1# Accessing Perfecto Cloud:
- Register for the first time user for two weeks of the free trial from the perfecto trial license web.
- Log in with the Perfecto cloud using the above free trial user.
Step2# Capture Security Token from Perfecto Cloud:
The security token is an encrypted version of long string which will be used later to connect the Perfecto mobile lab from third-party tools like Selenium WebDriver. Steps to capture the security token are mentioned below –
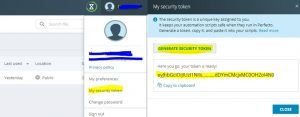
First, click on user name which is displayed in the right top corner and click on “My Security Token” link from user menu to open “My Security Token” popup.
Here, we need to click on “GENERATE SECURITY TOKEN” button and copy the generated security token.

Step3# Select a Device and get the Capabilities:
Capabilities are used to define the mobile devices which will be accessed from the Perfecto cloud. The structure for defining the capabilities are look like below –
DesiredCapabilities capabilitiesSample = new DesiredCapabilities(webBrowserName, “”, Platform.ANY);
…
capabilitiesSample.setCapability(“testPlatformName”, “Android”);
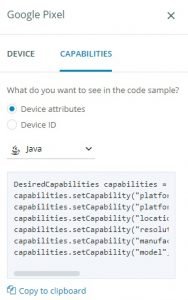
Here, “platformName” capability is used to define the platform of the mobile OS. To find the source code for the desire capabilities of the mobile android devices, we need to open the Perfecto Cloud UI with Manual Testing view. The source code of capabilities, can be copied to our selenium test case. The steps to follow for capturing the desire capabilities through the perfecto mobile cloud are mentioned below –
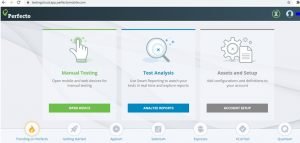
- Click on Open Device option which is available under the Manual Testing section. This section is located in Perfecto Landing page.
- On the Manual Testing view, select a device to proceed next.
- Now click to open the Capabilities tab which is available in the details pane. The details pan will be available after selection of the device only.
- All the capabilities will be displayed here. We can copy either all or selected capabilities based on the requirement.

Step4# URL to Connect Perfecto as Appium Server:
The structure of the URL for perfecto cloud will be looks like below –
https://<<Cloud Name>>.perfectomobile.com/nexperience/perfectomobile/wd/hub
If the URL to access the Perfecto cloud manually is “https://testingcloud.app.perfectomobile.com/lab/devices” then the cloud name will be testingcloud.
Step5# Reporting Client Instance Creation:
The best way to run our test in Perfecto, the first step is to crate an instance with the reference of ReportingClient class i.e., the smart reporting client. It will help us to analyze the report after the test execution. The reporting client is used to collect the basic information of the test. Later, this information will be send to the Smart Reporting system.
In the sample project(Utils.java), we have shown about the usage of the ReportiumClientFactoryclass’ createPerfectoReportiumClient() method. The instance of PerfectoExecutionContext class provides the link to the factory class.
withWebDriver() – With the help of this method, the link for the driver instance are supplied.
build() – This method is used to create the instance of the context object which will be supplied to the createPerfectoReportiumClient() method for ReportiumClient instance creation.
The main purpose of this reporting is to analyze the test result from the Perfecto Cloud.

Sample Project to Demonstrate the Perfecto Automation Approach in Mobile Devices
Manual Test Scenario:
- Login to the perfecto mobile cloud with valid user credential.
- Select any available device.
- Open the setting app.
- Click on sub-menu contains text as “data usage”.
- Verify that “Data Saver” submenu will be displayed.
Basic Information Collected: As pert of test automation, we have collected the Information such as cloud name, security token, capabilities, app package/activity name, captures the object’s property, etc.
Download codes for a sample project: Please click here to download codes for Sample Project. In this sample project, the basic codes are available for Local Appium, Local Selenium, Perfecto Appium and Perfecto Selenium. In this article, we will execute the java test code for Perfecto Appium.
Steps to Prepare the Test for Execution:
Step 1# Import the Sample Project into Eclipse Workspace, which was downloaded previously. This project can be imported through navigation “File->Open Projects from File System” available in Eclipse IDE.
Step 2# After importing the sample project, we need to update the file PerfectoAppium.java to modify basic details such as cloud name, security token, capabilities, app package/activity name, object’s property, etc. which are captured previously.
Step 3# Once the selenium test is ready for execution; we need to the right click on “PerfectoAppium.java” class to run the test as “Run As-> TestNG Test”.
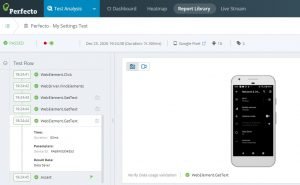
Step 4# After successful execution, the test result can be viewed from Eclipse and Perfect Analyze tab as well.


Sample Project to Demonstrate the Perfecto Automation Approach in Web Application:
At the starting point, LocalSelenium.java, a small Javascript with Maven dependencies can be configured to understand the basics on test automation using Selenium build tool Maven. The pom.xml file is institutional here as it contains all configurations setup and dependencies.
Note: Intentionally, the simple script has been written for better understanding. The purpose of the script to show the approach to connect Perfecto from Selenium. After connecting the Perfecto website, the script will check the title.
To start:
- Copy by cloning the sample project which is available in GitHub. The clone URL is – https://github.com/PerfectoMobileSA/PerfectoSampleProject
- Launch the IDE and check out the project from GitHub or Import in Eclipse.
- Need to download the appropriate Chrome driver as per the Chrome version which is installed in the device.
- Execute the LocalSelenium.java project as TestNG Test.
Conclusion:
Through this, “Selenium for Perfecto” article, we have discussed about complete and detailed overview of Perfecto Selenium Integration using Selenium WebDriver (Java). Also, we have learned to execute a sample project for Perfecto automation with the help of Perfecto mobile lab and automation capabilities. To learn more on Perfecto Automation, please click here.

Hi, I am K. Mondal, I am associated with a leading organization. I am having 12+ years of working experience across domains e.g., application development, automation testing, IT Consultant. I am very much interested in learning different technologies. I am here to fulfill my aspiration and currently contributing as an Author and Website Developer both in LambdaGeeks.
Lets Connect through LinkedIn-
