When Do LEDs Become Less Efficient in Terms of Lumen Depreciation?

when do leds become less efficient in terms of lumen depreciation

LEDs, like all light sources, experience a gradual decrease in light output over time due to a process called lumen depreciation. This phenomenon is influenced by various factors, including temperature, current, and product design. Understanding the mechanisms behind lumen depreciation and the industry standards used to measure it is crucial for assessing the long-term performance … Read more

Voltage vs Voltage Drop: A Comprehensive Guide for Electronics Students

voltage vs voltage drop

Voltage and voltage drop are fundamental concepts in electronics that are closely related but distinct. Understanding the nuances between these two terms is crucial for designing, analyzing, and troubleshooting electronic circuits. This comprehensive guide will delve into the technical details, providing a hands-on approach for electronics students to master the intricacies of voltage and voltage drop.

Understanding Voltage

Voltage, also known as electrical potential difference, is the force that drives the flow of electrons through a circuit. It is the measure of the potential energy difference between two points in an electrical system. Voltage is typically measured in volts (V), and it is the driving force that pushes the current through the circuit.

The voltage in a circuit can be generated by various sources, such as batteries, power supplies, or generators. These sources convert different forms of energy (chemical, mechanical, or electromagnetic) into electrical energy, which is then used to power the circuit.

The voltage in a circuit can be further classified into two types:

  1. Source Voltage: This is the voltage provided by the power source, such as a battery or power supply. It is the potential difference between the positive and negative terminals of the power source.

  2. Load Voltage: This is the voltage across the load or component in the circuit, such as a resistor or a motor. It is the potential difference between the two terminals of the load.

Understanding the relationship between source voltage and load voltage is crucial for analyzing and designing electronic circuits.

Voltage Drop Explained
voltage vs voltage drop

Voltage drop, on the other hand, is the reduction in voltage across a component or section of a circuit due to the flow of current. When current flows through a resistive element, such as a wire, a resistor, or a transistor, some of the energy is dissipated as heat, resulting in a decrease in the voltage across that element.

The voltage drop can be calculated using Ohm’s law, which states that the voltage drop (V) is equal to the product of the current (I) and the resistance (R) of the component or section of the circuit:

V = I × R

This means that the voltage drop is directly proportional to the current flowing through the circuit and the resistance of the component or section.

Voltage drop is an important consideration in electronic circuit design, as it can affect the performance and efficiency of the circuit. Excessive voltage drop can lead to reduced power delivery to the load, which can result in decreased performance or even component failure.

Factors Affecting Voltage Drop

Several factors can influence the voltage drop in a circuit, including:

  1. Resistance: The resistance of the components or wires in the circuit directly affects the voltage drop. Higher resistance leads to a greater voltage drop.

  2. Current: The amount of current flowing through the circuit also plays a crucial role. Higher current levels result in a larger voltage drop.

  3. Wire Length and Gauge: The length and gauge (thickness) of the wires in the circuit can impact the voltage drop. Longer and thinner wires have higher resistance, leading to a greater voltage drop.

  4. Temperature: The resistance of conductors can change with temperature, which can affect the voltage drop. Generally, as temperature increases, the resistance of the conductors increases, leading to a higher voltage drop.

  5. Inductive and Capacitive Effects: In circuits with inductive or capacitive components, the voltage drop can be influenced by the frequency of the signal and the reactance of these components.

Understanding these factors is essential for accurately calculating and predicting the voltage drop in a circuit, which is crucial for ensuring the proper operation and performance of electronic devices.

Measuring Voltage and Voltage Drop

Accurately measuring voltage and voltage drop is crucial for troubleshooting and analyzing electronic circuits. There are several methods and tools available for this purpose:

  1. Multimeter: A digital multimeter is the most common tool used to measure voltage and voltage drop. It can be used to measure the voltage across a component or the voltage drop across a section of the circuit.

  2. Oscilloscope: An oscilloscope is a powerful tool that can be used to visualize and measure the voltage waveforms in a circuit. It can provide detailed information about the voltage levels, waveform shapes, and voltage drop over time.

  3. Voltage Probes: Specialized voltage probes can be used in conjunction with a multimeter or oscilloscope to measure voltage and voltage drop at specific points in the circuit. These probes are designed to minimize the impact on the circuit under test.

  4. Voltage Divider Circuits: In some cases, a voltage divider circuit can be used to measure the voltage drop across a component or section of the circuit. By carefully designing the voltage divider, the voltage drop can be measured without significantly affecting the circuit operation.

When measuring voltage and voltage drop, it is important to consider the following best practices:

  • Ensure that the measurement device (multimeter, oscilloscope, etc.) is properly calibrated and connected to the circuit.
  • Avoid loading the circuit under test, as this can affect the voltage and voltage drop measurements.
  • Consider the input impedance of the measurement device and ensure it is high enough to minimize the impact on the circuit.
  • Carefully select the appropriate measurement range and settings on the measurement device to obtain accurate and reliable results.

By following these best practices, you can obtain accurate and reliable measurements of voltage and voltage drop, which are essential for understanding and troubleshooting electronic circuits.

Calculating Voltage Drop

As mentioned earlier, the voltage drop across a component or section of a circuit can be calculated using Ohm’s law:

V = I × R

Where:
– V is the voltage drop (in volts)
– I is the current flowing through the component or section (in amperes)
– R is the resistance of the component or section (in ohms)

Let’s consider a practical example to illustrate the calculation of voltage drop:

Suppose you have a circuit with a resistor of 10 ohms, and a current of 0.5 amps is flowing through it. Calculate the voltage drop across the resistor.

Using the Ohm’s law formula:
V = I × R
V = 0.5 A × 10 ohms
V = 5 volts

Therefore, the voltage drop across the 10-ohm resistor with a current of 0.5 amps is 5 volts.

It’s important to note that the voltage drop calculation can be more complex in circuits with multiple components, varying resistances, or non-linear elements. In such cases, you may need to use more advanced analysis techniques, such as Kirchhoff’s laws or network analysis methods.

Minimizing Voltage Drop

Minimizing voltage drop is crucial in electronic circuit design, as it can help improve the efficiency, performance, and reliability of the system. Here are some strategies for minimizing voltage drop:

  1. Reduce Resistance: Lowering the resistance of the components or wires in the circuit can significantly reduce the voltage drop. This can be achieved by using thicker wires, choosing components with lower resistance, or optimizing the circuit layout to minimize the length of the conductive paths.

  2. Increase Wire Gauge: Using thicker wires (higher gauge number) can reduce the resistance and, consequently, the voltage drop. This is particularly important in high-current circuits or long-distance power distribution.

  3. Optimize Circuit Layout: Carefully designing the circuit layout to minimize the length of the conductive paths can help reduce the overall resistance and voltage drop.

  4. Use Low-Resistance Components: Selecting components with low internal resistance, such as high-quality resistors, connectors, and switches, can help minimize the voltage drop.

  5. Employ Voltage Regulation: Incorporating voltage regulation circuits, such as linear regulators or switching regulators, can help maintain a stable output voltage despite changes in load or input voltage, effectively reducing the voltage drop.

  6. Implement Parallel Paths: Providing multiple parallel paths for the current to flow can distribute the current and reduce the voltage drop across individual components or sections of the circuit.

  7. Monitor and Maintain the Circuit: Regularly monitoring the voltage drop and maintaining the circuit components can help identify and address any issues that may contribute to excessive voltage drop over time.

By applying these strategies, you can effectively minimize the voltage drop in your electronic circuits, ensuring optimal performance, efficiency, and reliability.

Practical Applications and Considerations

Voltage and voltage drop are crucial concepts in a wide range of electronic applications, including:

  1. Power Distribution Systems: Accurate understanding of voltage drop is essential for designing efficient power distribution systems, such as those found in buildings, vehicles, or industrial facilities, to ensure proper voltage levels at the load.

  2. Electronic Circuits: Analyzing and managing voltage drop is crucial in the design of electronic circuits, from simple resistor-capacitor (RC) networks to complex digital and analog circuits, to ensure proper operation and prevent component damage.

  3. Automotive Electrical Systems: Automotive electrical systems rely heavily on the management of voltage and voltage drop, particularly in the context of battery charging, lighting, and other vehicle subsystems.

  4. Renewable Energy Systems: In renewable energy systems, such as solar photovoltaic or wind power, voltage drop analysis is essential for optimizing the power transmission and distribution infrastructure.

  5. Industrial Control Systems: Voltage drop is a critical consideration in industrial control systems, where accurate voltage levels are necessary for the proper operation of sensors, actuators, and other components.

When working with voltage and voltage drop in practical applications, it’s important to consider the following:

  • Safety: Ensure that all voltage and current measurements are performed safely, following appropriate safety protocols and using properly insulated tools and equipment.
  • Accuracy: Strive for accurate measurements and calculations to avoid design errors or operational issues.
  • Regulatory Compliance: Adhere to relevant electrical codes, standards, and regulations that may apply to your specific application or industry.
  • Thermal Management: Consider the thermal effects of voltage drop, as it can lead to power dissipation and heat generation, which may require additional cooling or thermal management strategies.
  • Dynamic Conditions: Be aware of the potential for voltage fluctuations or transients in the circuit, which can affect the voltage drop and the overall system performance.

By understanding the nuances of voltage and voltage drop, and applying the appropriate strategies and considerations, electronics students can develop the skills and knowledge necessary to design, analyze, and troubleshoot a wide range of electronic systems and circuits.

Conclusion

Voltage and voltage drop are fundamental concepts in electronics that are closely related but distinct. Understanding the relationship between these two terms is crucial for designing, analyzing, and troubleshooting electronic circuits.

In this comprehensive guide, we have explored the technical details of voltage and voltage drop, including their definitions, factors affecting voltage drop, measurement techniques, and calculation methods. We have also discussed strategies for minimizing voltage drop and the practical applications of these concepts in various electronic systems.

By mastering the intricacies of voltage and voltage drop, electronics students can develop the skills and knowledge necessary to design, analyze, and troubleshoot a wide range of electronic circuits and systems, ensuring their optimal performance, efficiency, and reliability.

References

  1. Semiconductor Engineering, “Is Your Voltage Drop Flow Obsolete?”, 2023-11-13, https://semiengineering.com/is-your-voltage-drop-flow-obsolete/
  2. Lectromec, “Determining Voltage Drop”, 2019-10-11, https://lectromec.com/determining-voltage-drop/
  3. Physics Stack Exchange, “I don’t understand what we really mean by voltage drop”, 2013-03-05, https://physics.stackexchange.com/questions/55948/i-dont-understand-what-we-really-mean-by-voltage-drop
  4. Electrical Engineering Stack Exchange, “What is the difference between voltage and voltage drop?”, 2015-06-24, https://electronics.stackexchange.com/questions/159524/what-is-the-difference-between-voltage-and-voltage-drop
  5. Texas Instruments, “Understanding Voltage Drop in Electrical Systems”, 2019, https://www.ti.com/lit/an/slva780/slva780.pdf

Mastering Voltage Divider in Series: A Comprehensive Guide

voltage divider in series

A voltage divider is a simple yet powerful circuit that allows you to reduce a high voltage to a lower one by using two resistors connected in series. This technique is widely used in electronics, from power supply design to sensor interfacing. In this comprehensive guide, we’ll dive deep into the intricacies of voltage divider in series, equipping you with the knowledge and tools to design and implement these circuits effectively.

Understanding the Basics of Voltage Divider in Series

A voltage divider in series consists of two resistors, R1 and R2, connected in series between the input voltage (Vin) and the ground. The output voltage (Vout) is taken from the junction between the two resistors. The formula to calculate the output voltage is:

Vout = Vin * (R2 / (R1 + R2))

where Vin is the input voltage, and R1 and R2 are the resistor values.

For example, if you have a 12V input voltage and you want to reduce it to 6V, you can use a voltage divider with R1 = 10kΩ and R2 = 10kΩ. The output voltage would be:

Vout = 12V * (10kΩ / (10kΩ + 10kΩ)) = 6V

Accounting for Load Current

voltage divider in series

One crucial factor to consider when using a voltage divider in series is the effect of load current. As the load current increases, the voltage drop across the resistors will also increase, causing the output voltage to decrease. To account for this, we can use the following formula:

Vout = Vin * (R2 / (R1 + R2)) * (1 - (Iload * R2 / (Vin + Iload * R1)))

where Iload is the load current.

For instance, if we have a 12V input voltage, a voltage divider with R1 = 10kΩ and R2 = 10kΩ, and a load current of 1mA, the output voltage would be:

Vout = 12V * (10kΩ / (10kΩ + 10kΩ)) * (1 - (0.001A * 10kΩ / (12V + 0.001A * 10kΩ))) = 5.88V

Choosing Resistor Values

When designing a voltage divider in series, it’s important to choose the resistor values carefully. Here are some key considerations:

  1. Resistance Ratio: The ratio of the two resistor values (R2/R1) determines the output voltage. A higher ratio will result in a lower output voltage.

  2. Power Rating: The resistors must be able to handle the power dissipated across them, which is given by the formula:

P = (Vin^2 * R2) / (R1 + R2)^2

Ensure that the power rating of the resistors is higher than the calculated power dissipation.

  1. Tolerance: Resistors with tight tolerances (e.g., 1% or 0.1%) should be used to ensure accurate voltage division. This is especially important when the voltage divider is used for precision measurements or sensitive circuits.

  2. Input Impedance: The input impedance of the voltage divider is the parallel combination of R1 and R2. This impedance should be high enough to avoid loading the source circuit and affecting the input voltage.

  3. Output Impedance: The output impedance of the voltage divider is the parallel combination of R1 and R2. This impedance should be low enough to drive the load circuit without significant voltage drop.

Advanced Considerations

  1. Temperature Effects: Resistor values can change with temperature, which can affect the output voltage of the voltage divider. Using resistors with a low temperature coefficient (TC) can help mitigate this issue.

  2. Noise and Stability: Voltage dividers can be susceptible to noise and instability, especially when used in sensitive analog circuits. Techniques like filtering, shielding, and grounding can help improve the noise performance.

  3. Voltage Regulation: In some applications, the output voltage of the voltage divider needs to be regulated against changes in the input voltage or load current. This can be achieved by using active voltage regulation circuits, such as op-amp-based regulators or switching regulators.

  4. Voltage Divider Cascading: Multiple voltage dividers can be cascaded to achieve larger voltage reduction ratios. However, this can introduce additional loading effects and complexity, so careful design is required.

  5. Voltage Divider Applications: Voltage dividers have a wide range of applications, including:

  6. Analog-to-digital converter (ADC) input conditioning
  7. Sensor signal conditioning
  8. Biasing circuits for amplifiers and transistors
  9. Adjustable power supply design
  10. Voltage monitoring and measurement

Practical Examples and Calculations

Let’s explore some practical examples of voltage divider in series circuits and the associated calculations.

Example 1: Reducing a 24V Supply to 12V

Suppose you have a 24V power supply and you need to reduce it to 12V for a specific circuit. You can use a voltage divider with the following resistor values:

  • R1 = 10kΩ
  • R2 = 10kΩ

The output voltage can be calculated as:

Vout = 24V * (10kΩ / (10kΩ + 10kΩ)) = 12V

Example 2: Voltage Divider with Load Current

Consider a voltage divider with the following parameters:

  • Vin = 15V
  • R1 = 20kΩ
  • R2 = 10kΩ
  • Iload = 1mA

The output voltage can be calculated as:

Vout = 15V * (10kΩ / (20kΩ + 10kΩ)) * (1 - (0.001A * 10kΩ / (15V + 0.001A * 20kΩ))) = 7.5V

Example 3: Cascaded Voltage Dividers

Suppose you need to reduce a 48V supply to 5V. You can use a cascaded voltage divider with the following resistor values:

  • R1 = 100kΩ
  • R2 = 20kΩ
  • R3 = 5kΩ

The output voltage can be calculated as:

Vout = 48V * (20kΩ / (100kΩ + 20kΩ)) * (5kΩ / (20kΩ + 5kΩ)) = 5V

Conclusion

Voltage divider in series is a fundamental and versatile circuit in electronics. By understanding the principles, formulas, and design considerations, you can effectively utilize voltage dividers to solve a wide range of problems, from power supply design to sensor interfacing. This comprehensive guide has provided you with the knowledge and tools to master voltage divider in series circuits and apply them in your electronic projects.

Reference:

  1. Voltage Dividers and Voltage Division Circuits – Electronics Tutorials: https://www.electronics-tutorials.ws/dccircuits/voltage-divider.html
  2. Resistor in series, or voltage divider? – Electronics Stack Exchange: https://electronics.stackexchange.com/questions/632528/resistor-in-series-or-voltage-divider
  3. Measure 20V without Voltage Dividers! – Arduino Forum: https://forum.arduino.cc/t/measure-20v-without-voltage-dividers/900767

Center Tap Transformer: A Comprehensive Guide for Electronics Students

center tap transformer

A center-tapped transformer is a specialized type of transformer that provides two separate voltage outputs, each referenced to a common ground point. This unique design allows for a wide range of applications in electronics, power distribution, and various other industries. In this comprehensive guide, we will delve into the technical details, testing procedures, and practical considerations of center-tapped transformers, equipping electronics students with the knowledge to effectively utilize these versatile devices.

Understanding the Center-Tapped Transformer

A center-tapped transformer is characterized by the addition of a third connection to the secondary winding, which is connected to a point halfway along the winding. This configuration allows the transformer to produce two separate voltage outputs, each referenced to the common center tap. The turns ratio of a center-tapped transformer is typically expressed as a single number, with the center tap considered as a single point.

For example, if the primary winding has twice as many turns as the secondary winding, the turns ratio would be expressed as 2:1, even though there are technically three points of connection on the secondary winding.

Testing a Center-Tapped Transformer

center tap transformer

When it comes to testing a center-tapped transformer, there are several key measurements that can be taken to ensure its proper functioning:

  1. Voltage Measurement: Measure the voltage between the center tap and one of the secondary windings, and then measure the voltage between the center tap and the other secondary winding. Both of these measurements should be equal, indicating that the transformer is balanced and providing equal voltage outputs.

  2. Current Measurement: Measure the current draw on each of the secondary windings. Ideally, the current draw should be evenly balanced between the two windings, indicating that the load is evenly distributed across both voltage outputs. However, slight imbalances in current draw may occur, particularly if the load is not perfectly balanced.

  3. Winding Resistance Measurement: Measure the resistance of each secondary winding, as well as the resistance between the center tap and each secondary winding. These measurements can help identify any issues with the transformer’s internal wiring or connections.

  4. Insulation Resistance Measurement: Measure the insulation resistance between the primary winding, secondary windings, and the transformer’s core. This can help detect any potential insulation breakdown or leakage issues.

  5. Transformer Turns Ratio Test: Measure the turns ratio between the primary and secondary windings to ensure it matches the expected value. This can be done using a specialized turns ratio tester or by calculating the ratio based on the measured voltages.

By performing these tests, electronics students can thoroughly evaluate the performance and condition of a center-tapped transformer, ensuring its safe and reliable operation.

Technical Specifications of Center-Tapped Transformers

When working with center-tapped transformers, it is important to consider the following technical specifications:

  1. Rated Voltage Output: This is typically expressed as a single value for the entire transformer, rather than for each individual secondary winding.

  2. Rated Current Output: This is usually expressed as a separate value for each secondary winding, as the current draw may not be evenly distributed.

  3. Transformer Efficiency: The efficiency of a center-tapped transformer, which is the ratio of the output power to the input power, can vary depending on the transformer’s design and operating conditions.

  4. Power Factor: The power factor of a center-tapped transformer is the ratio of the real power to the apparent power, and it can impact the overall efficiency and performance of the transformer.

  5. Temperature Rise Characteristics: The transformer’s ability to dissipate heat and maintain safe operating temperatures is an important consideration, especially in high-power applications.

  6. Insulation Class: The insulation class of a center-tapped transformer indicates the maximum operating temperature the insulation can withstand without degradation.

  7. Impedance: The impedance of a center-tapped transformer, which is the ratio of the voltage to the current, can affect the voltage regulation and load-handling capabilities of the transformer.

Understanding these technical specifications is crucial for electronics students when selecting, designing, and implementing center-tapped transformers in their projects.

Theoretical Explanation of Center-Tapped Transformer Operation

The operation of a center-tapped transformer can be explained using the principles of electromagnetic induction. When an alternating current is passed through the primary winding, it creates a magnetic field that induces a voltage in the secondary windings. By adding a center tap to the secondary winding, this voltage can be split into two separate outputs, each referenced to the common ground point.

The voltage induced in each half of the secondary winding is proportional to the number of turns in that half-winding. The center tap, being the midpoint of the secondary winding, provides a reference point for the two output voltages, which are typically equal in magnitude but opposite in polarity.

This configuration allows the center-tapped transformer to provide two separate voltage outputs, which can be used in a variety of applications, such as:

  1. Dual-Voltage Power Supplies: Center-tapped transformers are commonly used in power supply circuits to generate both positive and negative voltage rails, which are essential for powering various electronic components and circuits.

  2. Audio Amplifiers: In audio applications, center-tapped transformers are used to provide the necessary voltage for the output stage of push-pull amplifier circuits, ensuring balanced and efficient power delivery to the speakers.

  3. Welding Transformers: Center-tapped transformers are often used in welding equipment, where the two secondary windings can be connected in series to provide a higher voltage for the welding process, or in parallel to provide a higher current output.

  4. Voltage Regulation: Center-tapped transformers can be used in voltage regulation circuits, where the center tap is used as a reference point to maintain a stable output voltage despite fluctuations in the input voltage or load conditions.

Understanding the theoretical principles behind the operation of center-tapped transformers is essential for electronics students to design, analyze, and troubleshoot these devices effectively.

Considerations and Limitations of Center-Tapped Transformers

While center-tapped transformers offer several advantages, there are also some important considerations and limitations to keep in mind:

  1. Overloading: If too much current is drawn from one of the secondary windings, it can cause the transformer to overheat and potentially fail. To prevent this, it is crucial to ensure that the load is evenly distributed across both secondary windings and that the transformer is not operated beyond its rated current output.

  2. Voltage Imbalance: In some cases, the voltages across the two secondary windings may not be perfectly balanced, leading to unequal voltage outputs. This can be caused by factors such as winding asymmetry, core saturation, or uneven load distribution.

  3. Harmonic Distortion: The center-tapped configuration can introduce harmonic distortion in the output voltages, particularly if the load is non-linear or unbalanced. This can be mitigated by using appropriate filtering or balancing techniques.

  4. Efficiency Considerations: Center-tapped transformers may have slightly lower efficiency compared to other transformer configurations, due to the additional winding and the potential for uneven load distribution.

  5. Size and Weight: The center-tapped design can result in a larger and heavier transformer compared to single-winding transformers, which may be a consideration in applications with size and weight constraints.

  6. Grounding Considerations: The center tap of the secondary winding is typically connected to ground, which can have implications for the grounding scheme of the overall system.

Electronics students should be aware of these considerations and limitations when designing, selecting, and implementing center-tapped transformers in their projects, ensuring safe and reliable operation.

Practical Applications of Center-Tapped Transformers

Center-tapped transformers find a wide range of applications in various fields of electronics and electrical engineering, including:

  1. Power Supplies: As mentioned earlier, center-tapped transformers are commonly used in power supply circuits to generate both positive and negative voltage rails, which are essential for powering various electronic components and circuits.

  2. Audio Amplifiers: In audio applications, center-tapped transformers are used to provide the necessary voltage for the output stage of push-pull amplifier circuits, ensuring balanced and efficient power delivery to the speakers.

  3. Welding Equipment: Center-tapped transformers are often used in welding equipment, where the two secondary windings can be connected in series to provide a higher voltage for the welding process, or in parallel to provide a higher current output.

  4. Voltage Regulation: Center-tapped transformers can be used in voltage regulation circuits, where the center tap is used as a reference point to maintain a stable output voltage despite fluctuations in the input voltage or load conditions.

  5. Instrumentation and Measurement: Center-tapped transformers can be used in various instrumentation and measurement applications, such as current transformers, potential transformers, and isolation transformers, where the center tap provides a reference point for accurate measurements.

  6. Industrial Control Systems: Center-tapped transformers are employed in industrial control systems, where they are used to provide the necessary voltage and current levels for various control and monitoring components.

  7. Telecommunications: In telecommunications applications, center-tapped transformers are used for signal coupling, impedance matching, and isolation purposes, ensuring the reliable transmission of data and communication signals.

  8. Lighting and Heating Systems: Center-tapped transformers can be found in lighting and heating systems, where they are used to provide the appropriate voltage and current levels for various lighting fixtures, heating elements, and control circuits.

By understanding the capabilities and limitations of center-tapped transformers, electronics students can effectively incorporate these devices into a wide range of practical applications, contributing to the development of innovative and efficient electronic systems.

Conclusion

Center-tapped transformers are a versatile and essential component in the world of electronics and electrical engineering. This comprehensive guide has provided electronics students with a deep understanding of the technical details, testing procedures, and practical applications of these transformers.

By mastering the concepts and principles covered in this article, electronics students will be well-equipped to design, analyze, and troubleshoot center-tapped transformers in their projects, ensuring the safe and reliable operation of their electronic systems.

Remember, the key to success in working with center-tapped transformers lies in a thorough understanding of their technical specifications, testing methodologies, and practical considerations. Continuous learning and hands-on experience will further solidify your expertise in this field, empowering you to tackle even the most complex challenges in the world of electronics.

References:
– Center Tapped Transformer and 120/240 Volt Secondary Models. (n.d.). Retrieved from https://www.researchgate.net/publication/4335452_Center_Tapped_Transformer_and_120240_Volt_Secondary_Models
– center tapped transformer – NI Community – National Instruments. (2016, May 14). Retrieved from https://forums.ni.com/t5/Multisim-and-Ultiboard/center-tapped-transformer/td-p/3295430
– Help understanding current draw from center tapped transformer. (2016, July 8). Retrieved from https://www.eevblog.com/forum/beginners/help-understanding-current-draw-from-center-tapped-transformer/
– How to test center-tap transformer. (2006, July 25). Retrieved from https://www.edaboard.com/threads/how-to-test-center-tap-transformer.70548/
– Center Tapped Delta Transformer 5% Limitation – Mike Holt’s Forum. (2020, May 27). Retrieved from https://forums.mikeholt.com/threads/center-tapped-delta-transformer-5-limitation.2554009/
– Transformer – Electrical Engineering Tutorials. (n.d.). Retrieved from https://www.electrical4u.com/transformer/
– Center-Tapped Transformers – All About Circuits. (n.d.). Retrieved from https://www.allaboutcircuits.com/textbook/alternating-current/chpt-10/center-tapped-transformers/
– Transformer – Wikipedia. (n.d.). Retrieved from https://en.wikipedia.org/wiki/Transformer

The Crucial Role of Logic Gates in Secure Systems: A Comprehensive Exploration

logic gates role in security systems

Logic gates play a pivotal role in the design and implementation of secure systems, serving as the fundamental building blocks for a wide range of security-critical applications. From access control and alarm systems to cryptographic algorithms and fault-tolerant architectures, logic gates are the unsung heroes that ensure the reliability, efficiency, and robustness of modern security … Read more

9+ Pressure Drag Example: Detailed facts

220px Flow sphere.svg 1 150x150 1

In this article we will discuss about different Pressure Drag Examples. The pressure drag depends on the cross sectional area of the body rather than the surface area exposed.

Pressure Drag Examples are frequently seen in our daily life. Pressure drag occurs due to the increased pressure on the front end and decreased pressure on the rear end of an object while travelling through a fluid.

Different examples of pressure drag are listed below:

  1. A spherical shaped body moving through air
  2. A bicycle
  3. Swimmers
  4. A cylindrical body
  5. A moving car
  6. An airfoil or aerofoil with large angle of attack
  7. A moving truck
  8. A skydiver falling through the sky
  9. A boat travelling in water
  10. A piece of brick

Pressure drag is also caused by stationary object around which fluid medium passes. Streamlining reduces the Pressure Drag.

A spherical shaped body moving through air

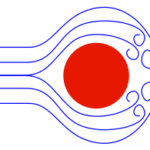
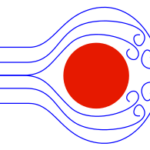
A spherical shaped body experience high pressure drag while moving through a fluid due to its shape. The more surface area the more air particles will hit and greater the resistance experienced by the body.

Due to the boundary layer separation in case of a spherical body low pressure wake is formed behind the body.

pressure drag example
Wind drag applied on a particular shape; Image Credit: Wikipedia

A bicycle

Aerodynamic drag is indeed a major resistive force in cycling, every bicyclist has to overcome the wind resistance. Pressure drag plays a major role in cycling, mainly caused by the air particles push together on the front facing surfaces and more spaced out on the back surfaces creating a vast pressure difference between front and back ends.

Every cyclist who has ever pedalled into a stiff headwind knows about wind resistance. It’s exhausting! In order to move forward, the cyclist must push through the mass of air in front of him.

download 1 5
Cyclist; Image credi: Wikipedia

Swimmers

Different forms of drag forces like friction, pressure and wave drag continuously act on a swimmer as he steps down in the pool to their final touch at the wall. Frictional drag occurs as a result of rubbing of water molecules with the body of the swimmer, a smoother body of the swimmer reduces friction to some extent.

While swimming at higher speed, there is an increase in pressure in the frontal region (head of the swimmer) creating a pressure difference between the two ends of the swimmer’s body. This difference in pressure generates turbulence behind the swimmer’s body, this extra resistance force is the pressure drag.

Wave drag occurs as a result of the swimmer’s body submerged in the water and partly out of the water. All the wave drag force is generated from the head and shoulder portion of swimmer’s body.

download 5 2
Swimmer; Image credi: Unsplash

A cylindrical body

A cylindrical body is an example of bluff body that means high pressure drag is created due to its shape. A bluff body is a body whose surface is not aligned with the streamlines whenever it is placed in a flow of air or liquid.

A cylinder offers less resistance in terms of frictional drag but a offers a large pressure drag due to the eddy formation after the body moves through a large wake region. 

A moving car

In case of a moving car, the magnitude of drag force is equal and acting in an opposite direction to the force that the engine creates at the wheels of the vehicle. Due to these two equal and opposite forces acting on the car, the net resulting force becomes zero and the car can maintain a constant speed.

If the we make the force produced by the engine zero by keeping the car in a neutral position for a while then only drag force acts on the car. At this condition, the net force is available on the car and the car decelerates.

Pressure drag comes from the eddying motions that are set up in the fluid by the passage of a body. The drag is associated with the formation of a wake in the flow.

A truck with flat frontal area experiences high air resistance than a sports car with streamlined body.

download 11
A moving car; Image Credit: Wikipedia

An aerofoil with large angle of attack

A flow which experiences an increased pressure is known as flow in adverse pressure gradient. After following this condition far enough boundary layer separates from the surface and creates eddies and vortices behind the body. As a result pressure drag increases(due to vast pressure differential between two ends) and lift decreases.

In case of an aerofoil with higher angle of attack, the adverse pressure gradient on the top rear portion produces a separated flow. Due to this separation, wake size increases and pressure loss occurs due to eddy formation. As a result pressure drag increases.

At a higher angle of attack, a large fraction of the flow above the top of the aerofoil may be separated, at this point pressure drag is higher than the viscous drag.

download 7 2
Airflow separating from a wing at a high angle of attack; Image Credit: Wikipedia

A moving truck

In case of a commercial truck the pressure drag or form drag is quite high due to the larger frontal cross sectional area. Pressure drag produced is greatly influenced by the shape and size of the object.

Bodies with a larger presented cross section experiences higher drag than thinner or streamlined objects.

Pressure drag follows the drag equation that it increases with the square of the speed and thus plays a great role for high speed vehicles.

The performance and fuel efficiency of a vehicle depends on two aerodynamic forces pressure drag and skin friction drag. An effort is always given to shape a body with less drag.

download 8 1
A Truck; Image Credit: Wikipedia

A skydiver falling through the sky

When a skydiver jumps from the airplane both air resistance or drag and gravitational force act on his body. Gravitational force remains constant but the air resistance increases with increase in earthbound velocity.

The force of the air particles striking the body can be changed by altering his body position (the cross sectional area of the body). This changes the velocity of the skydiver towards the earth.

The drag(resistance) force experienced by the body can be represented by the following formula:

R=0.5\\times D\\times p\\times A\\times v^{2}

Where D is the drag coefficient,

p is the density of the medium, in this case air,

 A is the cross-sectional area of the object, and

 v is velocity of the object.

download 3 5
Skydiver; Image Credit: Wikipedia

A boat travelling in water

When a boat passes through a fluid medium eddying motion set behind the body which results in pressure drag. This drag is associated with wake formation which can be observed behind a passing boat.

In comparison to friction drag, pressure drag is less sensitive to Reynolds number. Pressure drag is important for separated flows.

This drag force can be observed in the form of a wake seen behind a passing boat.

download 9 1
Wake formation behind a boat; Image Credit: Unsplash

A piece of brick

A piece of brick due to its bluff body like structure experiences high pressure drag when moves through a fluid.

For a bluff body dominant source of drag is pressure drag and always depend on the cross sectional area.

11+ Drag Force Example: Detailed facts

300px Points of sail close hauled right and down wind left 150x150 1

In this article, we will discuss different examples of drag Forces with detailed insights. Drag Forces are mechanical forces generated due to the interaction of a solid body with its surrounding fluid.

Drag Force Examples are very common and frequently seen in nature as the force acting opposite to the relative motion of any moving body. Whenever a body moves through air this resistive force is called aerodynamic drag and if the travelling medium is water, then it is known as hydrodynamic drag.

Drag Force Examples are listed below

A boat travelling in water

Forces on a boat result from motion of air which interact with the boat and results a motive power for sailing in water. The forces acting on the boat depend on wind speed and direction as well as the speed and direction of the craft.

Four forces act on the boat: its weight, the buoyant force (the contact force with the water that pushes the boat up), the forward force of the wind, and the backward drag of the water.

The drag force D experienced by a body while travelling through a fluid is given by,

D=\\frac{1}{2}C\\rho Av^{2}

Where:

C is the drag coefficient, typical values ranging from 0.4 to 1.0 for different fluids (such as air and water)

ρ is the density of the fluid through which the body is moving

v is the speed of the body relative to the fluid

A is the projected cross-sectional area of the body perpendicular to the flow direction .

drag force example
A sailing boat; Image credit: Wikipedia

An aeroplane flying in the sky

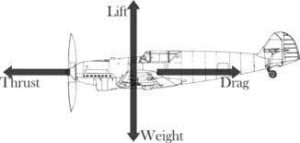
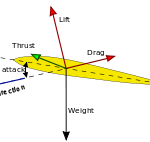
The combined outcome of four forces drag, thrust, lift and weight make it possible to fly an aeroplane in the sky.

 The weight of the aeroplane pulls it towards the centre of the earth, to overcome this pulling force enough lift in upward direction is required. Lift is the result of differences in air pressure on and above the aeroplane wings. Aeroplane engine produces thrust in the direction of motion of the plane which is balanced by the drag force acting opposite to the direction of motion.

When an airplane is flying straight and level at a constant speed, the lift it produces balances its weight, and the thrust it produces balances its drag. However, this balance of forces changes as the airplane rises and descends, as it speeds up and slows down, and as it turns.

download 6 1
Forces acting on an aeroplane in a steady level longitudinal flight ; Image Credit: Wikipedia

A bird flying in the sky

Flapping wings by bird is one of the widespread propulsion methods available in nature.

In case of a bird, the lift that is generated by flapping the wings can be considered as a vertical force that supports the weight of the bird’s body (i.e. downward gravitational pull). Here drag is considered as the horizontal force that opposes thrust. Thrust is the force that moves the object in the forward direction, for a bird the trust is provided by the muscles of the bird.

Drag is caused by air resistance and acts in the opposite direction of motion, drag produced depends on the shape of the object, density of air and the moving speed of that object. Thrust can either overcome or counteract the drag force.

During forward flight, a bird’s body generates drag that tends to decelerate its speed. By flapping its wings, or by converting potential energy into work if gliding, the bird produces both lift and thrust to balance the pull of gravity and drag

220px Lift force en.svg
Forces acting on a wing; Image credit: Wikipedia

A moving car

In case of a moving car, the magnitude of drag force is equal and acting in an opposite direction to the force that the engine creates at the wheels of the vehicle. Due to these two equal and opposite forces acting on the car, the net resulting force becomes zero and the car can maintain a constant speed.

If the we make the force produced by the engine zero by keeping the car in a neutral position for a while then only drag force acts on the car. At this condition, the net force is available on the car and the car decelerates.

Riding a bicycle or bike

Aerodynamic drag is indeed a major resistive force in cycling, every bicyclist has to overcome the wind resistance. Pressure drag plays a major role in cycling, mainly caused by the air particles push together on the front facing surfaces and more spaced out on the back surfaces

Every cyclist who has ever pedaled into a stiff headwind knows about wind resistance. It’s exhausting! In order to move forward, the cyclist must push through the mass of air in front of him.

Bike

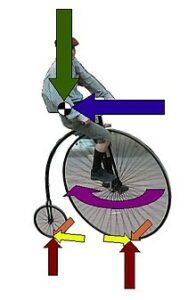
Bicycles and motorcycles are both single-track vehicles and so their motions have many fundamental attributes in common. If we consider the biker and the bike as a single system the external forces acting are: drag force, gravitational force, inertia, frictional force from the ground and internal forces are caused by the rider.

220px Bike external forces
Dynamics of a biker; Image Credit: Wikipedia

Parachute

The drag force acts on a parachute depends on the size of the parachute, larger the parachute higher will be the drag force acting on it.

The two forces acting on a parachute are drag force or air resistance and the gravitational force. Drag force acts in the opposite direction of gravitational force and slows down the parachute whenever it falls.

Paragliding 1350361
Parachute; Image Credit: Wikipedia

A skydiver falling through the sky

When a skydiver jumps from the airplane both air resistance or drag and gravitational force act on his body. Gravitational force remains constant but the air resistance increases with increase in earthbound velocity.

The force of the air particles striking the body can be changed by altering his body position (the cross sectional area of the body). This changes the velocity of the skydiver towards the earth.

The drag(resistance) force experienced by the body can be represented by the following formula:

R=0.5\\times D\\times p\\times A\\times v^{2}

Where D is the drag coefficient,

p is the density of the medium, in this case air,

 A is the cross-sectional area of the object, and

 v is velocity of the object.

download 2 2
Skidiving; Image Credit: Wikipedia

Motion of an arrows and frisbee

Trajectory of an arrow is influenced by three forces: a) force of acceleration from the bow towards the target, b) force of acceleration towards the earth due to gravitational force, and c) force of deceleration due to aerodynamic drag on the arrow.

The bow string force accelerates the arrow from the bow until the arrow reaches the launch velocity, drag force slows down its velocity as the arrow moves through the air. Finally the gravitational force brings back the arrow to the earth surface.

Large forces result in acceleration but heavy masses are very hard to accelerate or decelerate. Therefore, a lighter arrow leaves the bow at faster speed and loses velocity faster during the flight.

Runners  

When the runners run the “wind” they experience pushing against them is actually the force of drag. In case of a runner or swimmer the drag force is always acting against the motion, trying to slows down their motion. To overcome the drag a runner has to move fast to make the running forward. In other words more thrust should be produced by the body.

Swimmers

Different forms of drag forces like friction, pressure and wave drag continuously act on a swimmer as he steps down in the pool to their final touch at the wall. Frictional drag occurs as a result of rubbing of water molecules with the body of the swimmer, a smoother body of the swimmer reduces friction to some extent.

While swimming at higher speed, there is an increase in pressure in the frontal region (head of the swimmer) creating a pressure difference between the two ends of the swimmer’s body. This difference in pressure generates turbulence behind the swimmer’s body, this extra resistance force is the pressure drag.

Wave drag occurs as a result of the swimmer’s body submerged in the water and partly out of the water. All the wave drag force is generated from the head and shoulder portion of swimmer’s body.

Motion of balls

As the ball moves through air, Drag will resist the motion of the ball during its flight, and will reduce its range and height, at the same time crosswinds will deflect it from its original path. Both the effects are considered by the players in sports like golf.

A bouncing ball generally follows projectile motion, different forces act on a ball are drag force, gravitational force, magnus force due to ball’s spin and buoyant force, all the forces have to be considered to analyze ball’s motion.

In general, there are many factors that affect the magnitude of the drag force including the shape and size of the ball, the square of the velocity of the object, and conditions of the air; particularly, the density and viscosity of the air. Determining the magnitude of the drag force is difficult because it depends on the details of how the flow interacts with the surface of the object. For a soccer ball, this is particularly difficult because stitches are used to hold the ball together.

download 4 2
Bouncing Ball; Image Credit: Wikipedia

Read more about  Is Air Resistance A Force.

ESD Protection for Logic Gates: A Comprehensive Guide

esd protection for logic gates

ESD (Electrostatic Discharge) protection for logic gates is a critical aspect of electronic system design, ensuring the reliability and longevity of these crucial components. This comprehensive guide delves into the intricacies of ESD protection, providing a deep understanding of the ESD threat, its impact on electronic systems, and the methods employed to safeguard logic gates … Read more

Is it Safe to Operate a Zener Diode Beyond its Breakdown Voltage? Exploring the Risks and Consequences

is it safe to operate a zener diode beyond its breakdown voltage exploring the risks and consequences

Operating a zener diode beyond its breakdown voltage can lead to several risks and consequences, including increased current flow, decreased accuracy, and potential safety hazards. Understanding the proper operation of zener diodes is crucial for ensuring the reliability and safety of electronic circuits. Understanding Zener Diode Operation A zener diode is a type of semiconductor … Read more

What Components Typically Make Up an Analog HPF: A Comprehensive Guide

what components typically make up an analog hpf a comprehensive guide

Analog High-Pass Filters (HPFs) are electronic circuits that allow high-frequency signals to pass through while blocking low-frequency signals. They are commonly used in various applications, such as audio signal processing, radio communication, and instrumentation. The components that typically make up an analog HPF include resistors, capacitors, and operational amplifiers (op-amps). This comprehensive guide will provide … Read more