TOSCA Commander & Tosca User Management:Complete Guide!

tosca commander project

TOSCA Tutorial – Table of Content

The entire Tosca Tutorial has been covered through twelve articles which are specified in the below table of content. The “Overview of Tosca Commander” article has been written in simple languages and concepts are explained with images so that any entry level tester can learn the process in a quick time.

Through out this Tosca Commander & Tosca User Management article , we will explain about the overview of different components available in Tosca Commander along with Tosca user management – create, update, deactivate user. To get prepared for the Tosca interviews, please click here.

Tosca Commander

What is TOSCA Commander?

The primary component of this tool is the TOSCA commander which is used to test case development, maintenance and execution. The core features of the Tosca Commander are specified below – 

  • Tosca User management to add, edit, remove users
  • Scan applications to create modules
  • Creation of reusable library
  • Creation of test cases
  • Parameterization of Test Data using TCP, TCD, TDM, TDS
  • Maintenance of test cases
  • Managing of Test execution

Now, we are going to briefly discuss different options available in Tosca Commander which are used frequently for different automation activities:-

PROJECT: 

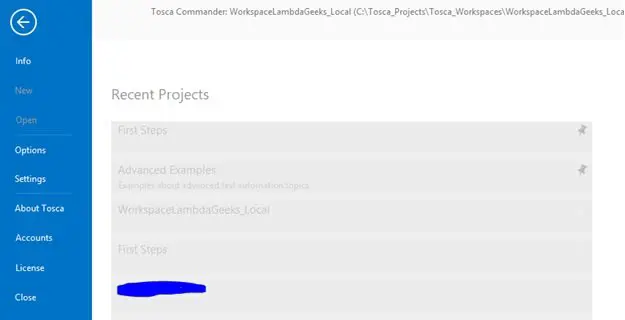
  • Info – It provides the details about the workspace.
  • New – It is used for creating a new workspace.
  • Open – We can open any existing workspace through this option.
  • Settings – We can view/change the configurations of different Tosca components.
  • Accounts  – We can log in to Tosca cloud through this option.
  • License – We can configure the license through this instead of using License wizard.
tosca commander - project
tosca commander – project

HOME: 

  • Search – We can search for any components which are available in Tosca workspace.
  • Project – We can view the hierarchy of different Tosca components or sections.
  • Scratch book – We can view the scratch book where the temporary execution logs are stored.
  • Sections – We can open any particular section.
  • Update all – If the workspace is connected with the common repository, we can sync the local copy of workspace with the common repository.
  • Checkin all – Commit/push any changes which are done in the local workspace into the common repository.
  • Checkout – Lock/reserve any particular root folder or components for an update. Through the checkout process, we can prevent other users from working on the same component.
  • Checkout Tree – It will check out all the child components available within the selected folder.
  • Import Subset – It is used to import any other subset or backup copy of workspaces.
  • Export – We can export the workspace copy as a subset/ backup.
  • Exploratory Testing – We can start the exploratory testing feature of Tosca Commander for scenario recording for testing or training purpose.
  • Manual Testcase – It’s used to create manual test cases.
  • Automated Test Case – It’s used to create automated test cases through recording.
tosca commander - home
tosca commander – home

TOOLS: 

Buffer Views – We can view the buffers which are created in the workspace. 

tosca commander - tools
tosca commander – tools

TEST CASES: 

The options available in these tabs are used for creating different components of test cases.

tosca commander - test cases
tosca commander – test cases

Create Folder –

It’s used to create any folder.

Run in Scratchbook –

We can execute any or part of test cases in the scratch book.  

API TESTING:

All the API Testing related options are available here. Please refer the API Testing section to learn more.

tosca commander - api testing
tosca commander – api testing

Sections of Tosca Commander: 

We are now going to understand the overview of different sections of the Tosca Commander, which are frequently used for test automation. Here all the sections have three parts –

  • Left position – Navigation/Hierarchy of folder/components 
  • Central position – Details of each selected folder/components, Test configuration (if applicable)
  • Right position – Properties of each selected folders or components.

Components of Tosca Commander:

We will discuss more on the important sections in the related topics of this tutorial.

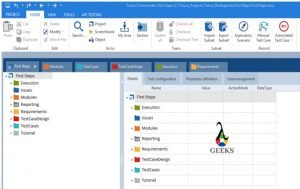
Project – It provides the hierarchy view of the different folders/ components, available in the workspace. 
tosca commander - project section
Project Section of Tosca Commander

Module – Modules (AUT objects map) are stored here.

tosca commander - module section
Module Section of Tosca Commander

Testcase – Technical components of any test cases are saved here. 

tosca commander - testcase section
TestCase Section of Tosca Commander

TestCaseDesign – The test data which are required to execute any specific test case, can be kept in TestCaseDesign section. This approach helps to manage test data in efficient and dynamic way. Also the technical components and test data can be isolated through this section.

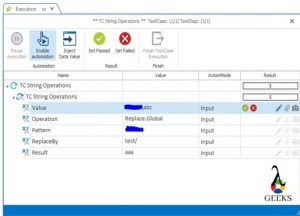
Execution – Test execution management can be done through this section. We can define execution list, trigger execution and analyzing the execution logs to investigate any issues.
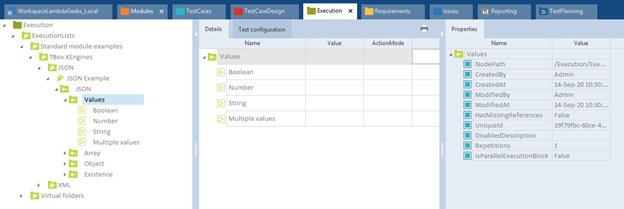
tosca commander - execution section
Execution Section of Tosca Commander

Requirements – Requirements related information is stored here. 
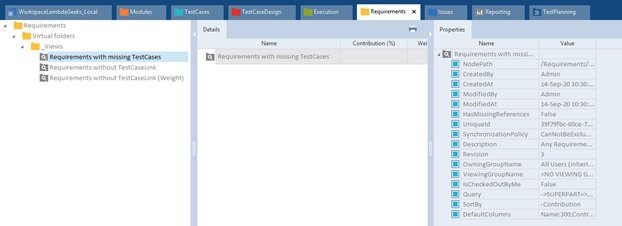
tosca commander - requirements section
tosca commander – requirements section

Issues – This section is used to maintain/ track any execution issues or bugs. Basically, defect management can be done through these options.

Reporting – Different kinds of standard or custom reports are stored here such as functionality coverage, execution status, requirement, bug status etc.

Test Planning – Plan and track all the testing activities as we work in Tricentis Tosca.

TOSCA User Management

In a Multiuser environment, the workspace data are stored in a central databases which is known as Common Repository. Multiple users should have the access to this repository. Here, Tosca User Management come into the picture to manages the users who are going to work with this workspace. The administrator has the rights to create, edit, delete any users. Also, access role can be defined for security purposes. To update data (modules, testcases, TDM, etc), first of all, user has to check out the component to restrict any other users to access it. After finishing the update, user has to check in the component to sync the update with the repository.

So, to connect the common repository, we need to provide access to each of the user .i.e. the administrator has to create individual users.

The below activities can be performed as a part of Tosca User management: 

  • · Create, activate user and assign groups.
  • · Assignment of roles.
  • · Deactivating users.
  • · Password reset.

Creating and activating user: 

Administrator has to follow the below steps to create and activate user – 

  • Step1# Open the project window via Home->Project.
  • Step2# Checkout root folder and switch to the Tosca User management tab. This shows all the user groups available with in the workspace.
  • Step3# Right-click on any of the user group and click on Create User icon and enter details to create the user.
  • Step4# Check the checkbox available in Enable column to activate the user. 
  • Step5# drag and drop the user in a different group to assign a different role. Also, we can change the user level.

Deactivating users: 

Uncheck the checkbox available in Enable column to deactivate any user.

Password Reset: 

Right-click on any user and click on Set Password option to create/update password.

tosca user management
Tosca User Management Section

Conclusion

Through out this “Tosca Commander and User Management” article of Tricentis Tosca Tutorial, we have explained about Tosca Commander and Tosca User Management approach which will going to help to develop the test case. Please click here to learn from Tricentis Support portal.
Tosca Workspace:Creation And Complete Guide

tosca workspace creation initial wizard

TOSCA Tutorial – Table of Content

While writing the “Tosca Workspace Creation” tutorial, we have used simple explanation so that entry level tester can understand the concepts easily. The entire Tosca tutorial is broken into below articles –

In this Tosca Workspace Creation article , we will discuss about step by step procedure to create Tosca workspace to start our hands on Tosca Automation activities. If you want to prepare for TOSCA Interview Questions, please click here.

TOSCA Workspace Creation

About Tosca Workspace

The Tosca workspace is acted as a repository of requirements, test cases, modules, and other components of Tosca. To develop, maintain or execute the test cases, we need to connect the workspace first. Otherwise, we will not be able to perform any automation activities. Workspace is created in the local drive. The workspace has to be defined in local work system. But it can also be defined in shared network drive. The data of the Tosca workspace, can be synched with different databases (SqlLite, SqlServer, DB2, Oracle) which an be acted as a central repository.

In a multiuser environment, i.e. more than one users are accessing the tool, the Tosca workspace has to created in central repositories. Tosca allows to create the workspace in different databases such as Oracle, SqlLite, DB2, SQLServer etc.

In a Singleuser Workspace, only one user is able to connect and work with Tosca. So, the central repository is not required here.

In the Multiuser Workspace, the data management is more simple and easier as the data are stored in shared databases which are known as common repositories. To perform any transaction (add, edit, delete) in a multiuser workspace, we need to lock the corresponding records first. It will restrict any other users to manipulate the same records. After completion of the transaction, w need to unlock the records. In Tosca, locking of data is know as check out and unlock is known as check in.

Common Repository Location Types: 

There are six different location types available to create a common repository for multiuser workspace. Those are – 

  • 1.     None – It’s applicable for single user workspace, i.e. no common repository is required.
  • 2.     Tricentis Cloud Repository – If we select this option, then the repository will be created in Tricentis hosted cloud server. To create this type of workspace, we need to login to Tricentis cloud during workspace creation.
  • 3.     SQLite – In this case, the repository will be created SQLite database. During the creatin, we need to specify 
  • the SQLite path and the repository name(only for creation) during the creation of workspace.
  • 4.     Oracle -Here, the repository has to be created in Oracle database. While creating the repository, we need to specify the Oracle schema name(optional) and the connection string  during the Tosca workspace creation.
  • 5.     MS SQL Server – In this case, the repository will be created SQL Server database. During the creatin, we need to specify the database schema name(optional) and the connection string during the creation of workspace.
  • 6.     DB2 – In this case, the repository will be created the DB2 database. During the creatin, we need to specify the database schema name(optional) and the connection string 
  • during the creation of workspace.

Note: After creating of the common Tosca repository, we need to access the workspace using the default user “Admin” with empty password. But while connecting the existing common repository, the user credential should have created prior to the creation of local workspace by the Admin. Also, to work with databases, the corresponding database driver should be installed.

Steps to Create Tosca Workspace:

  • 1. Open the Tosca Commander. 
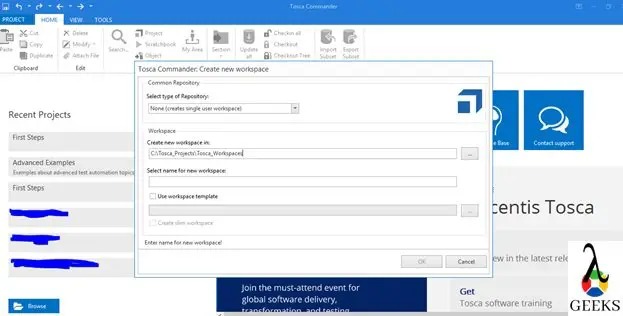
  • 2. Open new workspace creation wizard by the following navigation – PROJECT->New.
tosca workspace creation - initial wizard
tosca workspace creation – initial wizard
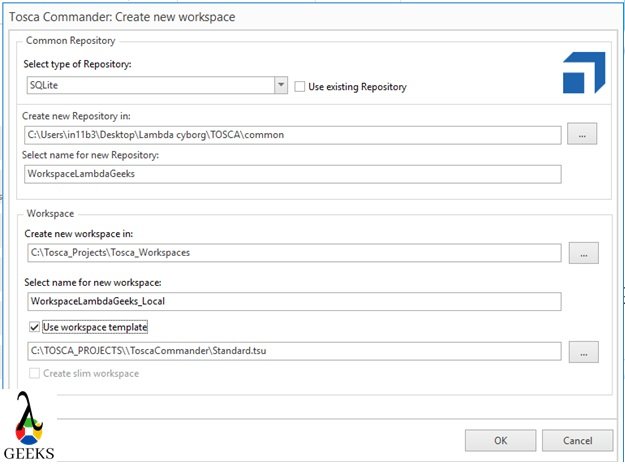
  • 3.     Enter below details based on the availability of fields –
    • “Select type of repository” – applicable for single user workspace.
    • “Use existing repository” – Select the checkbox if the common repository is already available.
    • “Create a new repository in” or ”Select existing repository” – It’s required for SQLite.
    • “Select name for new repository” – It’s required for SQLite.
    • “Schema name” – optional field while using Oracle, SQL Server and DB2 database.
    • “Connection string” – Connection string to connect the selected database.
    • “Create a new workspace in:” – Localdrive path where to create the local workspace.
    • “Select name for new workspace” – This field specify the name of the workspace.
    • “Use workspace template” – We need to check this while creating a common repository to load the default components.
  • 4.     In below example, we will be working with SQLite databases.
tosca workspace creation - initial wizard2
tosca workspace creation – initial wizard2
  • 5.     After entering all the details, we need to click on “OK” button to create the workspace. This step will take few minutes to complete. After the successful creation of workspace, the window will close automatically, and user authentication popup will appear to login to the workspace.
tosca workspace creation - login screen
tosca workspace creation – login screen
  • 6. After providing the default credential, we can open the workspace and start the working with Tosca Commander.
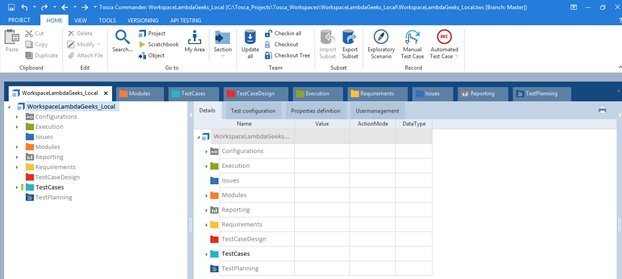
  • 7. After launching the Tosca for the first time, UI view will looks like –
tosca workspace creation - commander
tosca workspace – commander view

Conclusion

In this “Tosca Workspace Creation” article, we have explained about the steps of Tosca Workspace Creation process. It will help us to connect the workspace and start working with Tosca Commander. Please, click here to read more from Tricentis Support portal.

Tosca Setup:Tosca Download,Install,Config(Complete Guide!)

Tricentis Tosca Setup Download 1

Summary of Tricentis TOSCA Tutorial

We have segregated the entire Tosca tutorial in to below articles. We have wrote this article(TOSCA Tutorial) in simple language and keep the article short with the required concepts only so that any entry level software tester can understand this article in a shorter span of time.

In this article Tricentis Tosca Setup, we will discuss about step by step procedure to Install Tosca, uninstall and license configuration. If you want to prepare for TOSCA Interview Questions, please click here.

Download TOSCA

Trial Version:

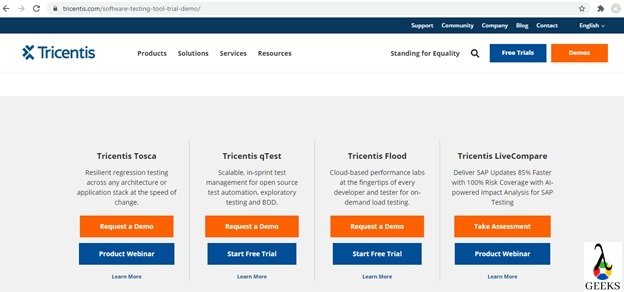
  1. Open Tricenties official site to download software.
  2. Click on the “Request a Demo” button available in right top corener of the website available in section Tricenties Tosca.
Tricentis Tosca Download 1
Tosca Setup Download 1
  • Enter the details in the form and click on “Request Demo” button to submit.
Tricentis Tosca Setup Download 2
Tosca Setup Download 2
  • Once the form has been submitted, Tricenties support team will contact you for the demo and understand the expectations. After that you will be able to request for trial version of tosca through email/ telephone.

Download for registered user:

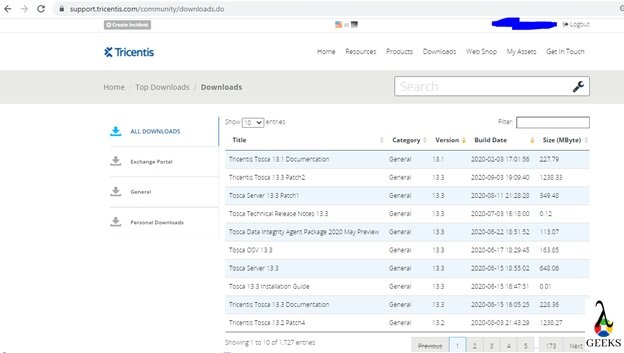
Open the tricentis support portal and download the latest tosca version in your local drive. In this article, we will work with TOSCA 13.2 Patch Level 3.

Tricentis Tosca Setup Download 3

INSTALL TOSCA

Basic System Requirement for Tosca Commander:

Hardware requirements:

  • CPU: i5 Dual-Core 2.4Ghz
  • RAM: 8GB
  • Hard disk space: 10GB
  • Network: 100 mbps

Software requirements:

  • Microsoft® .NET Framework Version 4.8 (Win 7, Win 8.1, Win 10)
  • Microsoft Visual C++ 2010, 2012, 2013, 2015.
  • 32 bit or 64 bit(recommended) – both are supported by tosca.

For more details on system requirements for TOSCA installation, please visit tricentis support portal.

Installation Steps:

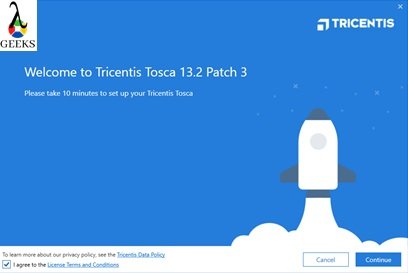
  • Step#1: Click on Installation Setup file from local directory.
  • Step#2: Accept License agreement and Continue.
Tricentis Tosca Setup Installation 1
Install Tosca Setup 1
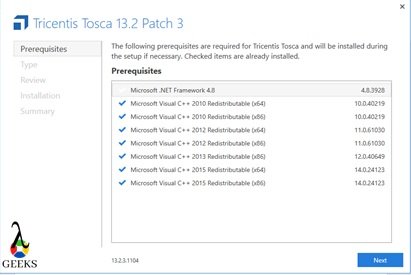
  • Step#3: After auto verification of prerequisites, click on Next to proceed.
Tricentis Tosca Setup Installation 2
Install Tosca Setup 2
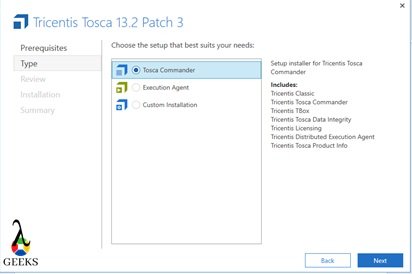
  • Step#4: Select Tosca Commander option for standard installation. But you can customize or installation based on the requirements. After the selection click on Next to proceed.
Tricentis Tosca Setup Installation 3
Install Tosca Setup 3
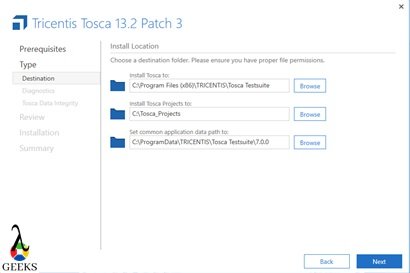
  • Step#5: Change Installation paths if required and Next.
Tricentis Tosca Setup Installation 4
Install Tosca Setup 4
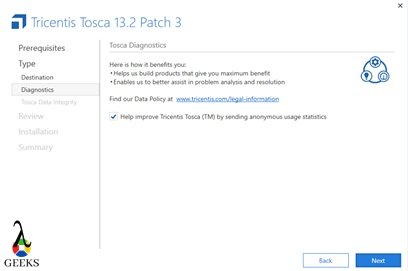
  • Step#6: Please select the checkbox if you want to send the usage statistics to Tricentis. Click on Next.
Tricentis Tosca Setup Installation 5
Install Tosca Setup 5
  • Step#7: Review and click on Install.
Tricentis Tosca Setup Installation 6
Install Tosca Setup 6
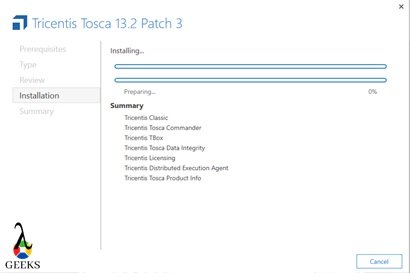
  • Step#8: Accept if any popups and wait for installation to be completed.
Tricentis Tosca Setup Installation 7
Install Tosca Setup 7
  • Step#9: Once done, please click on Finish to complete installation.
Tricentis Tosca Setup Installation 8
Install Tosca Setup 8
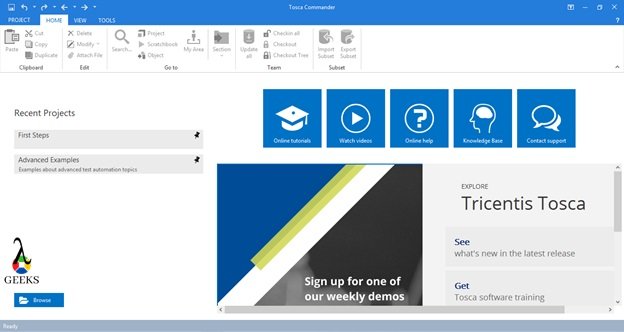
  • Step#10: Open TOSCA Commander from start menu to verify installation.  
Tricentis Tosca Setup Installation 9
Install Tosca Setup 9

Uninstall TOSCA

During up-gradation of Tricentis Tosca it is strongly recommended to completely uninstall Tricentis Tosca and install latest version to avoid any unexpected errors.

Uninstall Process Steps:

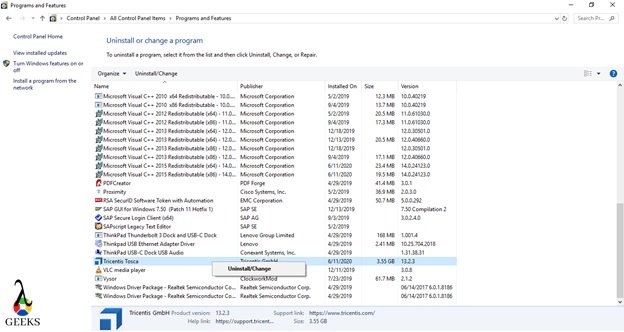
  • Step#1: Navigate to Control Panel and Click on “Programmes and Features”:
  • Step#2: Select Tricenties Tosca and Click on Uninstall:
Tricentis Tosca Setup Uninstallation
Tosca Setup Uninstallation
  • Step#3: Wait for process completion and restart the system.

Tricentis Tosca License Configuration

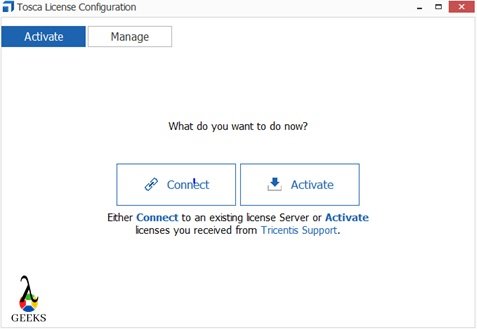
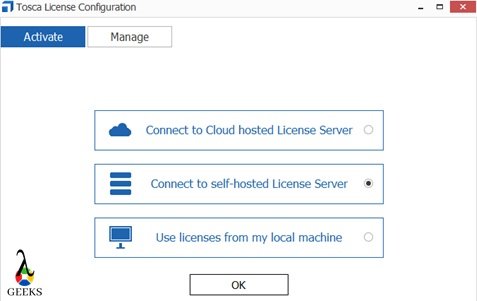
  • Step#1: Open the “Tosca License Configuration” wizard from the start menu.
Tricentis Tosca Setup License Configuration 1
  • Step#2: Based on the available licenses, please select the desire option. And click Ok. Here we are selecting second option i.e. “Connect to Self-Hosted License Server”.

Tricentis Tosca Setup License Configuration 2
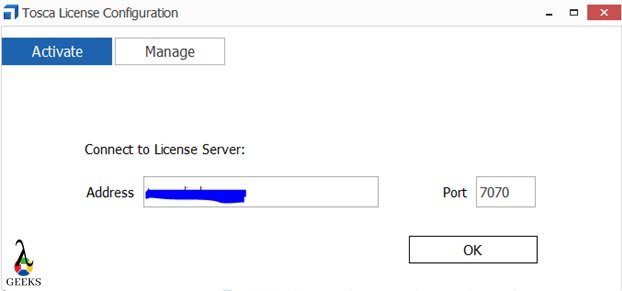
  • Step#3: Enter the license server details and click on OK to complete the configuration. Default post should be 7070.
Tricentis Tosca Setup License Configuration 3
  • Step#4: License Configured successfully.
Tricentis Tosca Setup License Configuration 4
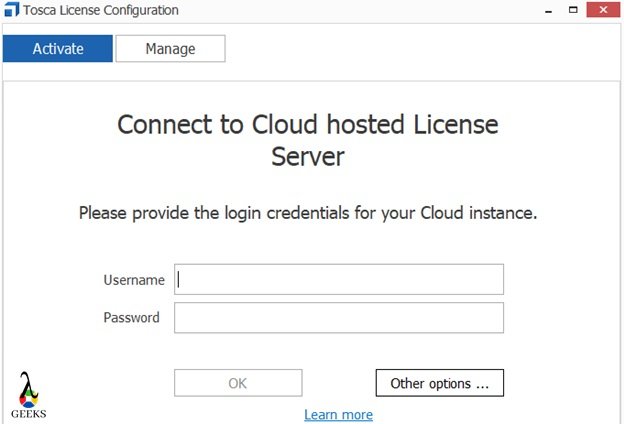
  • Step#5: For trial license, at step2, please select the first option and enter the user details which are created after registering in Tricentis portal.

Tricentis Tosca Setup License Configuration 5

Conclusion

In this article of Tricentis Tosca Tutorial, we have covered the setup of Tricentis TOSCA testing tool so that we can start with working with Tosca. Click here to understand more from Tricentis Support portal.
Please click to read the next article of TOSCA Tutorial – Complete Study of TOSCA Commander.

Tosca Tutorial:Complete Tutorial Series For Tosca 13.x

TOSCA Overview Tosca Architecture 300x188 1

Tosca Tutorial

The list of articles on Tosca Tutorial are mentioned in the table of content which will be explain through out the entire Tutorial. All the the articles are written in simple languages with proper example which will help the entry level software tester to understand in short time.

In this article, we will start with TOSCA Overview. To get the flavors of Tosca interviews, you can check the most frequently asked interview questions with answers from here.

Tosca Overview

The purpose of this tutorial is to describe a complete and detailed overview of TOSCA as a test automation tool for beginners.

  • Concepts of Software Testing:
    • Software testing is an important step to assure the quality of software products. It ensures that the requirements are fullfilled as per the expectations. Testing can be done in the different phases of Software development life cycles. Those are –
  • Unit Testing – Done by software developer at the time of development.
  • Integration Testing – After developing the different components, each of the components need to be integrated to make an unique product. After the integration, the integration testing is required to verify that the entire setup (includes all the software components) is working fine as a single product.
  • System Testing – After the integration testing, the system testing is required to ensure the quality of the software.
  • User Acceptance Testing
    • It is one type of black box testing. The business team (end user of the software product) is responsible to perform this testing to verify that all the requirements are fulfilled.
    • The Software or application testing can be performed manually or through some automated approach. There is multiple test automation tool is available in the marked to automate the testing process. In this article, we are going to explain the overview of TOSCA as a test automation tool.
  • What is Automation testing?
    • Today, the IT industry demands the quality and the efficacy with minimum human efforts to deliver any kind of IT services. Here, automation testing is playing a big role for testing services. Automation testing is a service to automate the testing process and scenarios to reduce the human efforts. In the automation vertical, the leading tools like QTP (UFT), RFT, and Selenium were consuming the major spaces. Now Tosca is giving tough competition to these tools.
  • Why Tosca?
    • Tosca is one of the market leading tool in the present days. It has the ability to perform functional and regression testing as well. The API testing which has n important role in AGILE process, can be done through TOSCA. Now a days, marked demands lesser testing efforts and lesser training span on the tool. In this aspect, Tosca is best suited tool as it supports the script less testing which will consume minimum time to learn. Tosca user can write efficient test cases with minimum skill set. Also, it generates a standard test reports for the management with out much customization.

Tosca Key Features:

  • Model-Based Testing Approach: This is the main features of Tosca as a test automation tool. Due to this Tosca is more suitable than other test automation tools which are available in the market. As a part of test case development, we have to create modules for each of the unit level functionalities. All the technical properties of test objects are stored in the modules which will be merged during the test creation along with test data.
  • Risk-Based Testing Approach: The another important aspect of Tosca as it supports the risk-based testing approach. Tosca is capable of assess the risk with the test cases. Basically, it can identify the subset of entire test suite which will minimize the chances of risks. Once the execution is completed, risks are measured by considering the test execution result and the risk coverage.
  • Script less test cases: Tosca supports script less automation which means that test cases can be developed by drag and drop method of modules in the TestCase section of Tosca. The test data parametrization and implementations of checkpoints, can be done through the configuration. So, anyone will be able to develop tests with minimum skillset and training.
  • Dynamic test data:  The dynamic test data can be kept separately from the technical testcases. To achieve this, Tosca provides advance features such as, TDM, TCD, TDS etc.
  • Easy to maintain:  If there is an application or data enhancement, same can be incorporated in the entire test suite by updating the modules or data in the central repository. The efforts spent here, is lesser with compare to any of the other test automation tools.
  • Distribute Execution: It signifies about the distribution of test execution in multiple system to reduce the human efforts and execution cycle. Based on the configuration of distributed execution, we can schedule the test execution in multiple systems.
  • API Testing: API testing is very useful when the entire application is not ready but some of the application components are developed. Using the API, Tosca is able to test the corresponding application components.
  • Test Recording: Tosca is able to record test scenario to generates linear test cases along with checkpoints to save time. This feature is very useful for one time testing only.
  • Detailed Reporting: Tosca generates step by step execution reports and logs with captured screens. The execution logs are very useful while investigating any errors.
  • Mobile Testing: Tosca supports the testing of mobile apps in both android and iOS devices. For iOS testing, additional MAC infrastructure is required.
  • Supported applications:  Tosca is compatible with different types of applications such as Salesforce, SAP, Web, Powerbuilder, DotNet, Mainframe, Mobile devices, etc.
  • Integration with third-party tools: Tosca helps to integrate with third party tools with minimum customization such as Perfecto, Selenium, Azure, Jenkins etc.

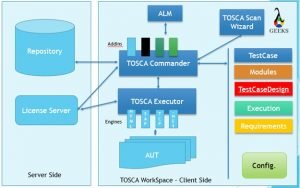
TOSCA Architecture:

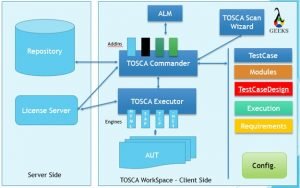
TOSCA is designed and developed by TRICENTIS Technology & Consulting GmbH (An Austrian Software Company based in Vienna). The test tool TOSCA have the below interfaces –

  • GUI – The Graphical User Interface
  • API – Application Programming Interface
  • CLI – Command Line Interface
  • Integrated Test Management
TOSCA Overview- Tosca Architecture
Architecture Diagram (Tosca Overview)

The latest version of TOSCA Commander which is available in the market is 13.3. The main components of Tosca are mentioned below –

  • Tosca Wizard
  • Tosca Commander
  • Tosca Executor
  • Test Repository

TOSCA Commander: 

TOSCA commander is the core backbone of the tool to develop, manage, execute, and analysis of test scripts creation. Tosca Commander has the five sections which are used in most of the projects – 

  • Module – All the Modules(keep the technical information of the test object) are stored in this section.
  • Testcase – The technical components of any test cases are kept in this section.
  • TestCaseDesign – This section is used to isolate the test data from the testcase in a well organized manner. The main intention of this section is not to touch the technical test cases to modify the test data.
  • Execution – This sections keeps the logs of test execution results in execution list. Basically, it is used to manage the test execution.
  • Requirements – All the requirements related information are stored in this section.
Tosca Overview - Tosca Commander
TOSCA Overview – Tosca Commander

A detailed study of different sections is available in the next article.

TOSCA Executor: 

Tosca Executor is used to performing executing test cases that are developed in TOSCA. This is an alternative to test execution without opening the Tosca commander. We can navigate the Tosca executor through the windows start menu:  Start-> All Programs-> Tricentis-> Tosca Executor

To get more details on TestSet files, please click here.

Tosca Overview - Tosca Executor
Tosca Overview – Tosca Executor

Tosca wizard: 

We need to scan the application to create modules (object map) for test automation. Tosca wizard is the old model of application scans. It can be open as a standalone component also from the Commander as well.

TOSCA Overview- Tosca Wizard
TOSCA Overview – Tosca Wizard

Test Repository:

Testcase can be stored in external shared repository/databases such as Oracle, SQLServer, SQL Lite, etc. Also, test data can be stored in an external repository in Tosca through different processes such as TDM – Test Data Management, TDS – Test Data Service. The test repository is required so that multiple testers can work at a time.

TOSCA Overview- Tosca Repository
TOSCA Overview – Tosca Repository

Tosca Supported platform:

  • Frameworks and programming languages: dotNet including WPF, Java, VB, Delphi.
  • Web browsers: Firefox, Internet Explorer, Chrome.
  • Application Development Environment: PowerBuilder.
  • Host Applications: 3270, 5250.
  • MS programs: MS Outlook, MS excel
  • Enterprise Application: Seibel, SAP.
  • Protocols and hardware: Flash, Webservices (SOAP),ODBC.

Conclusion

In this introductory article of Tosca overview, we have covered the overview of Tricentis TOSCA testing tool, Tosca Commander and Workspace. Please click here, to navigate to the Tosca support portal for more information.

Please click to read the next article of TOSCA Tutorial – Complete Study of TOSCA Commander.