TOSCA Tutorial – Table of Content
While writing the “Tosca Workspace Creation” tutorial, we have used simple explanation so that entry level tester can understand the concepts easily. The entire Tosca tutorial is broken into below articles –
- Tosca Tutorial #1: Tosca Overview
- Tosca Tutorial #2: Tricentis Tosca Setup – Install, Uninstall and License Configuration
- Tosca Tutorial #3: Tosca Workspace Creation
- Tosca Tutorial #4: Understanding of TOSCA Commander and Tosca User Management
- Tosca Tutorial #5: Tosca Scanning – An Introduction to Modules
- Tosca Tutorial #6: Tosca Test Case Creation
- Tosca Tutorial #7: Tosca Parameters and Library– Buffer, Business Parameter, TCP
- Tosca Tutorial #8:Tosca Test Execution, Reports, and Bug management
- Tosca Tutorial #9: Test Case Design – An approach to test data management
- Tosca Tutorial #10: Tosca Test Data Management.
- Tosca Tutorial #11: API Testing in Tosca
- Tosca Tutorial #12: Tosca Interview Questions and Answers
In this Tosca Workspace Creation article , we will discuss about step by step procedure to create Tosca workspace to start our hands on Tosca Automation activities. If you want to prepare for TOSCA Interview Questions, please click here.
TOSCA Workspace Creation
About Tosca Workspace
The Tosca workspace is acted as a repository of requirements, test cases, modules, and other components of Tosca. To develop, maintain or execute the test cases, we need to connect the workspace first. Otherwise, we will not be able to perform any automation activities. Workspace is created in the local drive. The workspace has to be defined in local work system. But it can also be defined in shared network drive. The data of the Tosca workspace, can be synched with different databases (SqlLite, SqlServer, DB2, Oracle) which an be acted as a central repository.
In a multiuser environment, i.e. more than one users are accessing the tool, the Tosca workspace has to created in central repositories. Tosca allows to create the workspace in different databases such as Oracle, SqlLite, DB2, SQLServer etc.
In a Singleuser Workspace, only one user is able to connect and work with Tosca. So, the central repository is not required here.
In the Multiuser Workspace, the data management is more simple and easier as the data are stored in shared databases which are known as common repositories. To perform any transaction (add, edit, delete) in a multiuser workspace, we need to lock the corresponding records first. It will restrict any other users to manipulate the same records. After completion of the transaction, w need to unlock the records. In Tosca, locking of data is know as check out and unlock is known as check in.
Common Repository Location Types:
There are six different location types available to create a common repository for multiuser workspace. Those are –
- 1. None – It’s applicable for single user workspace, i.e. no common repository is required.
- 2. Tricentis Cloud Repository – If we select this option, then the repository will be created in Tricentis hosted cloud server. To create this type of workspace, we need to login to Tricentis cloud during workspace creation.
- 3. SQLite – In this case, the repository will be created SQLite database. During the creatin, we need to specify
- the SQLite path and the repository name(only for creation) during the creation of workspace.
- 4. Oracle -Here, the repository has to be created in Oracle database. While creating the repository, we need to specify the Oracle schema name(optional) and the connection string during the Tosca workspace creation.
- 5. MS SQL Server – In this case, the repository will be created SQL Server database. During the creatin, we need to specify the database schema name(optional) and the connection string during the creation of workspace.
- 6. DB2 – In this case, the repository will be created the DB2 database. During the creatin, we need to specify the database schema name(optional) and the connection string
- during the creation of workspace.
Note: After creating of the common Tosca repository, we need to access the workspace using the default user “Admin” with empty password. But while connecting the existing common repository, the user credential should have created prior to the creation of local workspace by the Admin. Also, to work with databases, the corresponding database driver should be installed.
Steps to Create Tosca Workspace:
- 1. Open the Tosca Commander.
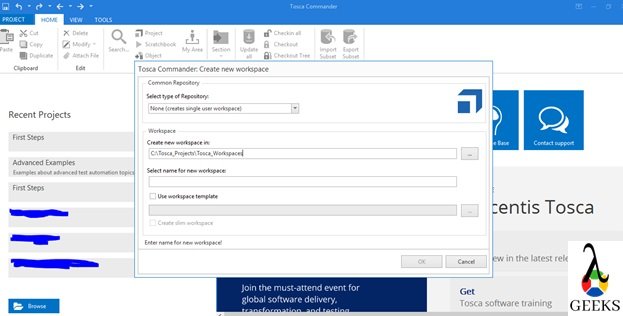
- 2. Open new workspace creation wizard by the following navigation – PROJECT->New.

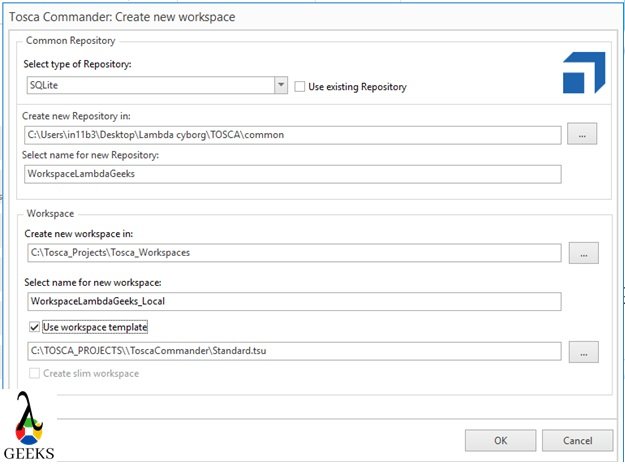
- 3. Enter below details based on the availability of fields –
- “Select type of repository” – applicable for single user workspace.
- “Use existing repository” – Select the checkbox if the common repository is already available.
- “Create a new repository in” or ”Select existing repository” – It’s required for SQLite.
- “Select name for new repository” – It’s required for SQLite.
- “Schema name” – optional field while using Oracle, SQL Server and DB2 database.
- “Connection string” – Connection string to connect the selected database.
- “Create a new workspace in:” – Localdrive path where to create the local workspace.
- “Select name for new workspace” – This field specify the name of the workspace.
- “Use workspace template” – We need to check this while creating a common repository to load the default components.
- 4. In below example, we will be working with SQLite databases.

- 5. After entering all the details, we need to click on “OK” button to create the workspace. This step will take few minutes to complete. After the successful creation of workspace, the window will close automatically, and user authentication popup will appear to login to the workspace.

- 6. After providing the default credential, we can open the workspace and start the working with Tosca Commander.
- 7. After launching the Tosca for the first time, UI view will looks like –

Conclusion
In this “Tosca Workspace Creation” article, we have explained about the steps of Tosca Workspace Creation process. It will help us to connect the workspace and start working with Tosca Commander. Please, click here to read more from Tricentis Support portal.

Hi, I am K. Mondal, I am associated with a leading organization. I am having 12+ years of working experience across domains e.g., application development, automation testing, IT Consultant. I am very much interested in learning different technologies. I am here to fulfill my aspiration and currently contributing as an Author and Website Developer both in LambdaGeeks.
Lets Connect through LinkedIn-