Deflection of beam | Complete Overview and Important Relations

image 42 1024x576 1

Contents: Deflection of Beam

  • Deflection Curve Definition
  • Deflection Angle Definition
  • Deflection Definition
  • Beam deflection boundary conditions
  • Relationship between Loading forces, shear force, bending moment, slope, and deflection
  • Beam Bending equations and relations
  • Beam deflection table and Formulas for standard load cases
  • Beam Deflection and slope with examples Case I: Overhanging Beam
  • Case II: Determine the maximum deflection of simply supported beam with point load at the center
  • Case III: Determine the maximum deflection of simply supported beam with a concentrated point load at a distance ‘a’ from support A
  • Double Integration Method
  • Procedure for Double Integration Method
  • Double integration method for finding beam deflection using Example of a cantilever beam with Uniformly distributed load
  • Double integration method for Triangular Loading

In engineering, deflection is the degree to which a structural element is displaced under a load (due to its deformation). It may refer to an angle or a distance. The deflection distance of a member under a load can be calculated by integrating the function that mathematically describes the slope of the deflected shape of the member under that load. Standard formulas exist for the deflection of common beam configurations and load cases at discrete locations. Otherwise methods such as virtual work, direct integration, Castigliano’s method, Macaulay’s method or the direct stiffness method are used.

Deflection Curve

When beams are loaded by lateral or longitudinal loads, the initial straight longitudinal axis is deformed into a curve known as the beam’s elastic curve or deflection curve. The deflection curve is the deformed axis of the selected beam.

Deflection Angle

The slope can be defined as the angle between the beam’s longitudinal axis and the tangent constructed to the beam’s deformation curve at any desired location. It is the angle of rotation of the neutral axis of the beam. It is measured in Radians.

Deflection

Deflection is the translation or displacement of any point on the axis of the beam, measured in the y-direction from the initial straight longitudinal axis to the point on the deflection curve of the beam. It is measured in mm. Deflection represents the deviation of the straight longitudinal axis due to transverse loading. In contrast, buckling of the beam represents the deviation of the initial straight longitudinal axis due to axial compressive load. It is usually represented by ‘y’

If the beam bends like the arc of a circle, it is called circular bending; otherwise, it is called non-circular bending. Suppose a Prismatic beam is subjected to a variable bending moment. In that case, it results in a non-circular type bending, and if it is subjected to constant Bending moment results in circular bending of the beam.

Beam deflection boundary conditions

  1. y is zero at a pin or roller support.
  2. y is zero at a built-in or cantilever support.
  3. Suppose the bending moment and flexural rigidity are discontinuous functions of the x. In that case, a single differential equation cannot be written for the entire beam; the equations of the curve for two adjacent segments should satisfy the given two conditions at the junction between segments:
  • 1. The y for the left-hand section must be equal to the y for the right-hand section.
  • 2. The slope for the left-hand section must be equal to the slope for the right-hand section.

Relationship between Loading forces, shear force, bending moment, slope, and deflection

Consider a Horizontal Beam AB in unloaded condition. If AB deflects under the load, the new position will be A’B’. The slope at any point C will be

i=\\frac{dy}{dx}

Usually, the deflection is minimal, and for a small radius of curvature,

ds=dx=Rdi
\\\\\\frac{di}{dx}=1/R
But\\;i=\\frac{dy}{dx}

Thus,

\\frac{d^2 y}{ dx^2}=1/R  

According to the simple bending moment theory

\\frac{M}{I}=\\frac{E}{R}
\\frac{1}{R}=\\frac{M}{EI}

Thus,

\\frac{d^2 y}{dx^2}=\\frac{1}{R}=\\frac{M}{EI}

Where,

E = Young’s Modulus of the material

I = Area moment of inertia

M = Maximum Moment

R = Radius of curvature of the beam

This is the Basic differential equation for the deflection of the beam.

Beam Bending equations and relations

Deflection = y
Slope = \\frac{dy}{dx}
Bending\\;moment =EI\\frac{d^2y}{dx^2}
Shear\\; Force = EI\\frac{d^3y}{dx^3}
Load \\;distribution =EI\\frac{d^4y}{dx^4}

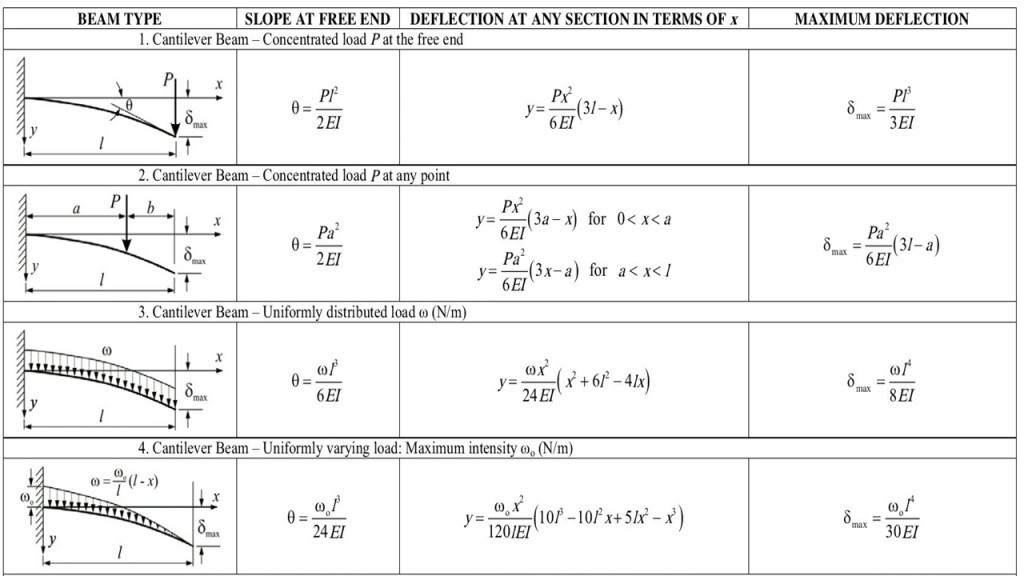
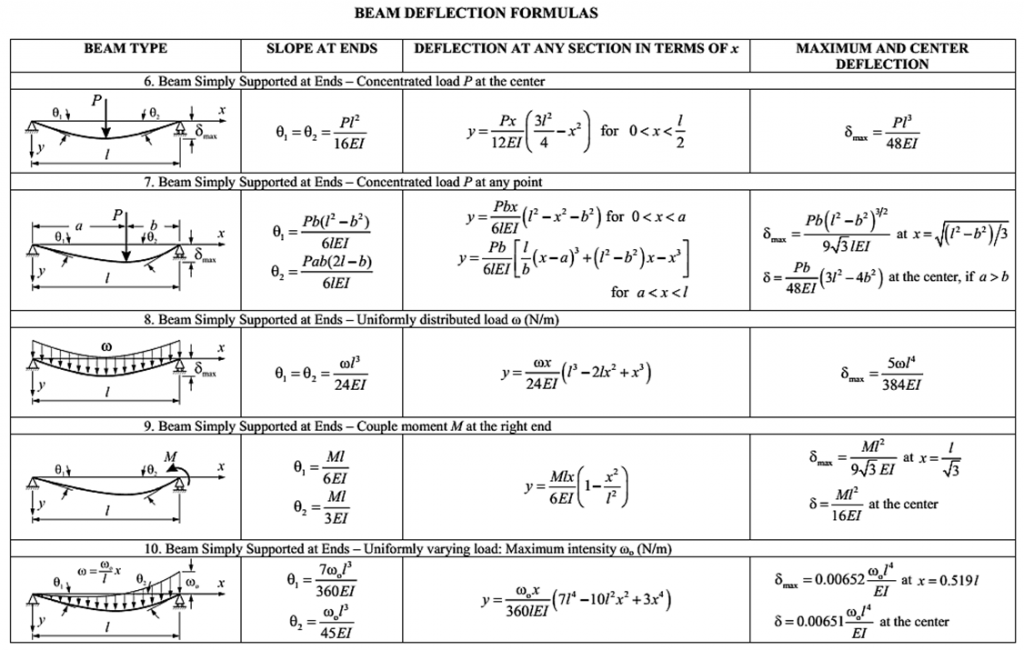
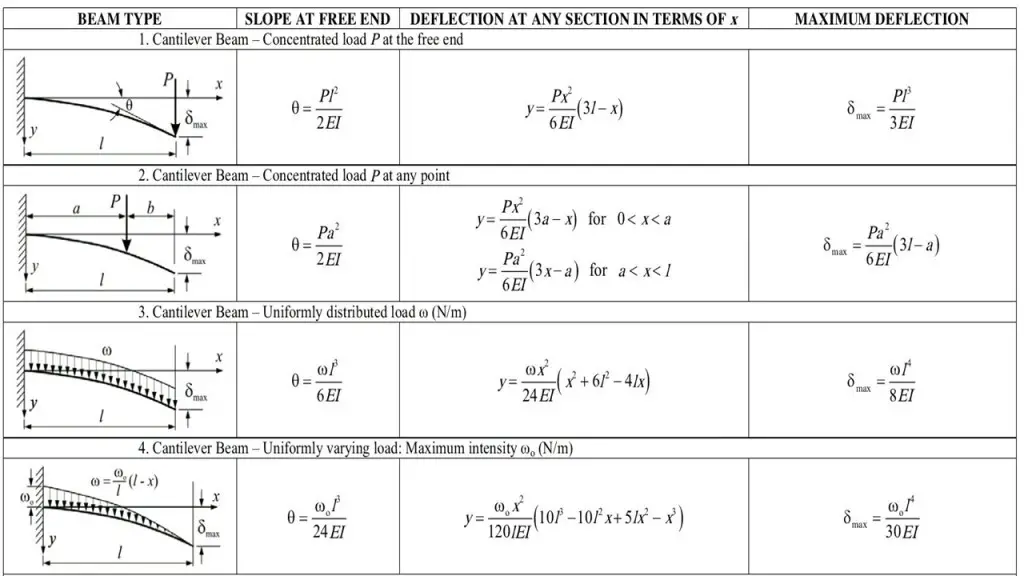
Beam deflection table and Formulas for standard load cases:

  • Maximum slope and deflection in a cantilever beam occur at the free end of the beam, while no slope or deflection is observed on the clamped end of a cantilever beam.
  •  For a simply supported beam with symmetric loading conditions, the maximum deflection can be found at the midspan. The maximum slope can be observed at the supports of the beam. Maximum deflection occurs where the slope is zero.

Beam Deflection and slope with examples

Case I: Overhanging Beam

Consider an overhanging steel beam carrying a concentrated load P = 50 kN at end C.

For The overhanging beam, (a) determine the slope and maximum deflection, (b) evaluate slope at 7m from A and maximum deflection from given data I = 722 cm2 , E = 210 GPa.
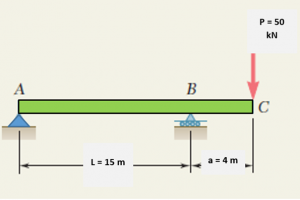
image 33

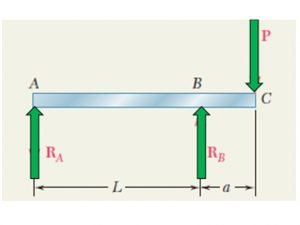
Solution: The Free body diagram for the given beam is
Deflection of overhanging beam

The value of the reaction at A and B can be calculated by applying Equilibrium conditions

\\sum F_y=0\\;\\sum M_A=0

For vertical Equilibrium, Fy = 0

R_A+R_B=P

Taking a moment about A, Clockwise moment positive and Counter Clockwise moment is taken negative.

P(L+a)-R_B*L=0
\\\\R_B=P(1+a/L)

Thus,

R_A+P(1+\\frac{a}{L})=P
R_A= \\frac{-Pa}{L}

Consider any section AD at a distance x from support A

The moment at point D is

M= \\frac{-Pa}{L x}

Using the differential equation of the curve,

EI \\frac{d^2 y}{dx^2}= \\frac{-Pa}{L x}

Integrating twice, we get

EI \\frac{dy}{dx}= \\frac{-1}{2}  \\frac{Pa}{L }x^2+C_1……………..[1]
EIy=\\frac{-1}{6}  \\frac{Pa}{L }x^3+C_1x+C_2……………..[2]

We find the constants of integration by using the boundary conditions available to us

At x = 0, y = 0; from equation [2] we get,

C_2=0

At x = L, y = 0; from equation [2] we get,

0=\\frac{-1}{6}  \\frac{Pa}{L }*L^3+C_1*L+0
C_1= \\frac{PaL}{6}

Thus, the equation of slope so obtained by substituting the values of C1 and C2 in [1]

EI \\frac{dy}{dx}= \\frac{-1}{2}  \\frac{Pa}{L }x^2+\\frac{PaL}{6}……………..[3]

Thus, the equation of deflection so obtained by substituting the values of C1 and C2 in [2]

EIy=\\frac{-1}{6}  \\frac{Pa}{L }x^3+\\frac{PaL}{6}x……………..[4]

Maximum deflection takes place when the slope is zero. Thus, the location of the point of maximum deflection can be found from [3]:

0= \\frac{-1}{2}  \\frac{Pa}{L }x^2+\\frac{PaL}{6}
 \\frac{1}{2}  \\frac{Pa}{L }x^2=\\frac{PaL}{6}
x_m=\\frac{L}{\\sqrt 3}
x_m=0.577 L

Putting the value of x in equation [4]

EIy_{max}=\\frac{-1}{6}  \\frac{Pa}{L }x_m^3+\\frac{PaL}{6}x_m
EIy_{max}=\\frac{-1}{6}  \\frac{Pa}{L }*0.577 L^3+\\frac{PaL}{6}*0.577 L
y_{max}=0.064\\frac{Pal^2}{EI}

Evaluate slope at 7m from A from given data:

 I = 722 \\;cm^4=72210^{-8}\\; m^4 , E = 210\\; GPa = 210*10^9\\; Pa

Using equation [3]

EI \\frac{dy}{dx}= \\frac{-1}{2}  \\frac{Pa}{L }x^2+\\frac{PaL}{6}
210*10^9*722*10^{-8}* \\frac{dy}{dx}= \\frac{-1}{2}  \\frac{50*10^3*4}{15 }*7^2+\\frac{50*10^3*4*15}{6}
\\frac{dy}{dx}=0.5452 \\;radians

maximum deflection in the beam can be given by

y_{max}=0.064\\frac{Pal^2}{EI}
y_{max}=0.064\\frac{50*10^3*4*15^2}{210*10^9*722*10^{-8}}
y_{max}=1.89 \\;m

Case II: Determine the maximum deflection of simply supported beam with point load at the center.

Consider a simply supported steel beam carrying a concentrated load F = 50 kN at Point C. For the Simply supported beam, (a) evaluate slope at A and maximum deflection from given data: I = 722 cm4 , E = 210 GPa, L =15 m

The Figure below shows the FBD for a simply supported beam with Point load on it.

image 36

According to standard relations and formula

Slope at the end of the beam can be given by

\\frac{dy}{dx}=\\frac{FL^2}{16EI}
\\frac{dy}{dx}=\\frac{50*10^3*15^2}{16*210*10^9*722*10^{-8}}
\\frac{dy}{dx}=0.463

For a simply supported beam with point load acting at the center, Maximum Deflection can be determined by

y_{max}=\\frac{FL^3}{48EI }
y_{max}=\\frac{50*10^3*15^3}{48*210*10^9*722*10^{-8} }
y_{max}=2.31 \\;m

Case III: For Simply supported beam with a concentrated point load at a distance from support A

Consider a simply supported steel beam carrying a concentrated load F = 50 kN at Point C. For the Simply supported beam, (a) evaluate slope at A and B and maximum deflection from given data: I = 722 cm4 , E = 210 GPa, L =15 m, a = 7 m, b = 13 m

The Figure below shows the FBD for a simply supported beam with Point load on it.

image 38

According to standard relations and formula

Slope at the support A of the beam can be given by

\\theta_1=\\frac{Fb(L^2-b^2)}{6LEI}
\\theta_1=\\frac{50*10^3*13*(20^2-13^2)}{6*20*210*10^9*722*10^{-8}}
\\theta_1=0.825 \\;radians 

The slope at the support B of the beam can be given by

\\theta_2=\\frac{Fab(2L-b)}{6LEI}
\\theta_2=\\frac{50*10^3*7*13*(2*20-13)}{6*20*210*10^9*722*10^{-8}}
\\theta_2=0.675 \\;radians

For a simply supported beam with point load acting at the center, Maximum Deflection can be determined by

y_{max}=\\frac{50*10^3*13}{48*210*10^9*722*10^{-8} }*(3*15^2-4*13^2)
y_{max}=-8.93*10^{-3}\\; m=-8.93\\;mm

Double Integration Method

If Flexural rigidity EI is constant and the moment is the function of distance x, Integration of EI (d2 y)/(dx2 )=M will yield Slope

EI \\frac{dy}{dx}=\\int M dx+C_1
EIy=\\int \\int Mdxdx+C_1x+C_2

where C1 and C2 are constants. They are determined by using the boundary conditions or other conditions on the beam. The above equation gives the deflection y as a function of x; it is called the elastic or deformation curve equation.

The above analysis method of deflection and slope of the beam is known as the double-integration method for calculating beam deflections. If the bending moment and flexural rigidity are continuous functions of the x, a single differential equation can be noted for the entire beam. For a statically determinate Beam, there are two support reactions; each imposes a given set of constraints on the elastic curve’s slope. These constraints are called boundary conditions and are used to determine the two constants of integration.

Double integration method boundary conditions

  1. y is zero at a pin or roller support.
  2. y is zero at a built-in or cantilever support.
  3. Suppose the bending moment and flexural rigidity are discontinuous functions of the x. In that case, a single differential equation cannot be written for the entire beam; the equations of the curve for two adjacent segments should satisfy the given two conditions at the junction between segments:
  • 1. The y for the left-hand section must be equal to the y for the right-hand section.
  • 2. The slope for the left-hand section must be equal to the slope for the right-hand section.

Procedure for Double Integration Method

  • Draw the elastic curve for the beam and consider all the necessary boundary conditions, such as y is zero at a pin or roller support and y is zero at a built-in or cantilever support.
  • Determine the bending moment M at an arbitrary distance x from the support using the sections’ method. Use appropriate Bending Moment rules while finding Moment M. for a discontinuous moment, the equations of the curve for two adjacent segments should satisfy the given two conditions at the junction between segments: 1. The y for the left-hand section must be equal to the y for the right-hand section. 2. The slope for the left-hand section must be equal to the slope for the right-hand section.
  • Integrate the equation twice to get the slope and deflection, and don’t forget to find the constant integration for every section using boundary conditions.

Examples of double integration method for finding beam deflection

Consider the Cantilever beam of length L shown in the Figure below with Uniformly distributed load. In a Cantilever beam, one end is Fixed while another end is free to move. We will derive the equation for slope and bending moment for this beam using the Double integration method.
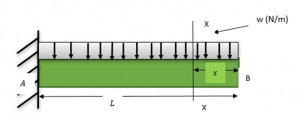
image 40

The bending moment acting at the distance x from the left end can be obtained as:

M=-wx* \\frac{x}{2}

Using the differential equation of the curve,

\\frac{d^2y}{dx^2}=M = \\frac{-wx^2}{2}

Integrating once we get,

EI \\frac{dy}{dx}= \\frac{-wx^3}{6}+C_1………..[1]

Integrating equation [1] we get,

EIy= \\frac{-wx^4}{24}+C_1 x+C_2……..[2]

The constants of integrations can be obtained by using the boundary conditions,

At x = L, dy/dx = 0; since support at A resists motions. Thus, from equation [1], we get,

C_1=\\frac{wL^3}{6}

At x = L, y = 0, No deflection at the support or fixed end A Thus, from equation [2], we get,

0= \\frac{-wL^4}{24}+\\frac{wL^3}{6} *L+C_2
C_2= \\frac{-wL^4}{8}

 Substituting the constant’s value in [1] and [2] we get new sets of equation as

EI \\frac{dy}{dx}= \\frac{-wx^3}{6}+\\frac{wL^3}{6}………..[3]
EIy= \\frac{-wx^4}{24}+\\frac{wL^3}{6} -\\frac{wL^4}{8}……..[4]

evaluate slope at x = 12 m and maximum deflection from given data: I = 722 cm4 , E = 210 GPa, L =20 m, w = 20 N-m

From the above equations: at x = 12 m,

EI \\frac{dy}{dx}= \\frac{-wx^3}{6}+\\frac{wL^3}{6}
210*10^9*722*10^{-8}* \\frac{dy}{dx}= \\frac{-20*12^3}{6}+\\frac{20*20^3}{6}
\\frac{dy}{dx}=0.01378 \\;radians

From equation [4]

EIy= \\frac{-wx^4}{24}+\\frac{wL^3}{6} -\\frac{wL^4}{8}
210*10^9*722*10^{-8}*y= \\frac{-20*12^4}{24}+\\frac{20*20^3}{6} -\\frac{20*20^4}{8}
y=-0.064 \\;m

Double integration method for Triangular Loading

Consider the Simply supported beam of length L shown in the Figure below with Triangular Loading. We will derive the equation for slope and bending moment for this beam using the Double integration method.
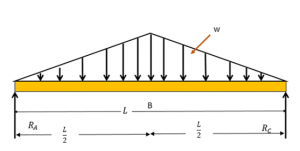
image 41

Since the loading is symmetric, each support reaction will bear half of the total loading. The reaction at A and B are found to be wL/4.

Moment at any point at a distance x from RA is

M=\\frac{wL}{4} x- \\frac{wx^2}{L}\\frac{x}{3}=\\frac{w}{12L} (3L^2 x-4x^3 ) 
 \\frac{d^2 y}{dx^2}=M=\\frac{w}{12L} (3L^2 x-4x^3 ) 

Integrating twice will get us the equations,

EI \\frac{dy}{dx}=\\frac{w}{12L}(\\frac{3L^2x^2}{2}-x^4)+C_1...........................[1]
EIy=\\frac{w}{12L} (\\frac{L^2x^3}{2}-\\frac{x^5}{5})+C_1 x+C_2……..[2]

At x = 0, y = 0; from equation [2] we get,

C_2=0

Due to symmetry of Load, the slope at midspan is zero. Thus, dy/dx = 0 at x = L/2

0=\\frac{w}{12L}(\\frac{3L^2*L^2}{2*4}-(L^4/16))+C_1
C_1=\\frac{-5wL^3}{192}

Substituting the constants value in [1] and [2] we get,

EI \\frac{dy}{dx}=\\frac{w}{12L}(\\frac{3L^2x^2}{2}-x^4)+\\frac{-5wL^3}{192}...........................[3]
EIy=\\frac{w}{12L} (\\frac{L^2x^3}{2}-\\frac{x^5}{5})+\\frac{-5wL^3}{192} x……..[4]

The Maximum deflection will be observed at the center of the beam. i.e., at L/2

EIy=\\frac{w}{12L} (\\frac{L^2(L/2)^3}{2}-\\frac{(L/2)^5}{5})+\\frac{-5wL^3}{192}(L/2)
EIy_{max}=\\frac{w}{12L} (\\frac{L^5}{16}-\\frac{L^5}{160})+\\frac{-5wL^4}{384}
EIy_{max}=\\frac{-wL^4}{120}

evaluate slope at x = 12 m and maximum value of y from given data: I = 722 cm4 , E = 210 GPa, L =20 m, w = 20 N-m

From the above equations: at x = 12 m,

EI \\frac{dy}{dx}=\\frac{w}{12L}(\\frac{3L^2x^2}{2}-x^4)+\\frac{-5wL^3}{192}
210*10^9*722*10^{-8}* \\frac{dy}{dx}=\\frac{20}{12*20}(\\frac{3*20^2*12^2}{2}-12^4)+\\frac{-5*20*20^3}{192}
\\frac{dy}{dx}=8.60*10^{-4 } \\;radians

From equation [4]

EIy_{max}=\\frac{-wL^4}{120}
210*10^9*722*10^{-8}*y=\\frac{-20*20^4}{120}
y=-0.01758\\;m

To know about Strength of material(click here)and Moment Area method Click here.
Macaulay’s Method & Moment Area Method: 11 Important Facts

image 5 300x192 1

Contents: Moment Area Method and Macaulay’s Method

  • Macaulay’s Method Definition
  • Macaulay’s Method for slope and deflection
  • Macaulay’s Method example 1: Slope and Deflection in a Simply supported Beam for Uniformly Distributed Load
  • Macaulay’s Method example 2: Slope and Deflection in an Overhanging Beam
  • Moment-Area Method
  • Moment Area Theorem
  • Example related to Moment Area Method
  • Bending Moment by parts
  • Applying Moment Area method on overhanging Beam with Uniformly distributed Loading for finding slope and deflection
  • Maximum Deflection due to unsymmetrical Loading
  • Q & As on Macaulay’s Method and Moment Area Method

Macaulay’s method

Mr W.H Macaulay devised Macaulay’s Method. Macaulay’s Method is very efficient for discontinuous loading conditions.

Macaulay’s Method (the double integration method) is a technique used in structural analysis to determine the deflection of Euler-Bernoulli beams and this method is very useful for case of discontinuous and/or discrete loading condition.

Macaulay’s Method for Slope and Deflection

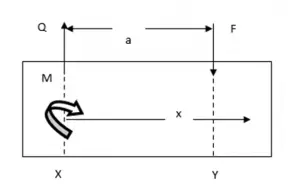
Consider a small section of a Beam in which, at a particular section X, the shearing force is Q and the Bending Moment is M as shown below. At another section Y, distance ‘a’ along the Beam, a concentrated load F is applied which will change the Bending Moment for the points beyond Y.

image 5
Section of Beam

Between X and Y,

\\\\M=EI \\frac{d^2 y}{dx^2}=M+Qx……………[1]\\\\\\\\EI \\frac{dy}{dx}=Mx+Q\\frac{x^2}{2} +C_1……………[2]\\\\\\\\EIy=M \\frac{x^2}{2}+Q \\frac{x^3}{6}+C_1 x+C_2……………[3]

And Beyond Y

M=EI \\frac{d^2 y}{dx^2}=M+Qx-F(x-a)…………… [4]\\\\\\\\EI \\frac{d y}{dx}=Mx+Q (x^2/2)-F (x^2/2)+Fax+C_3…………… [5]

EIy=M (x^2/2)+Q (x^3/6)-F (x^3/6)+Fa (x^2/2) C_3 x+C_4…………… [6]

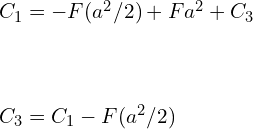
For the slope at Y, equating [5] and [2] we get,

Mx+Q (x^2/2)+C_1= Mx+Q (x^2/2)-F (x^2/2)+Fax+C_3

But at Point Y, x = a

C_1=-F (a^2/2)+Fa^2+C_3\\\\\\\\C_3=C_1-F (a^2/2)

Substituting the above equation in [5]

EI \\frac{dy}{dx}=Mx+Q (x^2/2)-F (x^2/2)+Fax+C_1-F (a^2/2)

EI \\frac{dy}{dx}=Mx+Q (x^2/2)-F(x-a)^2/2+C_1………….[7]

Also, for the same deflection at Y equating (3) and (6), with (x=a) we get

M(a^2/2)+Q(a^3/6)+C_1 a+C_2=M(a^2/2)+Q(a^3/6)-F(a^3/6)+F(a^3/6)+C_3 a+C_4

On solving these equations and substituting value of C3

C_4=F(a^3/6)+C_2

Substituting in equation [6] we get,

\\large EIy=M x^2/2+Q x^3/6-F x^3/6+Fa (x^2/2)(C_1-F a^2/2)x+F(a^3/6)+C_2

\\large EIy=M x^2/2+Q x^3/6-F (x-a)^3/6+C_1 x+C_2…………[8]

By further Investigating equations [4], [7] and [8] we can conclude that the Single Integration Method for obtaining Slope and deflection will still be applicable provided that the term F(x-a) is integrated with respect to (x-a) and not x. Also, the term W(x-a) is applicable only for (x>a) or when (x-a) is positive. Thus, these terms are called Macaulay terms. Macaulay terms should be integrated with respect to themselves and must be neglected when they are negative.

Thus, the generalized equation for the whole Beam becomes,

M=EI \\frac{d^2 y}{dx^2}=M+Qx-F(x-a)

Macaulay’s Method example 1: Slope and Deflection in a Simply supported Beam for Uniformly Distributed Load

Consider a simply supported beam with uniformly distributed loading over the complete span. Let weight  acting at distance a from End A and W2 acting at a distance b from end A.

image 6
Simply supported beam with uniformly distributed loading over the complete span

The Bending Moment Equation for the above beam can be given by

EI\\frac{d^2 y}{dx^2}=R_A x-w(x^2/2)- W_1 (x-a)-W_2 (x-b)

The U.D.L applied over the complete beam doesn’t require any special treatment associated with the Macaulay’s brackets or Macaulay’s terms. Keep in mind that Macaulay’s terms are integrated with respect to themselves. For above case (x-a) if it comes out negative then it must be ignored. Substituting the end conditions will yield the values of constants of integration in the conventional way and hence the required value of slopes and deflection.

image 7

In This case the U.D.L starts at point B the bending moment equation is modified and the uniformly distributed load term becomes Macaulay’s Bracket terms.

The Bending Moment equation for the above case is given below

EI \\frac{d^2 y}{dx^2}=R_A x-w[(x-a)^2/2]- W_1 [(x-a)]-W_2 [(x-b)]

Integrating we get,

EI\\frac{dy}{dx}=R_A(x^2/2)-w[(x-a)^3/6]-W_1 [(x-a)^2/2]-W_2 [(x-b)^2/2]+A

EIy=R_A(x^3/6)-w[(x-a)^4/24]-W_1 [(x-a)^3/6]-W_2 [(x-b)^3/6]+Ax+B

Macaulay’s Method example 2: Slope and Deflection in an Overhanging Beam

Given below is the overhanging beam in Fig. (a), we are need to calculate

(1) the equn for the elastic curve.

(2) the mid-values in-between the supports and at point E (indicate whether each  is up or down).

image 9

To determine the bending moment for the above beam the equivalent loading is used, is given below as Figure (b). In order to use Macaulay’s Bracket in the Bending Moment equations, we are required to extend each distributed load to the right end of the beam. We extends the 800 N/m loadings to point E and eliminates the un-necessary portion by applying an equal and opposite loadings to C-E. The global expression for the bending moment represented by free-body diagram in figure(c).

image 11
Fig. (b)
image 12
Fig. (c)

Substituting M into the differential equation for the elastic curve,

EI\\frac{d^2 y}{dx^2}=1000x-400(x-1)^2+400(x-4)^2+2600(x-6)

Integrating it,

EI\\frac{dy}{dx}=500x^2-400 (x-1)^3/3+400 (x-4)^3/3+1300(x-6)^2+P

Again, Integrating it,

EIy=500x^3/3 -100 (x-1)^4/3+100 (x-4)^4/3+1300 (x-6)^3/3+Px+Q….[a]

At Point A, the deflection is restricted due to simple support at A. Thus, at x = 0, y=0,

EI*0=500*0^3/3-100 (0-1)^4/3+100 (0-4)^4/3+1300 (0-6)^3/3+P*0+Q\\\\\\\\Q=-85100

Again, at Point D the deflection is restricted due to simple support at D. at x = 6 m, y = 0,

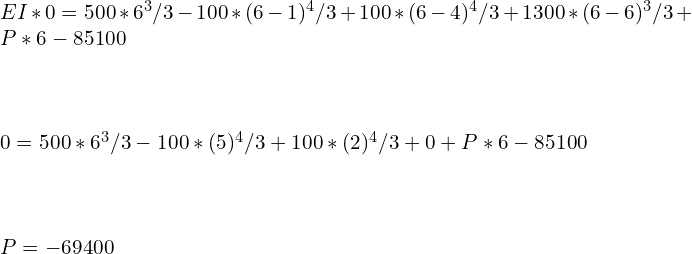
EI*0=500*6^3/3-100 *(6-1)^4/3+100 *(6-4)^4/3+1300*(6-6)^3/3+P*6-85100\\\\\\\\0=500*6^3/3-100 *(5)^4/3+100*(2)^4/3+0+P*6-85100\\\\\\\\P= -69400

When we substitute the values for P and Q to Eq. (a), we get

EIy=500 x^3/3-100 (x-1)^4/3+100(x-4)^4/3 +1300 (x-6)^3/3-69400x-85100….[b]

This is the Generalized equation to find deflection over the complete span of overhanging Beam.

In order to find the deflection at a distance of 3 m from the left end A, Substitute the value of x =3 in Eq. (b),

The equation of elastic curve so obtained is given by,

EIy=500*3^3/3 -100*(3-1)^4/3+100*(3-4)^4/3+1300*(3-6)^3/3-69400*3-85100

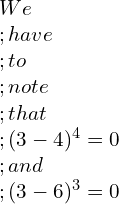
We\\; have\\; to\\; note\\; that\\; (3-4)^4=0 \\;and \\;(3-6)^3=0

EIy=-289333.33 \\;N.m^3

The negative sign of the value indicates that the deflection of the beam is downward direction in that region.
Now finding the Deflection at the extreme of the Beam i.e., at Point E
Put x = 8 m in eq. [b]

EIy=500*8^3/3-100*(8-1)^4/3+100*(8-4)^4/3+1300*(8-6)^3/3-69400*8-85100

EIy=-699800 \\;N.m^3

Again, the negative sign indicates the downward deflection.

Moment Area Method

In order to determine the slope or deflection of a beam at a specified location, the moment area method is considered most effective.

In this Moment Area Method, the bending moment’s integration is carried out indirectly, using the geometric properties of the area under the bending moment diagram, we assume that the deformation of Beam is below the elastic range and this results in small slopes and small displacements.

The First theorem of Moment Area method deals with slopes; the second theorem Moment Area method deals with deflections. These Two theorems form the basics of the Moment Area Method.

Moment Area Theorem

First – Moment Area Theorem

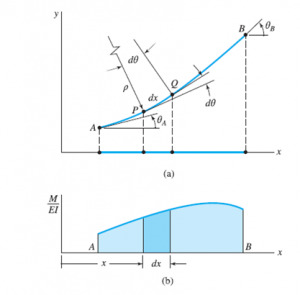
Consider a beam segment which is initially straight. The elastic curve AB for the segment taken into consideration is shown in fig (a). Consider two cross-sections of the beam at P and Q and rotate them through the angle dϴ relative to each other also separated by the distance dx.

Let’s assume the cross sections remain perpendicular to the axis of the beam.

dϴ = Difference in the slope of curve P and Q as depicted in Fig. (a).

From the given geometry, we see that dx = R dϴ, where R is the curvature radius of the deformed element’s elastic curve. Therefore, dϴ = dx/R, which upon using the moment-curvature relationship.

 \\frac{1}{R}=\\frac{M}{EI} \\;becomes\\;d\\theta=\\frac{M}{EI}dx \\;\\;…………..[a]

Integrating Eq.(a) over the segment AB yields

 \\int_{B}^{A}d\\theta=\\int_{B}^{A}\\frac{M}{EI}dx\\;\\;……………..[b]

image 14
(a) Elastic curve of the beam (b) B.M.D for the segment.

The left-hand side of Eq. (b) is the change in the slope between A and B. The right-hand side represents the area under the M/EI diagram between A and B, shown as the shaded area in Fig. (b). If we introduce the proper notation , Eq. (b) can be expressed in the form

 \\theta_{B/A}=Area\\;of Bending \\;Moment\\; Diagram \\;for\\;section\\;A-B

This is the First theorem of Moment Area Method. The First theorem of Moment Area method deals with slopes

Second – Moment Area Theorem

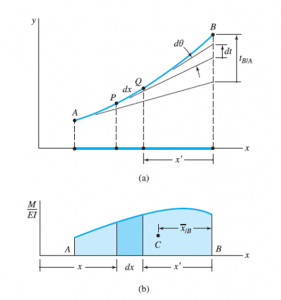
Let  t (B/A) be the vertical distance of point B from the tangent to the elastic curve at A. This distance is called the tangential deviation of B with respect to A. To calculate the tangential deviation, we first determine the contribution dt of the infinitesimal element PQ.

We then use integration for A to B dt = t (B/A)  to add all the elements between A and B. As shown in the figure, dt is the vertical distance at B between the tangents drawn to the elastic curve at P and Q. Recalling that the slopes are very small, we obtain from geometry,

dt=x'd\\theta

Where x’ is the horizontal distance of the element from B. Therefore, the tangential deviation is

t_{B/A}=\\int_{B}^{A}dt=\\int_{B}^{A}x' d\\theta

image 16
(a) Elastic curve of the beam. (b) B.M.D for the segment.

Putting value dϴ of  in Equation [a] we get,

t_{B/A}=\\int_{B}^{A}\\frac{M}{EI}x'dx\\;\\;………………..[c]

The right-hand side of Eq. (c) represents the first moment of the shaded area of the M/(EI) diagram in Fig. (b) about point B. Denoting the distance between B and the centroid C of this area by ,  we can write Eq. (c) as

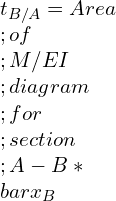
t_{B/A}= Area \\;of \\;M/EI \\;diagram\\; for\\; section\\; A-B* \\bar{x}_B

t_{B/A}= Distance \\;of\\; Center\\; of\\; gravity \\;of\\; B.M.D

\\bar{x}_B \\; is\\; the \\;Distance \\;of\\; center \\;of \\;gravity \\;of \\;M/EI \\;from \\;point \\;under\\; consideration\\; (B).

This is the second theorem of moment area method. The second theorem Moment Area method deals with deflections.

Bending Moment by parts

For studying Complex applications, the evaluation of the angle ϴ (B/A)  and the tangential deviation  can be simplified by independently evaluating the effect of each load acting on the beam.  A separate Bending Moment diagram is drawn for each load, and the slope is obtained by algebraic summation of the areas under the various B.M.Ds. Similarly, the deflection is obtained by adding the first moment area about a vertical axis through point B. A bending-moment diagram is plotted in parts. When a bending-moment is drawn in parts, the various areas defined by the BMD consists of shapes, such as area under 2nd degree curves, cubic curves, rectangles, triangles, and parabolic curves, etc.

Steps to draw bending moments by parts

  • Provide appropriate fixed support at a desired location. Simple supports are usually considered to be the best choice; however, another type of support is used depending upon the situation at hand.
  • Calculate the support reactions and assume them to be applied loads.
  • Draw a bending moment diagram for each load. Follow proper sign conventions while drawing bending moment diagram.
  • The slope is obtained by algebraic summation of the areas under the various B.M.Ds.
  • the deflection is obtained by adding the first moment area about a vertical axis through point B.

Applying Moment Area method on overhanging Beam with Uniformly distributed Loading for finding slope and deflection

Consider a Simply Supported overhanging beam with uniformly distributed loading from A to B and C to D as Shown below [ . Find slope and deflection by Using Moment Area method.]

overhanging Beam with Uniformly distributed Loading Using Moment Area method

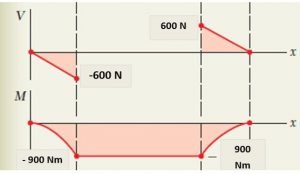
From a free-body diagram of the beam, we determine the reactions and then draw the shear and bending-moment diagrams, as the flexural-rigidity of the beam is constant, to calculate (M/EI) diagram we need to divide each value of M by EI.

R_B+R_D=2*3*200

R_B+R_D=1200

Also\\;\\sum M_B=0

(200*3*1.5)+(R_D*10)=200*3*11.5

R_D=600 N

Thus,\\;R_B=600 N

Drawing Shear Force and Bending Moment Diagram for the given beam

Macaulay
S.F.D and B.M.D

For Reference tangent: since the Beam is symmetric along with its loading with respect of Point C. The Tangent at C will act as a reference Tangent. From the diagram above

above\\;\\theta_c=0

Thus, tangent at E can be given by,

\\theta_E=\\theta_c+\\theta_{E/C}=\\theta_{E/C} …………..[1]

Macaulay 2
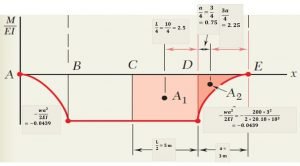
Moment Area Diagram with calculations

Slope at E: according to M/EI diagram and applying the First Moment area method as discussed above we get,

A_1= \\frac{-(wa^2)}{2EI}*(L/2)

A_1=\\frac{-(200*3^2)}{2*20.18*10^3}*5

A_1=-0.2230

Similarly, for A2

A_2=(1/3)* \\frac{-(wa^2)}{2EI}*a

A_2=(1/3)*\\frac{-(200*3^2)}{2*20.18*10^3}*3

A_2=-0.0446

From equation [1] we get,

\\theta_E=A_1+A_2

\\theta_E=-0.2230-0.0446=-0.2676

Deflection at Point E can be calculated by using Second moment area method

t_{D/C}=A_1*[L/4]

t_{D/C}=(-0.2230)*[10/4]

t_{D/C}=-0.5575

Similarly,

t_{E/C}=A_1*(a+L/4)+A_2 *(3a/4)

t_{E/C}=(-0.2230)*(3+10/4)+(-0.0446)*(3*3/4)

t_{E/C}=-1.326

But we know that

y_E=t_{E/C}-t_{D/C}\\\\y_E=-1.326-(-0.5575)\\\\y_E=-0.7685 m

Maximum Deflection due to unsymmetrical Loading

When a simply supported beam carries an unsymmetrical load, the maximum deflection will not occur at the centre of beam and required to be identify the beam’s K-point where the tangent is horizontal in order to evaluate the maximum deflection in a beam.

  1. We start with finding Reference tangents at one of the supports of the beam. Let ϴa be the slope of the tangent at Support A.
  2. Compute the tangential deviation t of support B with respect to A.
  3. Divide the obtained quantity by the span L between the supports A and B.
  4.  Since the slope ϴk=0, we must get,

\\theta_{K/A}= \\theta_K-\\theta_A=-\\theta_A

Using the first moment-area theorem, we can conclusively predict that point K can be found by measuring an area A

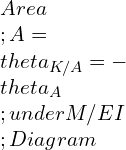
Area\\;A=\\theta_{K/A}=-\\theta_A\\;under M/EI\\;Diagram

By Observation we conclude that the maximum deflection y (max) = the tangential deviation t  of support A with respect to K (Fig. a) and we can determine y(max)  by calculating the first moment area between Support A and point K with respect to the vertical axis.

Question and Answer of Macaulay’s Method and Moment Area Method

Q.1) Which method is useful in order to determine the slope and deflection at a point on a Beam?

Ans: Macaulay’s Method is very efficient for this case.

Q.2) What does Second Moment Area Method states?

Ans: The Second Moment Area method states that,” the moment of Bending moment diagram B.M.D between any two points on an elastic line divided by flexural rigidity (EI) is equal to the intercept taken on a vertical reference line of the tangent at these points about the reference line.”

Q.3) Calculate the deflection of the beam if the slope is 0.00835 radians. The distance from the free end to the center of gravity of bending moment is 5 m?

Ans: The deflection at any point on the elastic curve is equal to Mx/EI.

But we know that M/EI is slope equation = 0.00835 rad.

So, Deflection = slope × (The distance from the free end to the center of gravity of bending moment

Deflection = 0.00835*5 = 0.04175 m = 41.75 mm.

To know about Strength of material(click here)and Bending Moment Diagram Click here.

Crankshaft: 9 Important Facts You Should Know

Slide2 300x221 1

Contents: Crankshaft

  • What is Crankshaft?
  • Material and manufacture of Crankshafts
  • Crankshaft diagram
  • Crankshaft Design Procedure
  • Crankshaft Deflection
  • Crankshaft Deflection Curve Plotting
  • Marine Crankshaft Failure Case Study
  • Failure Analysis of Boxer Diesel Crankshaft: Case Study
  • Crankshaft Fatigue Failure Analysis: A Review
  • Failure of Diesel Engine Crankshaft: A Case Study

What is crankshaft?

“A crankshaft is a shaft driven by a crank mechanism, involving of a series of cranks and crankpins to which the connecting rods of an engine is attached. It is a mechanical part able to perform a conversion between reciprocating motion and rotational motion. A reciprocating engine converts reciprocating motion of a piston to the rotational form, although in a reciprocating compressor, it translates opposite way means rotational to reciprocating forms. During this change in-between two motions, the crankshafts have “crank throws” or “crankpins” additional bearing surface which axis is offset from the crank, to which the “big end” of the connecting rod from each cylinder is attached.”

A crankshaft can be described as a component used to convert the piston’s reciprocating motion to the shaft into rotatory motion or vice versa. In simple words, it isa shaft with a crank attachment.

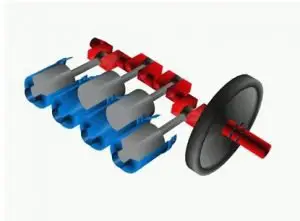
A typical crankshaft comprises of three sections:

  1. The shaft section that revolves inside the main bearings.
  2. The crankpins
  3. The crank arms or webs.
Slide2
https://en.wikipedia.org/wiki/Crankshaft

This is categorized in two types as per position of crank:

  1. Side crankshaft
  2. Centre crankshaft

The crankshaft can be further categorized in Single throw crank-shafts and multi throw crank-shafts depending on the no. of cranks in the shaft. A crankshaft which possesses only center crank or one-sided crank is entitled as single-throw crankshaft. A crankshaft with 2 or multiple center cranks or ‘2’ side cranks,  ‘1’ on each end is recognized as “multi-throw crankshafts”. The Side crank configuration includes geometric simplicity, are comparatively simple to be manufactured and assembled. They can be used with simple slide-on bearings and are relatively cheaper than Center crankshaft.

The center crank configuration provides better stability and balancing of forces with lower induced lower stresses. Their manufacturing cost is high, and a split connecting rod bearing is required for assembly. Applications which require multiple pistons working in phase, a multi-throw crankshaft can be developed by placing several centers cranks side-by-side, in a specified sequence, along a common centerline of rotation. The throws are rotationally indexed to provide the desired phasing.

Multi-cylinder internal combustion engines such as Inline and V- series Engine utilizes Multi-throw crankshaft. All types of crankshafts Experience dynamic forces generated by the rotating eccentric mass center at each crank pin. It is often necessary to utilize counterweights and dynamic balancing to minimize shaking forces, tractive effort and swaying couples generated by these inertia forces.

Material and manufacture of Crankshafts:

The crankshaft often experiences shocks and fatigues loading condition. Thus, the material of the crankshaft must possess more toughness and better resistance to fatigue. They are usually product of carbon steel, certain steel or cast-iron materials. For Engines used in industry, the crankshafts are generally generated from carbon steel such as 40-C-8, 55-C- 8 and 60-C-4.

In transport engine, manganese steel i.e., 20-Mn-2, 27-Mn-2 and 37-Mn-2 are commonly utilized to prepare the crank shafts. In aero engines, nickel-chromium steel such as 35-Ni-1-Cr-60 and 40-Ni-2-Cr-1-Mo-28 are generally utilized for manufacturing the crankshaft. 

The crank shafts are commonly finished by drop forging or casting process. The surface hardening of the crankpin is finished through the case carburizing process, Nitriding or induction hardening process. The selected Crankshaft materials must meet both the structural strength requirements and the bearing-site wear requirements.

In the typical crankshaft application, soft, ductile sleeves are attached to the connecting rod or the frame, so the crankshaft material must have the ability to provide a hard surface at the bearing sites. Many materials may meet structural strength requirements, but providing wear resistance at the bearing sites narrows the list of acceptable candidates.

Because of the asymmetric geometry, many crankshafts have been manufactured by casting or forging a “blank,” to be finish-machined later. Built-up weldments are used in some applications. Traditionally, cast iron, cast steel, and wrought steel have been used for crank shafts. The use of selectively carburized and hardened bearing surfaces is also every day. 

Crankshaft Design Procedure

The subsequent procedure has to be followed for design.

  1. Calculate the magnitude of the different loads acts upon the crank shaft.
  2. According to the loads, calculate the distance between the support structures and positions.
  3. For simplistic and safe design, the shaft has to be supported at the bearings’ center and all the forces and reactions has to be acts upon at those points. The distance between the supports be subject to on the length of the bearing, which usually depend on the shaft’s dia as of the tolerable bearing pressures.
  4. The thickness of the webs is expected to be from 0.4ds to 0.6ds, wherever “ds” is the shaft’s diameter. It usually considers as 0.22*D to 0.32*D, where D is the cylinder’s bore diameter in mm.
  5. Here and now estimate the distance between the support structures.
  6. Assuming the acceptable bending and shear stresses for Crank shaft material, find the dimension of the crankshaft.

Crankshaft Deflection

The crankshaft consists of the main shaft segments, individually reinforced by the main bearing, and then several web-shafts on which the specific piston connecting rod will rotate. The throw crank that is the crank pins and the connecting arms must be square with no deflection. If this is not the case, it causes unusual wear on the main bearings. A dial gauge detects the misalignment of the crank shaft between the crank arms. It is the uneven wear that occurs between the several segments of the crankshaft’s central axis.

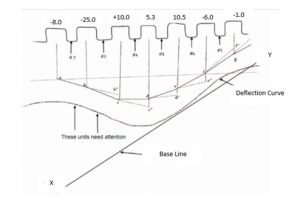
Crankshafts Deflection Curve Plotting

  • From the centerline of the crank shaft, A straight line is drawn parallel to it, and then perpendicular lines from each unit are drawn towards this parallel line.
  • After taking the crank shaft deflection of each unit, the values derived are noted above every unit of the crank web in the above graph.
  • Plot the distance -5.0 mm, which is the first deflection reading, downwards (for negative value and upwards for positive value) from the reference line on the center line of the unit and have the line “a-b” that is at an angle proportionate to the deflection at ‘a’.
  • This line is extended to intersect the center line of the next unit. The subsequent step is to calculate the deflection from this point of joint and join the point from the preceding point, which will escalate to the line “b-c”. The steps have to be repeated again till completion.
  • Plot a smooth curve between these points and compare this curve’s position with respect to the baseline XY. In the above graph, the curve drawn from the readings of unit 1 and 2 is being too far away from the baseline compared to the rest of the curve and hence need attention.
Crankshaft deflection curve
Crankshaft Deflection curve

Marine Crankshaft failure Case Study

The case study done is about the tragic failure of a web marine crankshaft.  The crank shaft is subjected to high bending and torsion, and its combined effect on failure of the crank shaft is analyzed.  The microscopic observation suggested that the crack initiation began on the crankpin’s filet due to rotary bending, and the propagation was a combination of cyclic bending and steady torsion.  The number of cycles from crack initiation to the crank shaft’s final failure was found by readings of the main engine operation on board. Benchmarks left on the fatigue crack surface are taken into consideration.

By using the linear elastic fracture mechanics, the cycles calculated depicted that the propagation was quick. It also shows that the level of bending stress was quite high compared with total cycles of the main engine in service. Microstructure defects or inclusions were not observed; thus, it indicates that the failure was due to external cause and not the internal intrinsic defect.

The crank shaft material had configuration (42CrMo4 + Ni + V) (chemical composition, %: C = 0.39; Si = 0.27; Mn = 0.79; P = 0.015; S = .014; Cr = 1.14; Mo = 0.21; Ni = 0.45; V = 0.10). The crank shaft of the main engine has damaged. The crank-web no. 4 has broken. Material near the crack initiation region was analyzed, and it showed bainitic microstructure. The material had hardness vickers285.

The fatigue looks as if in two different surfaces, one vertical to the crank shaft and the other in the horizontal plane with the crank shaft with changeover zones among two planes. Thus, the tragic failure of the above marine crank shaft was by fatigue and a combined with the rotating-bending with the steady torsion. The research and observation and development of new crank shafts are in progress to avoid this type of failure.

Reference:

Fonte MA, Freitas MM. Marine main engine crank shaft failure analysis: A case study, Engineering Failure Analysis 16 (2009) 1940–1947

Failure Analysis of Boxer Diesel Crankshaft: Case Study

The report is about the failure mode analysis of boxer diesel engine crank shaft. Crank shaft is the component that experience a higher complex dynamic loading because of rotating bending supplemented with torsion and bending on crankpin. Crank shafts are subjected to multi-axial loading. Bending-stress and shear-stress due to twisting and torsional-loading because of power-transmissions. Crank shafts are manufactured from forged steel, nodular cast iron and aus-tempered ductile-iron.

They should possess adequate strength, toughness, hardness, and high fatigue strength. They must be easy to machine and heat treat and shaped. Heat treatment increases wear resistance; thus, all diesel crank shafts are heat treated. They are surface hardened to enhance fatigue strength. High-level stresses are observed on critical zones like web fillets and the effects of centrifugal force due to power transmission and vibrations. The fatigue fracture near the web fillet region is the major cause of crank shaft failure since the crack generation, and propagation occurs through this zone. 

The specifications of the crankshaft of a box motor are: displacement = 2000 cu. cm, diameter cylinder = 100 mm, max power = 150 HP, max torque = 350 N m. It has been observed that after 95,000 km in service, the failure of crank shaft takes place. Fatigue failure has occurred at nearly 2000 manufactured engines. After analysis, it has been noted that the weakness of two central steel shells and the yielding of bedplate bridges due to cracking were the main culprits of failure of crank shaft.

The crank shaft’s bending amplitude increases from cracked steel shells’ weakness and the bridges of the bedplate, which are beneath them. There was certainly no evidence of material defects or misalignment of main journal bearings. The devastating failure of the crank shaft was due to flawed design of steel support shells and bedplate bridges. The improved design from the manufacturer will solve this problem.

Reference:

M. Fonte et al., Crankshaft failure analysis of a boxer diesel motor, Engineering Failure Analysis 56 (2015) 109–115.

Crankshaft Fatigue Failure Analysis: A Review

In this paper, the root cause of fracture of the air compressor’s crank shaft is being analyzed using various methods and parameters like chemical composition, mechanical property, macroscopic, microscopic characteristics, and theoretic calculations. This paper also aims in improving the design, fatigue strength and work reliability of the crank shaft. The crank shaft used in this study is 42CrMo steel which is forged and heat-treated and nitridated to increase the fatigue strength of crank shaft.  The analyzing procedure for the cause of crank shaft fracture is carried out in three parts:

  • Experimental analysis of crank shaft
  • Macroscopic features and microstructure analysis
  • Theoretical calculations

The chemical element analysis is being done to accurately determine the crank shaft material’s chemical composition and check if they are under the standard permissible values. It is done with the help of spectrometer. The fractured surfaces are classified into three regions: (1) fatigue crack initiation region, (2) fatigue expansion region and (3) static fracture region.

During the analysis, its w found that the fatigue crack growth rate is high due to high bending. The misalignment of main journals and small fillet to lubrication hole are the leading causes of high bending. The fatigue crack was initiated on the edge of the lubrication hole and thus led to the fracture. The beach marks produced due to small overloads because of starting and stopping the compressor were not visible. In a particular rotating cycle after a period of standard work, micro-cracks due to high bending stress concentration appeared on the lubrication hole’s fillet. However, the crank shaft can still close to normal working condition.

As the operating time went on increasing, the fluctuation also increased, leading the cracks to propagate to the static fracture region, leading to complete failure. The microscopic observation of the fracture surface measured utilizing Scanning Electron Microscopy (SEM), which showed that crack at the edge of the lubricating hole was the reason to fracture the crank shaft. According to the theoretical calculation, the curve for safety for the lubrication hole and fillet region is obtained, which helps identify the weakest sections.

By improving the surface quality and reducing surface roughness reliability of the crank shaft can be increased.  Proper alignment of main journals will reduce induced bending stress and increase the fatigue life of crank shaft.

Reference:

W.Li et al., Analysis of Crankshaft fatigue failure, Engineering Failure Analysis 55 (2015) 139–147.

Failure of Diesel Engine Crankshaft: A Case Study

In this paper, the failure analysis, modal, and stress analysis of a diesel engine’s crankshaft is conducted. To evaluate the fracture of crankshaft material, both the visual inspection and investigation were done. The engine used was S-4003, and its crank shaft was ruptured near the crankpin four after 5500 hours of operation.  The crankshaft was broken after about 30h to 700h of engine operation. The additional analysis showed the presence of micro-cracks near the 2nd crankpin and 2nd journal. The study showed that the primary reason behind the failure was a faulty grinding process.

For further experimental analysis, the specimen was cut from the damaged part. Non-linear Finite element analysis was used to identify the reasons for the abrupt failure of crankshaft. The analysis was performed for determining the stresses induced in the shaft due to cyclic loading conditions when the engine runs at maximum power.

Numerical analysis is used to find the relation between the connecting rod and the crankshaft by applying complex boundary conditions. For the determination of modes and frequency of free vibration, numerical modal analysis of the crankshaft was performed.

After the analysis, it was observed that the stress value in the fillet of the crankpin no.4 was about 6% of the yield stress of crankshaft material. The modal analysis gave the result that during the second mode of free vibration, the high-stress area was found in the area where the crack generation took place (critical zone).

On further observation, it was discovered that crankshaft failure occurred by resonant vibration generated due to unbalanced masses on the shaft, which induced high cyclic stress conditions, causing it to decrease crankshaft’s fatigue life.

Reference:

Lucjan Witek et al., Failure investigation of a crankshaft of diesel engine, Procedia Structural Integrity 5 (2017) 369–376

To know about Strength of material click here

21 Questions & Answers On Bending Moment Diagram

Definition

Shear Force Diagram is the Graphical representation of the variation of Shear Force Over the cross-section along the length of the beam. With the Shear Force Diagram’s help, we can identify Critical sections Subjected to Shear and design amendments to be made to avoid failure.

Similarly,

Bending Moment Diagram is the Graphical representation of the Bending moment’s variation over the cross-section along the length of the beam. With the Bending moment Diagram’s help, we can identify Critical sections Subjected to bending and design amendments to be made to avoid failure. While constructing the Shear Force Diagram [S.F.D.], There is a sudden rise or sudden drop due to point load acting on the beam while constructing Bending moment Diagram [BMD]; there is a sudden rise or sudden drop due to couples acting on the beam.

Q.1) What is the Formula for Bending Moment?

The Algebraic sum of the moments over a particular cross-section of the beam due to clock or anticlockwise moments is called bending moment at that point.

 Let W be a force vector acting at a point A in a body. The moment of this force about a reference point (O) is defined as

M = W x p

Where M = Moment vector, p = the position vector from the reference point (O) to the point of application of the force A. The  symbol indicates the vector cross product. it is easy to compute the moment of the force about an axis that passes through the reference point O. If the unit vector along the axis is ”i”, the moment of the force about the axis is defined as

M = i . (W x p)

Where [.] represent Dot product of the vector.

Q.2) What is Bending moment and Shear force?

Ans:

Shear Force is the Algebraic sum of forces Parallel to cross-section over a particular cross-section of the beam due to action and reaction forces. Shear Force tries to shear off the beam’s Cross section perpendicular to the beam’s axis, and due to this, the developed shear stress distribution is Parabolic from the neutral axis of the beam.

A Bending moment is a summation of the moments over a particular cross-section of the beam due to Clockwise and Counter Clockwise Moments. Bending moment tries to bend the beam in the plane of the member, and due to transmission of Bending moment over a Cross-section of the beam, the Developed Bending stress distribution is Linear from the neutral axis of the beam.

Q.3) What is Shear Force Diagram S.F.D. and Bending Moment Diagram B.M.D?

Ans: Shear Force Diagram [S.F.D.] Shear Force Diagram can be described as the Pictorial representation of the variation of Shear Force that is generated in the beam, Over the cross-section and along the length of the beam. With the Shear Force Diagram help, we can identify Critical sections Subjected to Shear and design amendments to be made to avoid failure.

Similarly, Bending Moment Diagram [BMD] is the Graphical representation of the Bending moment’s variation over the cross-section along the beam’s length. With the Bending moment Diagram’s help, we can identify Critical sections Subjected to bending and design amendments to be made to avoid failure. While constructing the Shear Force Diagram [S.F.D.] There is a sudden rise or sudden drop due to point load acting on the beam while constructing Bending moment Diagram [BMD]; there is a sudden rise or sudden drop due to couples acting on the beam.

Q.4) What is the unit of Bending moment?

Ans: Bending Moment has a unit similar to a couple as Nm.

Q.5) Why is moment at hinge zero?

Ans: In hinge Support, the movement is restricted in Vertical and Horizontal Direction. It offers no resistance for the rotational motion about the support. Thus, support offers a rection towards horizontal and vertical motion and no reaction to the moment. Thus, the Moment is Zero at the hinge.

Q.6) What is the bending of beam?

Ans:  If the moment applied to the beam tries to bend the beam in the plane of the member, then it is called a bending moment, and the phenomenon is called bending of beam.

Q.7) What is the condition of deflection and bending moment in a simply supported beam?

Ans: The conditions of deflection and bending moment in a simply supported beam are:

  • The maximum Bending Moment that yields bending stress must be equal to or less than the Permissible strength bearing capacity of the material of the beam.
  • The maximum induced deflection should be less than acceptable level based on Durability for the given length, the period, and material of the beam.

Q.8) What is the difference between bending moment and bending stress?

Ans: Bending Moment is the Algebraic sum of the moments over a particular cross-section of the beam due to Clockwise and Counter Clockwise Moments. Bending moment tries to bend the beam in the plane of the member, and due to transmission of Bending moment over a Cross-section of the beam, the Developed Bending stress distribution is Linear from the neutral axis of the beam. Bending stress can be defined as resistance induced due to Bending Moment or by two equal and opposite couples in the plane of the member.

Q.9) How are the intensity of load shear force and bending moments related to mathematically?

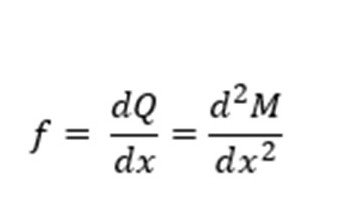
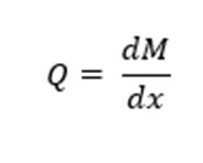
Ans: Relations: Let f = load intensity

    Q = Shear Force

    M = Bending Moment

Slide1 4

The rate of change of shear force will give the intensity of the distributed load.

Slide2

The rate of change of bending moment will give shear force at that point only.

Slide3

Q.10) What is the relation between loading shear force and bending moments?

Ans: The rate of change of Bending moment will give Shear force at that particular point only.

Q.11) What is the difference between a plastic moment and a bending moment?

Ans: The plastic moment is defined as the maximum value of the moment when the complete cross-section has reached its yielding limit or permissible stress value. Theoretically, It is the maximum bending moment that the entire section can bear before yielding any load beyond this point will result in large plastic deformation. While Bending Moment is the Algebraic sum of the moments over a particular cross-section of the beam due to Clockwise and Counter Clockwise Moments. Bending moment tries to bend the beam in the plane of the member, and due to transmission of Bending moment over a Cross-section of the beam, the Developed Bending stress distribution is Linear from the neutral axis of the beam.

Q.12) What is the difference between the moment of force, couple, torque, twisting moment, and bending moment? If any two are the same, what is the use of assigning different names?

Ans: A moment, a torque, and a couple are all similar concepts which rests on a basic principle of the product of a force (or forces) and a distance. A Moment of force can be formulated as the product of force and the length of the line crossing over the point of support and is vertical to the acting force. Bending moment tries to bend the beam in the plane of the member and due to transmission of Bending moment over a Cross-section of the beam.

A couple is a moment that is generated of two forces having the same magnitude, acting in the opposite direction equidistant from the reaction point. Therefore, a couple is statically equivalent to a simple Bending. Torque is a moment when functional have a tendency to to twist a body around its axis of rotation. A Typical example of torque is a torsional moment applied on a shaft.

Q.13) Why maximum bending moments is smallest when the numerical value is the same in positive and negative directions?

Ans: The maximum bending moment and minimum bending moment are dependent on the condition and direction of application of stress rather than the magnitude of stress. A positive sign denotes tensile stress, and the negative sign denotes compression. The maximum magnitude of the bending moment is taken for designing, while the sign denotes whether the beam is designed for compressive loading or tensile loading conditions. Usually, beams are designed for tensile stress as a material is likely to yield under tension and ultimately rupture.

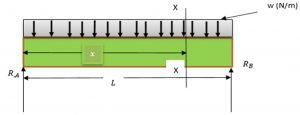
Q.14) What is bending moment equation as a function of distance x calculated from the leftside for a simply supported beam of span L carrying U.D.L. w per unit length?

Ans:

SSB UDL 1
Simply Supported Beam with U.D.L Loading Condition

The resultant load acting on the Beam Due to U.D.L. can be given by

W = Area of a rectangle

W = L * w

W=wL

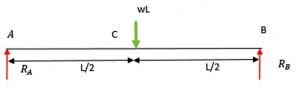
Equivalent Point Load wL will act at the center of the beam. i.e., at L/2

FBD SSB UDL 1
Free Body Diagram for Simply supported Beam under U.D.L Condition

The value of the reaction at A and B can be calculated by applying Equilibrium condition

\\sum F_y=0,\\sum M_A=0

For vertical Equilibrium,

R_A+R_B=wL

Taking Moment about A, Clockwise moment positive, and Counter Clockwise moment is taken as negative

\\frac{wL^2}{2}-R_B*L=0

R_B=\\frac{wL}{2}

Putting the value of RB in Vertical equilibrium equation we get,

R_A=wL-R_B

R_A=wL-\\frac{wL}{2}=\\frac{wL}{2}

Let X-X be the section of interest at a distance of x from end A

According to the Sign convention discussed earlier, if we start calculating Shear Force from the Left side or Left end of the beam, Upward acting force is taken as Positive, and Downward acting Force is taken as Negative. For Bending Moment Diagram, if we start calculating Bending Moment from the Left side or Left end of the beam, Clockwise Moment is taken as positive. Counter Clockwise Moment is taken as Negative.

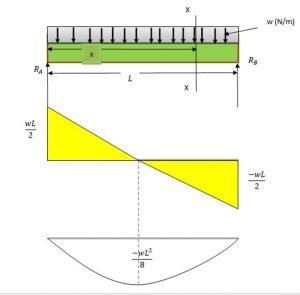
Shear Force at A

S.F_A=R_A=\\frac{wL}{2}

Shear force at region X-X is

 S.F_x=R_A-wx

 S.F_x=\\frac{wL}{2}-wx

S.F_x=w\\frac{L-2x}{2}

Shear Force at B

S.F_B=R_B=\\frac{-wL}{2}

Bending Moment at A = 0

Bending Moment at X

B.M_x=M_A-\\frac{wx^2}{2}

B.M_x=0-\\frac{wx^2}{2}

B.M_x=-\\frac{wx^2}{2}

Bending Moment at B = 0

Bending Moment Diagram From Simply Supported Beam under U.D.L

Q.15) Why does the cantilever beam have a maximum bending moment on its support? Why doesn’t it have a bending moment on its free end?

Ans: For a cantilever beam with point loading, the beam has fixed support at one end, and another end is free. Whenever a load is applied on the beam, only the support resists the motion. At the free end, there is no restriction of motion. So, the moment will be maximum at support and minimum or zero at the free end.

Q.16) What is the bending moment in a beam?

Ans: Bending Moment tries to bend the beam in the plane of the member and due to transmission of Bending moment over a Cross-section of the beam.

Q.17) Where do tension and compression act in bending of simply supported as well as in cantilever beams?

Ans: For a simply supported beam with uniform Loading acting downward, the location of induced maximum bending tensile stress is acted on the bottom fiber of cross-section at the midpoint of the beam, while the maximum compression bending stress is acted on the top fiber of the cross-section at the midpoint of span.  For a cantilever beam of a given span, the maximum bending stress will be at the beam’s Fixed end. For downward net load, maximum tensile bending stress is acted on top of cross-section, and max compressive stress is acted on the bottom fiber of the beam.

Q.18) Why are we taking the bending moment left side of beam to the point that the shear force is zero?

Ans: The bending moment can be taken on any side of the beam. It is generally preferred that If we start calculating Bending Moment from the Left side or Left end of the beam, Clockwise Moment is taken as Positive and Counter Clockwise Moment is taken as Negative. If we start calculating Shear Force from the Left side or Left end of the beam, Upward acting Force is taken as Positive and Downward acting Force is taken as Negative according to Sign Convention.

Q.19) How do we use the sign convention in bending moments and shearing forces?

Ans: If we start calculating Bending Moment from the right side or right end of the beam, Clockwise Moment is taken as negative, and Counter-wise Moment is taken as Positive. If we start calculating Bending Moment from the Left side or Left end of the beam, Clockwise Moment is taken as Positive, and Counter Clockwise Moment is taken as Negative.

Q.20) How do I strengthen a simply supported steel I beam against Shear and bending?

Ans: The strength of the I-Beam, which is simply supported, can be increased against Shear and bending conditions by increasing the Area Moment of Inertia of the beam, adding stiffeners to the web of I-Beam, changing the material of the beam to a higher strength material having greater yield strength. Changing the type of loading also affects the strength of the beam.

Q.21) What is Point of Contraflexure?

Ans: The point of Contraflexure can be defined as the point in the Bending Moment diagram where the bending moment is becomes ‘0 ’. This occasionally termed a Point of inflexion. At the point of contraflexure, the Bending moment curve of the beam will change sign. It is generally seen in a Simply supported beam subjected to moment at the mid-span of the beam and combined loading conditions of U.D.L. and point loads.

To know about Strength of material(click here)and Bending Moment Diagram Click here.

Read more about Macaulay’s Method & Moment Area Method.

Bending Moment: 9 Important Factors Related To It

Supports 1 300x119 1

Contents: Bending Moment

  1. Bending Moment Definition
  2. Bending Moment Equation
  3. Relation between load intensity, Shear Force and Bending Moment
  4. Unit for Bending Moment
  5. Bending Moment of a Beam
  6. Bending Moment Sign Convention
  7. Shear Force and Bending Moment Diagram
  8. Types of Supports and Loads
  9. Question and Answer

Bending Moment Definition

In solid body mechanics, a bending moment is a reaction induced inside a structural member when an external force or moment is applied to it, causing the member to bend. The foremost, standard, and simplest structural member subjected to bending moments is that beam. If the moment applied to the beam tries to bend the beam in the plane of the member, then it is called a bending moment. In the case of Simple bending, If the Bending moment is applied over a particular Cross-section, the stresses Developed are called Flexural or Bending stress. It varies linearly from the neutral axis over the cross-section of the beam.

Bending Moment Equation

The Algebraic sum of the moments over a particular cross-section of the beam due to clock or anticlockwise moments is called bending moment at that point.

 Let W be a force vector acting at a point A in a body. The moment of this force about a reference point (O) is defined as

M = W x p

Where M = Moment vector, p = the position vector from the reference point (O) to the point of application of the force A. The  symbol indicates the vector cross product. it is easy to compute the moment of the force about an axis that passes through the reference point O. If the unit vector along the axis is ”i”, the moment of the force about the axis is defined as

M = i . (W x p)

Where [.]represent Dot product of a vector.

The Mathematical Relation between load intensity, Shear Force and Bending Moment

Relations: Let f = load intensity

    Q = Shear Force

    M = Bending Moment

Slide1 4

The rate of change of shear force will give the intensity of the distributed load.

Slide2

The rate of change of bending moment will give shear force at that point only.

Slide3

Unit for Bending Moment

Bending moment has a unit similar to the couple as Nm.

Bending Moment of a Beam

Assuming a Beam AB having a certain length subjected to Bending Moment M, If the Top fiber of the beam, i.e., above the neutral axis, is in compression, then it is called Positive Bending Moment or Sagging Bending moment. Similarly, If the Top fiber of the beam, i.e., above the neutral axis, is in tension, it is called the Negative Bending Moment or Hogging Bending moment.

 Bending Moment
Sagging and Hogging of a Beam

Bending Moment Sign Convention

There is a Specific Sign convention followed while determining Maximum Bending-moment and Drawing and BMDs.

  1. If we start calculating Bending-Moment from the right side or right end of the beam, Clockwise Moment is taken as negative, and Counter-wise Moment is taken as Positive.
  2. If we start calculating Bending-Moment from the Left side or Left end of the beam, Clockwise Moment is taken as Positive, and Counter Clockwise Moment is taken as Negative.
  3. If we start calculating Shear Force from the right side or right end of the beam, Upward acting force is taken as Negative, and Downward acting Force is taken as Positive.
  4. If we start calculating Shear Force from the Left side or Left end of the beam, Upward acting force is taken as Positive, and Downward acting Force is taken as Negative.

Shear Force and Bending Moment Diagram

Shear Force is the Algebraic sum of forces Parallel to cross-section over a particular cross-section of the beam due to action and reaction forces. Shear Force tries to shear off the beam’s Cross section perpendicular to the beam’s axis, and due to this, the developed shear stress distribution is Parabolic from the neutral axis of the beam. Bending moment is a sum of the moments over a particular cross-section of the beam due to Clockwise and Counter Clockwise Moments. This tries to bend the beam in the plane of the member, and due to transmission of it over a cross-section of the beam, the Developed Bending stress distribution is Linear from the neutral axis of the beam.

Shear Force Diagram is the Graphical representation of the variation of Shear Force Over the cross-section along the length of the beam. With the Shear Force Diagram’s help, we can identify Critical sections Subjected to Shear and design amendments to be made to avoid failure.

Similarly, Bending Moment Diagram is the Graphical representation of the Bending moment’s variation over the cross-section along the length of the beam. With the B. M Diagram’s help, we can identify Critical sections Subjected to bending and design amendments to be made to avoid failure. While constructing the Shear Force Diagram [S.F.D.], There is a sudden rise or sudden drop due to point load acting on the beam while constructing Bending moment Diagram [BMD]; there is a sudden rise or sudden drop due to couples acting on the beam.

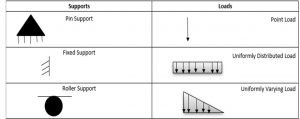
Types of Supports and Loads

Fixed Support: It can offer three reactions in the plane of the member (1 Horizontal reaction, 1 Vertical reaction, 1 Moment reaction)

Pin Support: It can offer two reactions in the plane of the member (1 Horizontal reaction, 1 Vertical reaction)

Roller Support: It can offer only one reaction in the plane of the member (1 Vertical reaction)

Concentrated or point Load: In this, the entire intensity of load is restricted to a finite area or on a point.

Uniformly Distributed Load [U.D.L.]:  In this, the entire intensity of load is constant along the length of the beam.

Uniformly varying Load [U.V.L.]:  In this, the entire intensity of load is varying linearly along the length of the beam.

Supports 1
Types of Supports and Loads

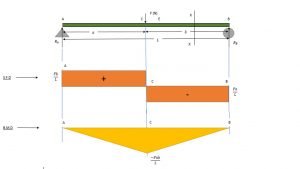
Shear Force Diagram and Bending Moment Diagram for a simply supported beam carrying point load only.

Consider the simply supported beam shown in the figure below carrying Point loads only. In a Simply supported beam, one end is pin supported while another end is roller support.

FBD SSB
Free Body Diagram for Simply Supported Beam Subjected to Load F

The value of the reaction at A and B can be calculated by applying Equilibrium conditions of

\sum F_y=0, \sum F_x=0 ,\sum M_A=0

For vertical Equilibrium,

R_A+R_B=F…………[1]

Taking Moment about A, Clockwise moment positive and Counter Clockwise moment is taken negative

F*a-R_B*L=0

R_B=\frac{Fa}{L}

Putting the value of RB in [1], we get

R_A=F-R_B

R_A=F-\frac{Fa}{L}

R_A=\frac{F(L-a)}{L}=\frac{Fb}{L}

Thus,\; R_A=\frac{Fb}{L}

Let X-X be the section of interest at a distance of x from end A

According to the Sign convention discussed earlier, if we start calculating Shear Force from the Left side or Left end of the beam, Upward acting force is taken as Positive, and Downward acting Force is taken as Negative.

Shear Force at Point A

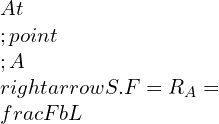
At\;point\;A\rightarrow S.F=R_A=\frac{Fb}{L}

We know that the Shear Force remains constant between points of application of Point Loads.

Shear force at C

S.F=R_A=\frac{Fb}{L}

Shear force at region X-X is

S.F=R_A-F

 S.F=\frac{Fb}{L}-F

    =\frac{F(b-L)}{L}

S.F=\frac{-Fa}{L}

Shear Force at B

S.F=R_B=\frac{-Fa}{L}

For Bending Moment Diagram, if we start calculating B.M from the Left side or Left end of the beam, Clockwise Moment is taken as positive. Counter Clockwise Moment is taken as Negative.

  • at A = 0
  • at B = 0
  • at C

B.M_C=-R_A*a

B.M_C=\frac{-Fb}{L}*a

B.M_C=\frac{-Fab}{L}

SFD SSB
Shear Force and Bending Moment Diagram for Simply Supported Beam with Point Load

Shear Force [S.F.D] and Bending Moment Diagram [B.M.D] for a Cantilever beam with Uniformly Distributed load (U.D.L.) only.

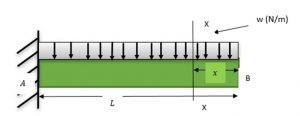
Consider the Cantilever beam shown in the figure below U.D.L. only. In a Cantilever beam, one end is Fixed while another end is free to move.

Cantilever UDL 1
Cantilever Beam Subjected to Uniformly Distributed Loading Condition

The resultant load acting on the Beam Due to U.D.L. can be given by

W = Area of a rectangle

W = L * w

W=wL

Equivalent Point Load wL will act at the center of the beam. i.e., at L/2

Free Body Diagram of the Beam becomes

Cantilever UDL FBD 2
Free Body Diagram of the Beam

The value of the reaction at A can be calculated by applying Equilibrium conditions

\sum F_y=0, \sum F_x=0 ,\sum M_A=0

For horizontal Equilibrium

\sum F_x=0

R_{HA}=0

For vertical Equilibrium

\sum F_y=0

R_{VA}-wL=0

R_{VA}=wL

Taking Moment about A, Clockwise moment positive and Counter Clockwise moment is taken as negative

wL*\frac{L}{2}-M_A=0

M_A=\frac{wL^2}{2}

Let X-X be the section of interest at a distance of x from a free end

According to the Sign convention discussed earlier, if we start calculating Shear Force from the Left side or Left end of the beam, Upward acting force is taken as Positive, and Downward acting Force is taken as Negative.

Shear force at A is 

S.F_A=R_{VA}=wL

at region X-X is

S.F_x=R_{VA}-w[L-x]

S.F_x=wL-wL+wx=wx

Shear force at B is

S.F=R_{VA}-wL

S.F_B=wL-wL=0

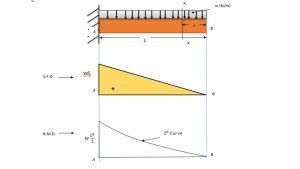
The shear Force values at A and B states that the Shear force varies linearly from fixed end to free end.

For BMD , if we start calculating Bending Moment from the Left side or Left end of the beam, Clockwise Moment is taken as Positive and Counter-Clockwise Moment is taken as Negative.

B.M at A

B.M_A=M_A=\frac{wL^2}{2}

B.M at X

B.M_x=M_A-w[L-x]\frac{L-x}{2}

B.M_x=\frac{wL^2}{2}-\frac{w(L-x)^2}{2}

B.M_x=wx(L-\frac{x}{2})

B.M at B

B.M_B=M_A-\frac{wL^2}{2}

B.M_B=\frac{wL^2}{2}-\frac{wL^2}{2}=0

Cantilever with UDL SFD BMD
S.F.D and B.M.D Diagram For cantilever beam with Uniformly Distributed Loading

4 Point Bending Moment Diagram and Equations

Consider a simply supported beam with two equal Loads W acting at a distance a from either end.

FBD 4 point bending
FBD for 4 – Point Bending Diagram

The value of the reaction at A and B can be calculated by applying Equilibrium conditions

\sum F_y=0, \sum F_x=0 ,\sum M_A=0

For vertical Equilibrium

R_A+R_B=2W…………[1]

Taking Moment about A, Clockwise moment positive and Counter Clockwise moment is taken negative

Wa+W[L-a]=R_BL

R_B=W

From [ 1 ]we get

R_A=2W-W=W

According to the Sign convention discussed earlier, if we start calculating Shear Force from the Left side or Left end of the beam, Upward acting force is taken as Positive, and Downward acting Force is taken as Negative. For BMD diagram plotting, if we start calculating Bending Moment from the Left side or Left end of the beam, Clockwise Moment is taken as Positive and Counter-Clockwise Moment is taken as Negative.

Shear force at A is

S.F_A=R_A=W

Shear force at C is

S.F_C=W

Shear force at D is

S.F_D=0

Shear force at B is

S.F_B=0-W=-W

For Bending Moment Diagram

B. M at A = 0

B. M at C

B.M_C=R_A*a

B.M_C=Wa

B.M at D

B.M_D=WL-Wa-WL+2Wa

B.M_D=Wa

B. M at B = 0

4 point Bending
S.F.D and B.M.D diagram for 4 Point Bending Diagram

Question and Answer of Bending Moment

Q.1) What is the difference between moment and bending moment?

Ans: A Moment can be defined as the product of force and the length of the line passing through the point of support and is perpendicular to the force. A bending moment is a reaction induced inside a structural member when an external force or moment is applied to it, causing the member to bend.

Q.2) What is a bending moment diagram definition?

Ans: Bending Moment Diagram is the Graphical representation of the variation of B.M Over the cross-section along the length of the beam. With this Diagram’s help, we can identify Critical sections Subjected to bending and design amendments to be made to avoid failure.

Q.3) What is the Formula for Bending Stress?

Ans: Bending Stress can be defined as resistance induced due to Bending Moment or by two equal and opposite couples in the plane of the member. Its Formula is given by

\frac{M}{I}=\frac{\sigma}{y}=\frac{E}{R}

Where, M = Applied bending moment over the cross-section of the beam.

I = Second area moment of Inertia

σ = Bending Stress-induced in the member

y = Vertical distance between the neutral axis of the beam and the desired fiber or element in mm

E = Young’s Modulus in MPa

R = Radius of Curvature in mm

To know about Strength of material click here