How To Find Molar Mass From Molarity: Detailed Explanation

Calculating the molar mass from molarity is an essential concept in chemistry. Molarity measures the concentration of a solution, while molar mass determines the mass of a given substance. By understanding how to find molar mass from molarity, you can determine the mass of a substance in a solution and perform various calculations in chemistry. In this blog post, we will explore step-by-step guides and examples to help you master this important concept.

How to Calculate Molar Mass from Molarity

how to find molar mass from molarity
Image by Mikael Häggström – Wikimedia Commons, Wikimedia Commons, Licensed under CC0.

A. Step-by-step Guide to Calculate Molar Mass from Molarity

To calculate the molar mass from molarity, follow these steps:

  1. Identify the solute: Determine the substance whose molar mass you want to calculate.

  2. Determine the molarity: Molarity is defined as the number of moles of solute per liter of solution. It is represented by the formula:

Molarity (M) = Moles of Solute / Volume of Solution (in liters)

  1. Rearrange the formula: Rearrange the formula to solve for moles of solute:

Moles of Solute = Molarity (M) * Volume of Solution (in liters)

  1. Calculate the molar mass: The molar mass is calculated by dividing the mass of the solute by the moles of solute:

Molar Mass = Mass of Solute / Moles of Solute

B. Worked-out Example: Calculating Molar Mass from Molarity

Let’s consider an example to understand how to calculate the molar mass from molarity:

Suppose you have a solution with a molarity of 0.5 M and a volume of 1 liter. You want to find the molar mass of the solute.
– First, use the formula Moles of Solute = Molarity * Volume of Solution to calculate the moles of solute:
Moles of Solute = 0.5 M * 1 L = 0.5 moles
– Next, divide the mass of the solute by the moles of solute to find the molar mass. Let’s say the mass of the solute is 50 grams:
Molar Mass = 50 g / 0.5 moles = 100 g/mol

Therefore, the molar mass of the solute in the given solution is 100 grams per mole.

How to Find Molar Mass Given Molarity and Volume

how to find molar mass from molarity
Image by Christinelmiller – Wikimedia Commons, Wikimedia Commons, Licensed under CC BY-SA 4.0.

A. Steps to Find Molar Mass Given Molarity and Volume

To find the molar mass given molarity and volume, follow these steps:

  1. Determine the molarity and volume: Identify the given molarity and volume values in the problem.

  2. Use the formula: Use the formula Moles of Solute = Molarity * Volume of Solution to calculate the moles of solute.

  3. Determine the mass: Measure the mass of the solute in grams.

  4. Calculate the molar mass: Divide the mass of the solute by the moles of solute to find the molar mass.

B. Worked-out Example: Finding Molar Mass Given Molarity and Volume

Let’s work through an example to understand how to find the molar mass given molarity and volume:

Suppose you have a solution with a molarity of 0.1 M and a volume of 500 milliliters. You want to find the molar mass of the solute.
– First, convert the volume from milliliters to liters:
Volume of Solution = 500 mL * (1 L / 1000 mL) = 0.5 L
– Use the formula Moles of Solute = Molarity * Volume of Solution to calculate the moles of solute:
Moles of Solute = 0.1 M * 0.5 L = 0.05 moles
– Next, measure the mass of the solute. Let’s assume it is 10 grams.
– Calculate the molar mass by dividing the mass of the solute by the moles of solute:
Molar Mass = 10 g / 0.05 moles = 200 g/mol

Therefore, the molar mass of the solute in the given solution is 200 grams per mole.

How to Determine Molar Mass from Moles and Grams

how to find molar mass from molarity
Image by International Union of Pure and Applied Chemistry (IUPAC) – Wikimedia Commons, Licensed under CC BY-SA 4.0.

A. Steps to Determine Molar Mass from Moles and Grams

To determine the molar mass from moles and grams, follow these steps:

  1. Identify the number of moles: Determine the number of moles of the substance.

  2. Determine the mass: Measure the mass of the substance in grams.

  3. Calculate the molar mass: Divide the mass of the substance by the number of moles.

B. Worked-out Example: Determining Molar Mass from Moles and Grams

Let’s go through an example to understand how to determine the molar mass from moles and grams:

Suppose you have 2 moles of a substance and its mass is 40 grams. You want to find the molar mass of the substance.
– Identify the number of moles: The number of moles is given as 2 moles.
– Determine the mass: The mass of the substance is measured as 40 grams.
– Calculate the molar mass by dividing the mass by the number of moles:
Molar Mass = 40 g / 2 moles = 20 g/mol

Therefore, the molar mass of the substance is 20 grams per mole.

How to Find Molar Mass without Moles

A. Steps to Find Molar Mass without Moles

To find the molar mass without moles, follow these steps:

  1. Determine the mass: Measure the mass of the substance in grams.

  2. Identify the number of particles: Determine the number of particles, such as atoms or molecules, present in the substance.

  3. Calculate the molar mass: Divide the mass of the substance by the number of particles.

B. Worked-out Example: Finding Molar Mass without Moles

Let’s work through an example to understand how to find the molar mass without moles:

Suppose you have 50 grams of a substance, and it contains 6.02 x 10^23 molecules. You want to find the molar mass of the substance.
– Determine the mass: The mass of the substance is given as 50 grams.
– Identify the number of particles: The substance contains 6.02 x 10^23 molecules.
– Calculate the molar mass by dividing the mass by the number of particles:
Molar Mass = 50 g / (6.02 x 10^23) molecules

Therefore, the molar mass of the substance can be found by dividing the mass by the number of particles.

How to Find Molarity from Molar Mass and Density

A. Steps to Find Molarity from Molar Mass and Density

To find the molarity from molar mass and density, follow these steps:

  1. Determine the molar mass: Identify the molar mass of the solute.

  2. Determine the density: Measure the density of the solution in grams per milliliter.

  3. Calculate the molarity: Calculate the molarity using the formula:

Molarity (M) = Molar Mass / (Density * Volume of Solution)

B. Worked-out Example: Finding Molarity from Molar Mass and Density

Let’s go through an example to understand how to find the molarity from molar mass and density:

Suppose the molar mass of the solute is 30 g/mol, and the density of the solution is 1.5 g/mL. You want to find the molarity of the solution.
– Determine the molar mass: The molar mass of the solute is given as 30 g/mol.
– Determine the density: The density of the solution is given as 1.5 g/mL.
– Calculate the molarity using the formula:
Molarity = 30 g/mol / (1.5 g/mL * Volume of Solution)

Therefore, the molarity of the solution can be found by dividing the molar mass by the product of density and volume.

Also Read:

How To Find Molar Mass From Volume: Detailed Explanations

Understanding how to find molar mass from volume is a fundamental concept in chemistry. molar mass is defined as the mass of one mole of a substance, and it plays a crucial role in various calculations in chemistry, such as determining the concentration of a solution or the amount of a substance in a given volume. In this blog post, we will explore different methods to find molar mass from volume, including calculations involving temperature, pressure, density, and concentration.

III. How to Find Molar Mass from Volume

A. Step-by-Step Guide to Calculate Molar Mass from Volume

image

To calculate the molar mass from volume, follow these steps:

  1. Determine the volume of the substance in question. Make sure the volume is measured in a consistent unit, such as liters (L) or milliliters (mL).
  2. Convert the volume to the molar volume at standard temperature and pressure (STP). The molar volume at STP is approximately 22.4 liters per mole.
  3. Divide the given volume by the molar volume to obtain the number of moles.
  4. Finally, divide the mass of the substance by the number of moles to find the molar mass.

B. Worked Out Examples of Finding Molar Mass from Volume

Let’s work through a couple of examples to solidify our understanding.

Example 1: Find the molar mass of a gas with a volume of 44.8 liters at STP.

Solution:

  • Step 1: The given volume is 44.8 liters.
  • Step 2: Since the volume is at STP, we can directly use the molar volume of 22.4 liters/mol.
  • Step 3: number of moles = 44.8 L / 22.4 L/mol = 2 moles
  • Step 4: Divide the mass of the substance by the number of moles to find the molar mass. (This Step requires additional information, such as the mass of the substance.)

Example 2: A sample of gas occupies a volume of 5.60 liters at a pressure of 2.50 atmospheres and a temperature of 300 Kelvin. Find the molar mass of the gas.

Solution:

  • Step 1: The given volume is 5.60 liters.
  • Step 2: Since the volume is not at STP, we need to use the ideal gas law to calculate the molar mass.
  • Step 3: From the ideal gas law equation: PV = nRT, we can rearrange it to solve for n (number of moles). n = PV / RT
  • Step 4: Insert the values into the equation: n = (2.50 atm * 5.60 L) / (0.0821 atm L/mol K * 300 K) ≈ 0.481 mol
  • Step 5: Divide the mass of the substance by the number of moles to find the molar mass. (This Step requires additional information, such as the mass of the substance.)

IV. How to Find Molar Mass with Volume, Temperature, and Pressure

molar mass from volume

A. The Ideal Gas Law and its Application

The ideal gas law, PV = nRT, relates the pressure, volume, temperature, and the number of moles of a gas. It is a useful tool for finding the molar mass when more than just the volume is known.

B. Step-by-Step Guide to Calculate Molar Mass with Volume, Temperature, and Pressure

To calculate the molar mass using the ideal gas law, follow these steps:

  1. Determine the volume, temperature, and pressure of the gas.
  2. Convert the temperature to Kelvin by adding 273.15 to the Celsius value.
  3. Convert the pressure to atmospheres if it is not already in that unit.
  4. Use the ideal gas law equation PV = nRT to calculate the number of moles of the gas.
  5. Finally, divide the mass of the substance by the number of moles to find the molar mass.

C. Worked Out Examples of Finding Molar Mass with Volume, Temperature, and Pressure

Let’s work through an example to illustrate this concept.

Example: A gas occupies a volume of 10.0 liters at a temperature of 25 degrees Celsius and a pressure of 4.00 atmospheres. Find the molar mass of the gas.

Solution:

  • Step 1: The given volume is 10.0 liters, temperature is 25 degrees Celsius (298K), and pressure is 4.00 atmospheres.
  • Step 2: Convert the temperature to Kelvin: 25 degrees Celsius + 273.15 = 298K.
  • Step 3: The pressure is already in atmospheres.
  • Step 4: Use the ideal gas law equation PV = nRT to calculate the number of moles. Rearranging the equation, we have n = PV / RT.
  • Step 5: Insert the values into the equation: n = (4.00 atm * 10.0 L) / (0.0821 atm L/mol K * 298 K) ≈ 1.36 mol.
  • Step 6: Divide the mass of the substance by the number of moles to find the molar mass. (This Step requires additional information, such as the mass of the substance.)

How to Calculate Mass from Volume and Concentration

A. Understanding Concentration in Chemistry

concentration is a measure of the amount of solute dissolved in a given amount of solvent or solution. It is vital in many areas of chemistry, such as preparing solutions and determining stoichiometry. Molar concentration, also known as molarity, is the most common way to express concentration, and it is defined as the number of moles of solute per liter of solution.

B. Step-by-Step Guide to Calculate Mass from Volume and Concentration

To calculate the mass from volume and concentration, follow these steps:

  1. Determine the volume of the solution and the molar concentration.
  2. Convert the volume to liters if it is not already in that unit.
  3. Multiply the volume by the molar concentration to obtain the number of moles of solute.
  4. Finally, multiply the number of moles by the molar mass to find the mass of the solute.

C. Worked Out Examples of Calculating Mass from Volume and Concentration

Let’s work through an example to illustrate this concept.

Example: What is the mass of the solute in a 500 mL solution with a molar concentration of 0.25 M?

Solution:

  • Step 1: The given volume is 500 mL, and the molar concentration is 0.25 M.
  • Step 2: Convert the volume to liters: 500 mL / 1000 mL/L = 0.5 L.
  • Step 3: Multiply the volume by the molar concentration: 0.5 L * 0.25 mol/L = 0.125 mol.
  • Step 4: Multiply the number of moles by the molar mass to find the mass of the solute. (This Step requires additional information, such as the molar mass of the solute.)

VI. How to Find Molar Mass from Density and Volume

A. Understanding Density in Chemistry

Density is a measure of how much mass is contained in a given volume. It is often used to identify substances or determine the concentration of a solution. In the context of finding molar mass, density can be a useful parameter when combined with volume.

B. Step-by-Step Guide to Calculate Molar Mass from Density and Volume

To calculate the molar mass from density and volume, follow these steps:

  1. Determine the density and volume of the substance.
  2. Convert the density to grams per liter (g/L) if it is not already in that unit.
  3. Multiply the density by the volume to obtain the mass of the substance.
  4. Finally, divide the mass by the molar mass to find the number of moles, and hence, the molar mass.

C. Worked Out Examples of Finding Molar Mass from Density and Volume

Let’s work through an example to illustrate this concept.

Example: A liquid has a density of 1.50 g/mL and occupies a volume of 250 mL. Find the molar mass of the liquid.

Solution:

  • Step 1: The given density is 1.50 g/mL, and the volume is 250 mL.
  • Step 2: Convert the density to grams per liter: 1.50 g/mL * 1000 mL/L = 1500 g/L.
  • Step 3: Multiply the density by the volume: 1500 g/L * 250 mL = 375000 g.
  • Step 4: Divide the mass by the molar mass to find the number of moles and the molar mass. (This Step requires additional information, such as the mass of the substance.)

VII. How to Find Concentration from Molar Mass and Volume

A. Understanding the Relationship between Concentration, Molar Mass, and Volume

The concentration of a solution is directly related to the molar mass and volume of the solute. By knowing the molar mass and volume, we can calculate the concentration of a solution.

B. Step-by-Step Guide to Find Concentration from Molar Mass and Volume

To find the concentration from molar mass and volume, follow these steps:

  1. Determine the molar mass of the solute and the volume of the solution.
  2. Convert the volume to liters if it is not already in that unit.
  3. Divide the molar mass by the volume to obtain the concentration in moles per liter (M).

C. Worked Out Examples of Finding Concentration from Molar Mass and Volume

Let’s work through an example to illustrate this concept.

Example: A solution contains 0.50 moles of solute dissolved in 2.0 liters of solution. Find the concentration of the solution.

Solution:

  • Step 1: The molar mass of the solute is not given, but we know the number of moles.
  • Step 2: The volume is already in liters.
  • Step 3: Divide the number of moles by the volume: 0.50 mol / 2.0 L = 0.25 M.

Also Read:

Mastering the Art of Finding the Area of a Trapezoid 2: A Comprehensive Guide

how to find the area of a trapezoid 2

In the realm of geometry, understanding the area of various shapes is a fundamental skill. One such shape that often appears in mathematical problems is the trapezoid. While the basic formula for finding the area of a trapezoid is well-known, there are more advanced techniques and considerations when dealing with specific types of trapezoids. This … Read more

How to Find Wavelength of Transverse Wave: Problems, Examples and Facts

wavelength of transverse wave 0

In the vast world of waves, the concept of wavelength plays a crucial role in understanding and analyzing transverse waves. Whether you’re studying physics, mathematics, or any other field that deals with wave phenomena, knowing how to find the wavelength of a transverse wave is essential. In this blog post, we will dive deep into this topic, exploring the definition of wavelength, its importance in wave analysis, and the step-by-step process to calculate it. So, let’s get started!

The Concept of Wavelength in Transverse Waves

Definition of Wavelength

wavelength of transverse wave 2

Before we delve into the calculation of wavelength, let’s first understand what it represents. Wavelength is the distance between two consecutive points in a wave that are in phase with each other. In transverse waves, this distance is measured from crest to crest or trough to trough. It is typically denoted by the Greek letter lambda $\lambda$.

The wavelength of a wave determines the spatial extent of one complete cycle of oscillation. In simpler terms, it represents the length of the wave in the direction perpendicular to its motion. An understanding of wavelength is vital in analyzing various wave phenomena and their interactions.

Importance of Wavelength in Wave Analysis

Wavelength plays a crucial role in the study of wave properties and behaviors. It is directly related to other fundamental characteristics of waves, such as frequency, speed, and amplitude. By manipulating and understanding these relationships, scientists and researchers can gain valuable insights into different wave phenomena.

Wavelength is particularly important when studying wave interference, reflection, refraction, and diffraction. These phenomena occur due to the interaction of waves with different wavelengths. By analyzing the wavelengths involved, we can predict and explain the outcome of such interactions.

Relationship between Wavelength and Transverse Waves

In transverse waves, particles oscillate perpendicular to the direction of wave propagation. This motion creates crests and troughs along the wave. The wavelength of a transverse wave is related to the distance between two consecutive crests or troughs.

To visualize this, imagine a string being moved up and down at one end. As the wave travels along the string, each particle of the string moves in a transverse motion. The distance between two adjacent points that move in the same direction (either up or down) represents the wavelength of the transverse wave.

How to Calculate the Wavelength of a Transverse Wave

Now that we have a solid understanding of the concept of wavelength in transverse waves, let’s explore how to calculate it. To measure the wavelength accurately, we need a few tools and follow a step-by-step guide.

Tools Needed to Measure Wavelength

To measure the wavelength of a transverse wave, you will need the following tools:

  1. A ruler or a measuring tape
  2. A source of transverse waves (such as a rope or a string)
  3. A stable surface to set up your wave source

Step-by-Step Guide to Calculating Wavelength

Follow these steps to calculate the wavelength of a transverse wave:

  1. Set up your wave source on a stable surface, ensuring it is taut and straight.
  2. Generate a transverse wave by creating a disturbance at one end of the wave source. This can be done by moving your hand up and down or using any other suitable method.
  3. Observe the wave as it propagates along the wave source.
  4. Identify a crest or a trough in the wave and mark it using a marker or a small piece of tape.
  5. Measure the distance between two consecutive crests or troughs using a ruler or a measuring tape. Make sure to measure the distance along the direction of wave propagation.
  6. Record the measured distance as the wavelength of the transverse wave.

Worked out Examples of Wavelength Calculation

Let’s work through a couple of examples to solidify our understanding of how to calculate the wavelength of a transverse wave.

Example 1:

Suppose you have a rope stretched between two points, and you generate a transverse wave by flicking it at one end. After observing the wave’s motion, you measure a distance of 1.5 meters between two consecutive crests. In this case, the wavelength of the transverse wave is 1.5 meters.

Example 2:

Imagine that you have a string attached to a wall, and you create a transverse wave by shaking it up and down. Upon careful measurement, you find that the distance between two troughs is 0.8 meters. Therefore, the wavelength of the transverse wave in this scenario is 0.8 meters.

By following these steps and using the appropriate tools, you can accurately determine the wavelength of a transverse wave.

Common Mistakes and Misconceptions in Finding Wavelength

While calculating the wavelength of a transverse wave, there are some common errors and misconceptions to be aware of. Let’s discuss them briefly and provide tips to avoid these mistakes.

Common Errors in Calculating Wavelength

One common mistake is measuring the distance between a crest and the adjacent trough, rather than between two consecutive crests or troughs. Remember, the wavelength is the distance between two points that are in phase with each other.

Another error is not measuring along the direction of wave propagation. Make sure to measure the distance horizontally or vertically, depending on how the wave propagates.

Misconceptions about Wavelength and Wave Frequency

Sometimes, students confuse wavelength with wave frequency. While wavelength represents the spatial extent of a wave, frequency refers to the number of complete oscillations or cycles occurring in a given time interval. These two properties of a wave are distinct and should not be confused with each other.

Wavelength and wave frequency are related through the wave speed, which is the product of wavelength and frequency. This relationship is described by the equation:

 \text{Wave Speed} = \text{Wavelength} \times \text{Frequency}

Tips to Avoid Mistakes in Wavelength Calculation

wavelength of transverse wave 1

To avoid errors and misconceptions while calculating the wavelength of transverse waves, keep the following tips in mind:

  1. Clearly identify and measure the distance between two consecutive crests or troughs.
  2. Ensure that you measure the distance along the direction of wave propagation.
  3. Differentiate between wavelength and wave frequency, understanding their distinct meanings.
  4. Double-check your calculations and measurements to minimize errors.

By being mindful of these tips, you can enhance the accuracy of your wavelength calculations and develop a better understanding of transverse waves.

Understanding how to find the wavelength of a transverse wave is a fundamental skill in wave analysis. By comprehending the concept of wavelength, its significance in wave phenomena, and the step-by-step process to calculate it, you are equipped with valuable knowledge for studying various fields like physics, mathematics, and engineering. So, next time you encounter a transverse wave, you’ll be ready to measure its wavelength accurately and explore its fascinating characteristics.

Numerical Problems on How to Find Wavelength of Transverse Wave

Problem 1:

A transverse wave propagates in a medium with a frequency of 50 Hz. The speed of the wave is 300 m/s. Calculate the wavelength of the wave.

Solution:

how to find wavelength of transverse wave
Image by Badseed – Wikimedia Commons, Wikimedia Commons, Licensed under CC BY-SA 3.0.

Given:
Frequency (f) = 50 Hz,
Speed of the wave (v) = 300 m/s.

The formula to calculate the wavelength $\lambda$ of a transverse wave is given by:
 \lambda = \frac{v}{f}

Substituting the given values into the formula, we get:
 \lambda = \frac{300}{50} = 6 \, \text{m}

Hence, the wavelength of the transverse wave is 6 meters.

Problem 2:

how to find wavelength of transverse wave
Image by Sharon Bewick – Wikimedia Commons, Licensed under CC BY-SA 3.0.
wavelength of transverse wave 3

The wavelength of a transverse wave is 8 cm. The speed of the wave is 400 m/s. What is the frequency of the wave?

Solution:

Given:
Wavelength $\lambda$ = 8 cm = 0.08 m,
Speed of the wave (v) = 400 m/s.

The formula to calculate the frequency (f) of a transverse wave is given by:
 f = \frac{v}{\lambda}

Substituting the given values into the formula, we get:
 f = \frac{400}{0.08} = 5000 \, \text{Hz}

Hence, the frequency of the transverse wave is 5000 Hz.

Problem 3:

A transverse wave has a wavelength of 3 meters and a frequency of 60 Hz. Calculate the speed of the wave.

Solution:

Given:
Wavelength $\lambda$ = 3 m,
Frequency (f) = 60 Hz.

The formula to calculate the speed (v) of a transverse wave is given by:
 v = \lambda \times f

Substituting the given values into the formula, we get:
 v = 3 \times 60 = 180 \, \text{m/s}

Hence, the speed of the transverse wave is 180 m/s.

Also Read:

How to Find Limiting Reactant: 9 Scenarios And Steps,Example

How to Find Limiting Reactant

In chemistry, a limiting reactant is a substance that limits the amount of product that can be formed in a chemical reaction. Identifying the limiting reactant is crucial because it allows us to calculate the maximum amount of product that can be obtained. In this blog post, we will explore the concept of limiting reactants, understand their importance, and learn how to determine them in different scenarios.

Understanding the Concept of Limiting Reactant

Before we dive into finding the limiting reactant, let’s understand what it actually means. In a chemical reaction, reactants combine to form products. The balanced equation for the reaction shows the stoichiometric relationship between reactants and products. However, in reality, the reactants may not be available in the exact ratio specified by the balanced equation. This is where the concept of limiting reactant comes into play.

The limiting reactant is the reactant that is completely consumed first, thereby limiting the amount of product that can be formed. The other reactant, which is not completely consumed, is referred to as the excess reactant. To find the limiting reactant, we compare the amounts of each reactant present and calculate which one will run out first.

Importance of Identifying the Limiting Reactant

Identifying the limiting reactant is crucial for several reasons. Firstly, it allows us to determine the maximum amount of product that can be obtained. This is important for industries that rely on chemical reactions to produce specific amounts of products. Additionally, knowing the limiting reactant helps in calculating other important parameters such as the theoretical yield and percent yield of a reaction. By understanding the concept of limiting reactants, chemists can optimize reactions to obtain higher yields and minimize waste.

Steps to Determine the Limiting Reactant

To determine the limiting reactant, we follow these steps:

  1. Write the balanced chemical equation for the reaction.
  2. Identify the given quantities of each reactant (mass, moles, concentration, or volume).
  3. Convert the given quantities to moles (if necessary) using the molar mass or molar volume of the reactant.
  4. Use the stoichiometry of the balanced equation to calculate the amount of each reactant required to completely react.
  5. Compare the calculated amounts of each reactant to identify the limiting reactant.

Now that we understand the concept of limiting reactants and why they are important, let’s explore how to find them in different scenarios.

Finding Limiting Reactant with Different Parameters

how to find limiting reactant
Image by AGeremia – Wikimedia Commons, Wikimedia Commons, Licensed under CC BY-SA 4.0.
how to find limiting reactant

Image by Juan Carcache – Wikimedia Commons, Wikimedia Commons, Licensed under CC BY-SA 4.0.

How to Find Limiting Reactant with Mass

When given the mass of each reactant, we can determine the limiting reactant by following these steps:

  1. Convert the given masses of each reactant to moles using their molar masses.
  2. Use the stoichiometry of the balanced equation to calculate the moles of product that can be formed from each reactant.
  3. The reactant that produces the lesser amount of product is the limiting reactant.

Let’s consider an example to illustrate this:

Suppose we have a reaction between ammonia (NH3) and oxygen (O2) to produce nitrogen gas (N2) and water (H2O), according to the balanced equation:

4 NH3 + 5 O2 → 4 NO + 6 H2O

If we have 10 grams of ammonia and 8 grams of oxygen, we can find the limiting reactant as follows:

  1. Convert the given masses to moles:
  2. Moles of NH3 = mass / molar mass = 10 g / 17.03 g/mol ≈ 0.587 mol
  3. Moles of O2 = mass / molar mass = 8 g / 32 g/mol = 0.25 mol

  4. Use the stoichiometry to calculate the moles of product:

  5. Moles of NO produced from NH3 = 0.587 mol NH3 * (4 mol NO / 4 mol NH3) = 0.587 mol
  6. Moles of NO produced from O2 = 0.25 mol O2 * (4 mol NO / 5 mol O2) = 0.2 mol

  7. Since the moles of NO produced from O2 (0.2 mol) is less than the moles produced from NH3 (0.587 mol), oxygen is the limiting reactant in this scenario.

How to Find Limiting Reactant with Moles

When given the number of moles of each reactant, we can find the limiting reactant by following these steps:

  1. Use the stoichiometry of the balanced equation to calculate the moles of product that can be formed from each reactant.
  2. The reactant that produces the lesser amount of product is the limiting reactant.

Let’s consider another example to illustrate this:

Suppose we have a reaction between hydrogen gas (H2) and nitrogen gas (N2) to produce ammonia gas (NH3), according to the balanced equation:

3 H2 + N2 → 2 NH3

If we have 5 moles of hydrogen gas and 4 moles of nitrogen gas, we can find the limiting reactant as follows:

  1. Use the stoichiometry to calculate the moles of product:
  2. Moles of NH3 produced from H2 = 5 mol H2 * (2 mol NH3 / 3 mol H2) ≈ 3.333 mol
  3. Moles of NH3 produced from N2 = 4 mol N2 * (2 mol NH3 / 1 mol N2) = 8 mol

  4. Since the moles of NH3 produced from H2 (3.333 mol) is less than the moles produced from N2 (8 mol), hydrogen gas is the limiting reactant in this scenario.

How to Find Limiting Reactant with Concentration

When given the concentrations of each reactant, we can determine the limiting reactant by following these steps:

  1. Convert the given concentrations to moles per liter using the molar volume of the reactant (22.4 L/mol for gases at STP).
  2. Use the stoichiometry of the balanced equation to calculate the moles of product that can be formed from each reactant.
  3. The reactant that produces the lesser amount of product is the limiting reactant.

Let’s consider one more example to illustrate this:

Suppose we have a reaction between hydrochloric acid (HCl) and sodium hydroxide (NaOH) to produce sodium chloride (NaCl) and water (H2O), according to the balanced equation:

HCl + NaOH → NaCl + H2O

If we have a 1 Molar (M) solution of HCl and a 2 M solution of NaOH, we can find the limiting reactant as follows:

  1. Convert the given concentrations to moles per liter:
  2. Moles of HCl = concentration * volume = 1 M * 1 L = 1 mol
  3. Moles of NaOH = concentration * volume = 2 M * 1 L = 2 mol

  4. Use the stoichiometry to calculate the moles of product:

  5. Moles of NaCl produced from HCl = 1 mol HCl * (1 mol NaCl / 1 mol HCl) = 1 mol
  6. Moles of NaCl produced from NaOH = 2 mol NaOH * (1 mol NaCl / 1 mol NaOH) = 2 mol

  7. Since the moles of NaCl produced from HCl (1 mol) is less than the moles produced from NaOH (2 mol), HCl is the limiting reactant in this scenario.

These examples demonstrate how to find the limiting reactant in different scenarios based on mass, moles, and concentration. In the next sections, we will explore how to find the limiting reactant in specific types of reactions and complex scenarios.

How to Find Limiting Reactant with Volume

When given the volume of each reactant, we can determine the limiting reactant by following these steps:

  1. Convert the given volumes to moles using the molar volume of the reactant (22.4 L/mol for gases at STP).
  2. Use the stoichiometry of the balanced equation to calculate the moles of product that can be formed from each reactant.
  3. The reactant that produces the lesser amount of product is the limiting reactant.

Let’s consider an example to illustrate this:

Suppose we have a reaction between hydrogen gas (H2) and oxygen gas (O2) to produce water vapor (H2O), according to the balanced equation:

2 H2 + O2 → 2 H2O

If we have 10 liters of hydrogen gas and 15 liters of oxygen gas, we can find the limiting reactant as follows:

  1. Convert the given volumes to moles:
  2. Moles of H2 = volume / molar volume = 10 L / 22.4 L/mol = 0.446 mol
  3. Moles of O2 = volume / molar volume = 15 L / 22.4 L/mol = 0.670 mol

  4. Use the stoichiometry to calculate the moles of product:

  5. Moles of H2O produced from H2 = 0.446 mol H2 * (2 mol H2O / 2 mol H2) = 0.446 mol
  6. Moles of H2O produced from O2 = 0.670 mol O2 * (2 mol H2O / 1 mol O2) = 1.340 mol

  7. Since the moles of H2O produced from H2 (0.446 mol) is less than the moles produced from O2 (1.340 mol), hydrogen gas is the limiting reactant in this scenario.

How to Find Limiting Reactant in Different Types of Reactions

Now that we have covered the basics of finding the limiting reactant, let’s explore how to apply this concept in different types of reactions.

How to Find Limiting Reactant in Combustion Reaction

In a combustion reaction, a hydrocarbon reacts with oxygen to produce carbon dioxide and water. To find the limiting reactant in a combustion reaction, follow the steps mentioned earlier, considering the reactants involved in the reaction.

How to Find Limiting Reactant in Double Displacement Reaction

In a double displacement reaction, two compounds exchange ions to form two new compounds. To find the limiting reactant in a double displacement reaction, follow the same steps mentioned earlier, considering the compounds involved in the reaction.

Finding Limiting Reactant in Complex Scenarios

Sometimes, reactions involve more than two reactants or can produce multiple products. In such complex scenarios, finding the limiting reactant requires additional steps.

How to Find Limiting Reactant with Three Reactants

To find the limiting reactant when three reactants are involved, follow these steps:

  1. Calculate the moles of each reactant based on their given quantities.
  2. Use the stoichiometry of the balanced equation to calculate the moles of product that can be formed from each reactant.
  3. Compare the calculated moles of product for each reactant.
  4. The reactant that produces the least moles of product is the limiting reactant.

How to Find Limiting Reactant when there are Two Products

When a reaction produces multiple products, we need to determine the limiting reactant for each product separately. Follow these steps:

  1. Calculate the moles of each reactant based on their given quantities.
  2. Use the stoichiometry of the balanced equation to calculate the moles of each product that can be formed from each reactant.
  3. Compare the calculated moles of each product for each reactant.
  4. The reactant that produces the least moles of any of the products is the limiting reactant.

Advanced Concepts Related to Limiting Reactant

In addition to finding the limiting reactant, there are a few advanced concepts related to this topic that are worth exploring.

How to Find Excess Reactant

The excess reactant is the reactant that is left over after the limiting reactant has been completely consumed. To find the excess reactant, follow these steps:

  1. Calculate the moles of each reactant based on their given quantities.
  2. Use the stoichiometry of the balanced equation to calculate the moles of product that can be formed from each reactant.
  3. Determine the limiting reactant.
  4. Calculate the moles of the excess reactant by subtracting the moles of the limiting reactant from the initial moles of the reactant.

How to Find Theoretical Yield using Limiting Reactant

Theoretical yield is the maximum amount of product that can be obtained from a reaction based on the limiting reactant. To find the theoretical yield, follow these steps:

  1. Calculate the moles of the limiting reactant.
  2. Use the stoichiometry of the balanced equation to calculate the moles of product that can be formed from the limiting reactant.
  3. Convert the moles of product to grams using the molar mass of the product.

By understanding and applying these advanced concepts, chemists can obtain a deeper understanding of chemical reactions and make more accurate calculations.

Also Read:

How To Find Frequency Of Transverse Wave: Problems, Examples And Facts 

frequency of transverse wave 0

How to Find Frequency of Transverse Wave

Transverse waves are a fascinating phenomenon in physics, and understanding their frequency is crucial to comprehending their behavior. In this blog post, we will delve into the intricacies of finding the frequency of transverse waves, exploring the foundational concepts, mathematical formulas, practical measurement techniques, and advanced concepts related to frequency and transverse waves. So, let’s dive in!

Understanding the Basics of Transverse Waves

Before we can tackle the concept of frequency, let’s first grasp the basics of transverse waves. In a transverse wave, the oscillations occur perpendicular to the direction of wave propagation. Imagine a rope held at one end while you shake the other end up and down. The wave moves horizontally, while the rope oscillates vertically. This up-and-down motion represents the transverse nature of the wave.

The Role of Frequency in Transverse Waves

Frequency plays a vital role in transverse waves. It refers to the number of complete cycles or oscillations that a wave undergoes in one second. In simpler terms, frequency tells us how many times the wave repeats its pattern per unit of time. For example, if you observe a transverse wave and count 10 complete cycles in one second, the frequency of that wave would be 10 hertz (Hz).

The Importance of Frequency Measurement in Physics

how to find frequency of transverse wave
Image by justin evans – Wikimedia Commons, Licensed under CC0.

Frequency measurement is of utmost importance in physics, as it helps us understand the characteristics and behavior of transverse waves. By accurately measuring the frequency, we can determine various properties of the wave, such as its speed, wavelength, and amplitude. Additionally, frequency analysis allows us to study wave interference, propagation, reflection, and the energy carried by the wave.

The Mathematical Approach to Finding Frequency of Transverse Waves

Now, let’s delve into the mathematical aspect of finding the frequency of transverse waves. To calculate the frequency, we can use a simple formula:

f = \frac{v}{\lambda}

Where:
f represents the frequency of the wave,
v denotes the wave speed, and
\lambda represents the wavelength of the wave.

Understanding the Variables in the Frequency Formula

To use the frequency formula effectively, it is essential to understand the variables involved. Wave speed \(v) refers to the rate at which the wave propagates through a medium. It is typically measured in meters per second (m/s).

Wavelength \(\lambda), on the other hand, represents the distance between two corresponding points on the wave, such as the crest of one wave to the crest of the next wave or the trough to the trough. It is measured in meters (m).

Worked Out Examples: Using the Formula to Calculate Frequency

how to find frequency of transverse wave
Image by Glogger – Wikimedia Commons, Wikimedia Commons, Licensed under CC BY-SA 3.0.

Let’s put the frequency formula into action with a couple of worked-out examples to solidify our understanding.

Example 1:
Suppose we have a transverse wave traveling through a medium with a speed of 20 m/s and a wavelength of 2 meters. To find the frequency of the wave, we can use the formula:

f = \frac{v}{\lambda}

Plugging in the given values, we get:

f = \frac{20 \, \text{m/s}}{2 \, \text{m}}

Simplifying the equation gives us:

f = 10 \, \text{Hz}

Therefore, the frequency of the transverse wave in this example is 10 Hz.

Example 2:
Let’s consider another scenario where the wave speed is 15 m/s, and the wavelength is 0.5 meters. Applying the frequency formula, we have:

f = \frac{15 \, \text{m/s}}{0.5 \, \text{m}}

Simplifying further, we find:

f = 30 \, \text{Hz}

Hence, the frequency of this transverse wave is 30 Hz.

Practical Approach to Measuring Frequency of Transverse Waves

In real-world applications, measuring the frequency of transverse waves requires appropriate tools and techniques. One commonly used tool is an oscilloscope, which displays the waveform graphically, allowing us to visualize the number of cycles per second. Another technique involves using a frequency counter, a device specifically designed to measure the frequency of a wave accurately.

Step-by-Step Guide to Measure Frequency

If you want to measure the frequency of a transverse wave manually, here is a step-by-step guide you can follow:

  1. Identify a complete cycle of the transverse wave you wish to measure.
  2. Start a stopwatch or timer.
  3. Count the number of complete cycles the wave undergoes within a specific time frame, for example, 10 seconds.
  4. Divide the number of cycles by the time taken to get the frequency (cycles per second or Hz).

Common Problems and Solutions in Measuring Frequency

frequency of transverse wave 2

While measuring the frequency of transverse waves, you may encounter a few challenges. One common issue is distinguishing complete cycles accurately, especially if the waveform is complex or distorted. To overcome this, it is crucial to carefully observe the wave and identify the points that represent a full cycle. Additionally, external noise or interference can affect the accuracy of measurements. To mitigate this, try conducting measurements in a controlled and quiet environment.

Advanced Concepts Related to Frequency of Transverse Waves

As we delve deeper into the topic, it is essential to explore some advanced concepts related to the frequency of transverse waves:

  • The Impact of Frequency on Wave Properties: The frequency of a transverse wave directly influences its speed, wavelength, and amplitude. Higher frequencies generally correspond to shorter wavelengths and higher speeds, while lower frequencies tend to have longer wavelengths and lower speeds.

  • The Role of Frequency in Wave Interference and Diffraction: Frequency plays a crucial role in wave interference and diffraction phenomena. When two or more waves with different frequencies intersect, they can interfere constructively or destructively, resulting in complex patterns. Similarly, diffraction occurs when waves encounter obstacles or pass through narrow openings, and the frequency determines the extent of diffraction.

  • The Connection between Frequency and Energy of Transverse Waves: The energy of a transverse wave is directly proportional to its frequency. Higher frequency waves carry more energy, while lower frequency waves carry less energy. This relationship between frequency and energy is a fundamental principle in wave physics.

By understanding these advanced concepts, we can gain a deeper insight into the behavior and properties of transverse waves.

Numerical Problems on How to Find Frequency of Transverse Wave

Problem 1:

frequency of transverse wave 1

A transverse wave travels along a string with a speed of 30 m/s. The wavelength of the wave is 0.5 m. Find the frequency of the wave.

Solution:

Given:
Wave speed, v = 30 \, \text{m/s},
Wavelength, \lambda = 0.5 \, \text{m}

The formula to find the frequency of a wave is given by:

 f = \frac{v}{\lambda}

Substituting the given values, we get:

 f = \frac{30 \, \text{m/s}}{0.5 \, \text{m}}

Simplifying the equation:

 f = 60 \, \text{Hz}

Therefore, the frequency of the wave is 60 Hz.

Problem 2:

A transverse wave is produced on a string with a frequency of 200 Hz. If the wave speed is 40 m/s, find the wavelength of the wave.

Solution:

Given:
Frequency, f = 200 \, \text{Hz},
Wave speed, v = 40 \, \text{m/s}

The formula to find the wavelength of a wave is given by:

 \lambda = \frac{v}{f}

Substituting the given values, we get:

 \lambda = \frac{40 \, \text{m/s}}{200 \, \text{Hz}}

Simplifying the equation:

 \lambda = 0.2 \, \text{m}

Therefore, the wavelength of the wave is 0.2 m.

Problem 3:

frequency of transverse wave 3

A transverse wave has a wavelength of 1 m and a frequency of 50 Hz. Find the wave speed.

Solution:

Given:
Wavelength, \lambda = 1 \, \text{m},
Frequency, f = 50 \, \text{Hz}

The formula to find the wave speed is given by:

 v = \lambda \cdot f

Substituting the given values, we get:

 v = 1 \, \text{m} \cdot 50 \, \text{Hz}

Simplifying the equation:

 v = 50 \, \text{m/s}

Therefore, the wave speed is 50 m/s.

Also Read:

How To Find Amplitude Of Transverse Wave: Problems, Examples And Facts 

amplitude of transverse wave 0

How to Find Amplitude of Transverse Wave

In this blog post, we will explore the concept of transverse waves and understand the importance of amplitude in such waves. We will also learn how to calculate the amplitude of a transverse wave and explore practical ways to measure it. Additionally, we will address common mistakes and misconceptions related to amplitude calculation. So, let’s dive in!

Understanding the Concept of Transverse Wave

how to find amplitude of transverse wave
Image by Unknown Artist – Wikimedia Commons, Licensed under CC BY-SA 3.0.

A transverse wave is a type of wave where the particles of the medium vibrate perpendicular to the direction of wave propagation. This means that the particles move up and down or side to side as the wave passes through them. Examples of transverse waves include waves on a string, light waves, and electromagnetic waves.

Importance of Amplitude in Transverse Waves

amplitude of transverse wave 2

The amplitude of a transverse wave plays a significant role in determining various wave properties. It represents the maximum displacement of the particles from their equilibrium position. The larger the amplitude, the greater the energy carried by the wave. It also affects the wave’s intensity and determines the wave’s height or loudness (in the case of sound waves).

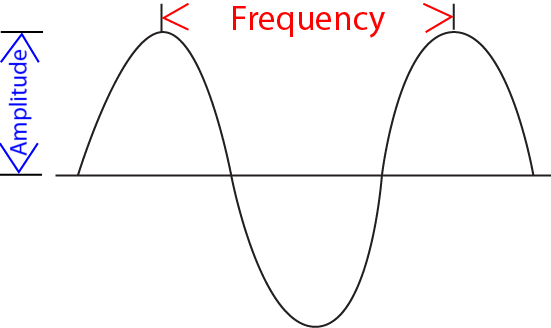
The amplitude of a transverse wave is closely related to the wave’s polarization. Polarization refers to the direction in which the particles of the medium vibrate. The amplitude determines the maximum distance the particles move in that direction. Understanding amplitude and polarization is crucial in fields like optics, where the behavior of light waves is studied.

How to Calculate the Amplitude of a Transverse Wave

To calculate the amplitude of a transverse wave, we need to identify the peak and trough of the wave. The peak is the highest point of the wave, while the trough is the lowest point. Once we have identified these points, we can use a mathematical formula to determine the amplitude.

The mathematical formula to calculate the amplitude of a transverse wave is as follows:

Amplitude = frac{{text{{Peak}} - text{{Trough}}}}{2}

Let’s work out a few examples to understand this calculation better.

A. Worked Out Examples on Amplitude Calculation

how to find amplitude of transverse wave
Image by Badseed – Wikimedia Commons, Wikimedia Commons, Licensed under CC BY-SA 3.0.

Example 1:
Let’s say we have a wave on a string, and the peak of the wave is measured to be 4 units and the trough is measured to be -2 units. By applying the formula, we can calculate the amplitude as follows:

Amplitude = frac{{4 - (-2)}}{2} = frac{6}{2} = 3

Therefore, the amplitude of this wave is 3 units.

Example 2:
Consider a scenario where the peak of a wave is at 10 units and the trough is at -5 units. Using the formula, we can calculate the amplitude as follows:

Amplitude = frac{{10 - (-5)}}{2} = frac{15}{2} = 7.5

Hence, the amplitude of this wave is 7.5 units.

Practical Approach to Measure Amplitude of a Transverse Wave

When it comes to measuring the amplitude of a transverse wave in practical scenarios, there are various tools and techniques available. For example, in the case of waves on a string, we can use a ruler or a measuring tape to measure the height of the wave. In the case of sound waves, we can use a microphone and a sound level meter to measure the wave’s intensity, which is directly proportional to the amplitude.

While measuring the amplitude, it’s essential to take certain precautions. Ensure that the measuring instrument is placed accurately, and the measurements are taken at the same point consistently to obtain accurate results. It’s also important to consider the units of measurement and understand their significance.

Common Mistakes and Misconceptions about Amplitude of Transverse Wave

Amplitude calculation can sometimes be challenging, leading to common mistakes and misconceptions. Let’s address a few of them:

  • Misinterpretations of Amplitude: Some people confuse amplitude with the wavelength or the distance between two consecutive peaks or troughs of a wave. Remember, amplitude represents the maximum displacement of particles, while wavelength represents the distance between two corresponding points on the wave.

  • Common Errors in Calculating Amplitude: One common error is miscalculating the difference between the peak and the trough. It’s crucial to pay attention to signs and ensure the correct subtraction of values.

To avoid mistakes in amplitude calculation, here are a few tips:

  1. Clearly identify the peak and trough of the wave.
  2. Be cautious while subtracting values; consider the signs.
  3. Double-check your calculations for accuracy.

Remember, practice is key to mastering amplitude calculation.

Understanding and calculating the amplitude of a transverse wave is essential for various applications in physics and other scientific fields. We have explored the concept of transverse waves, the importance of amplitude, and discussed how to calculate it using a mathematical formula. Additionally, we’ve examined practical methods for measuring amplitude and highlighted common mistakes to avoid. By mastering the concept of amplitude, we gain a deeper understanding of the behavior and properties of transverse waves. So, keep practicing and exploring the fascinating world of waves!

How can understanding transverse wave examples in-depth help in finding the amplitude of a transverse wave?

In order to comprehend the concept of finding the amplitude of a transverse wave, it is crucial to have a thorough understanding of transverse wave examples. By exploring and analyzing various examples of transverse waves, such as waves on a vibrating string or electromagnetic waves, one can gain valuable insights into the characteristics and properties of these waves. This deeper understanding of transverse wave examples provides the necessary foundation to accurately determine the amplitude of a transverse wave. To delve into transverse wave examples further, you can refer to the article ““Understanding transverse wave examples in-depth”.

Numerical Problems on how to find amplitude of transverse wave

Problem 1

A transverse wave is described by the equation:
y(x, t) = 5sin(2pi x - 4pi t)
where y is the displacement of the wave, x is the position, and t is the time. Determine the amplitude of the transverse wave.

Solution

The amplitude of the transverse wave can be determined by looking at the coefficient in front of the sine function. In this case, the coefficient is 5, so the amplitude of the transverse wave is A = 5.

Problem 2

amplitude of transverse wave 3

A transverse wave is described by the equation:
y(x, t) = 3cos(4pi x + frac{pi}{2} t)
where y is the displacement of the wave, x is the position, and t is the time. Calculate the amplitude of the transverse wave.

Solution

The amplitude of the transverse wave can be determined by looking at the coefficient in front of the cosine function. In this case, the coefficient is 3, so the amplitude of the transverse wave is A = 3.

Problem 3

A transverse wave is described by the equation:
y(x, t) = 2sin(pi x + 3pi t)
where y is the displacement of the wave, x is the position, and t is the time. Find the amplitude of the transverse wave.

Solution

amplitude of transverse wave 1

The amplitude of the transverse wave can be determined by looking at the coefficient in front of the sine function. In this case, the coefficient is 2, so the amplitude of the transverse wave is A = 2.

Also Read:

How To Find Frequency Of A Wave:7 Quick Facts

Frequency Of A Wave

frequency is an essential concept in understanding waves and their characteristics. It helps us analyze and interpret various wave phenomena in fields such as physics, engineering, and signal processing. In this blog post, we will explore how to find the frequency of a wave, using different methods and tools. We’ll cover everything from the basic concepts of frequency to practical examples and calculations. So, let’s dive into the fascinating world of wave frequency!

Frequency Of A Wave

How to Find the Frequency of a Wave

how to find the frequency of a wave
Image by L31n42 – Wikimedia Commons, Wikimedia Commons, Licensed under CC0.

A. The Concept of Frequency in Waves

Before we delve into the calculations, let’s establish a clear understanding of what frequency represents in the context of waves. frequency refers to the number of complete cycles or oscillations that a wave undergoes in a given unit of time. It is measured in hertz (Hz), where 1 Hz corresponds to one cycle per second. The higher the frequency, the more oscillations occur in a given time frame.

B. Importance of Frequency in Wave Analysis

frequency plays a crucial role in wave analysis as it provides valuable information about the characteristics of a wave. It helps us determine the pitch of a sound wave, the color of light, the vibration of a guitar string, and even the transmission of radio signals. By understanding the frequency of a wave, we can analyze its behavior, identify patterns, and make predictions about its interactions with other waves or objects.

Calculating the Frequency of a Wave using Wavelength

A. The Relationship between Frequency and Wavelength

To calculate the frequency of a wave using its wavelength, we need to understand the relationship between these two parameters. wavelength refers to the distance between two consecutive points in a wave that are in the same phase, such as two peaks or troughs. It is usually denoted by the Greek letter lambda (λ).

The relationship between frequency (f), wavelength (λ), and wave velocity (v) is given by the wave equation:

v = f cdot lambda

In simpler terms, the wave velocity is equal to the product of frequency and wavelength. By rearranging the equation, we can solve for frequency:

f = frac{v}{lambda}

B. Step-by-step Guide to Calculate Frequency using Wavelength

Here’s a step-by-step guide to calculating the frequency of a wave using its wavelength:

  1. Determine the wavelength (λ) of the wave. This can be measured directly or obtained from a given problem.
  2. Find the wave velocity (v) of the medium through which the wave is propagating. For example, in the case of sound waves, the wave velocity is the speed of sound in air.
  3. Use the wave equation, (v = f cdot lambda), and rearrange it to solve for frequency: (f = frac{v}{lambda}).
  4. Substitute the values of wave velocity and wavelength into the equation to find the frequency.

C. Worked-out Example on Finding Frequency using Wavelength

Let’s work through an example to illustrate how to find the frequency of a wave using its wavelength. Suppose we have a wave traveling through a medium with a velocity of 343 meters per second (m/s). The wavelength of the wave is measured to be 0.5 meters (m).

Using the formula (f = frac{v}{lambda}), we can calculate the frequency as follows:

f = frac{343 , text{m/s}}{0.5 , text{m}} = 686 , text{Hz}

Therefore, the frequency of the wave is 686 Hz.

Determining the Frequency of a Wave using Period

A. Understanding the Concept of Period in Waves

period is another important parameter that can be used to calculate the frequency of a wave. It refers to the time it takes for one complete cycle or oscillation of a wave to occur. The period is denoted by the symbol T and is measured in seconds (s).

B. The Relationship between Frequency and Period

The relationship between frequency (f) and period (T) is the reciprocal of each other. It can be expressed by the equation:

f = frac{1}{T}

In other words, the frequency is equal to the inverse of the period.

C. Step-by-step Guide to Calculate Frequency using Period

To calculate the frequency of a wave using its period, follow these steps:

  1. Determine the period (T) of the wave. This can be measured directly or obtained from a given problem.
  2. Use the equation (f = frac{1}{T}) to calculate the frequency.
  3. Substitute the value of the period into the equation to find the frequency.

D. Worked-out Example on Finding Frequency using Period

Let’s work through an example to demonstrate how to find the frequency of a wave using its period. Suppose we have a wave with a period of 0.01 seconds (s). Using the equation (f = frac{1}{T}), we can calculate the frequency as follows:

f = frac{1}{0.01 , text{s}} = 100 , text{Hz}

Therefore, the frequency of the wave is 100 Hz.

How to Find the Frequency of a Wave in Python

how to find the frequency of a wave
Image by Frequency-modulation.png – Wikimedia Commons, Wikimedia Commons, Licensed under CC BY-SA 3.0.

Python is a powerful programming language that can be used for various scientific and mathematical calculations, including wave analysis. By utilizing Python’s libraries and functions, we can easily calculate the frequency of a wave. One such library commonly used for wave analysis is NumPy.

B. Python Code to Calculate Wave Frequency

Below is an example of Python code that calculates the frequency of a wave using the wavelength:

“`python
import numpy as np

def calculate_frequency(wavelength, wave_velocity):
frequency = wave_velocity / wavelength
return frequency

wavelength = 0.5
wave_velocity = 343

frequency = calculate_frequency(wavelength, wave_velocity)
print(“The frequency of the wave is:”, frequency, “Hz”)
“`

C. Worked-out Example on Finding Frequency using Python

Let’s use the Python code above to find the frequency of a wave with a wavelength of 0.5 meters (m) and a wave velocity of 343 meters per second (m/s).

The output of the code will be:

The frequency of the wave is: 686.0 Hz

Therefore, the frequency of the wave, calculated using Python, is 686 Hz.

How to Find the Frequency of a Wave in MATLAB

MATLAB is a widely-used programming language and environment for numerical computations and data analysis. It offers powerful tools and functions for wave analysis, making it convenient to calculate the frequency of a wave. MATLAB’s built-in functions, such as fft and ifft, are particularly useful for frequency analysis.

B. MATLAB Code to Calculate Wave Frequency

Here’s an example of MATLAB code that calculates the frequency of a wave using the wavelength:

“`matlab
wavelength = 0.5;
wave_velocity = 343;

frequency = wave_velocity / wavelength;
disp(

'The frequency of the wave is:', num2str(frequency), ' Hz'

);
“`

C. Worked-out Example on Finding Frequency using MATLAB

Let’s use the MATLAB code above to find the frequency of a wave with a wavelength of 0.5 meters (m) and a wave velocity of 343 meters per second (m/s).

The output in MATLAB will be:

The frequency of the wave is: 686 Hz

Therefore, the frequency of the wave, calculated using MATLAB, is 686 Hz.

Special Cases in Finding the Frequency of a Wave

A. How to Find the Frequency of a Sine Wave

When dealing with a simple sine wave, finding its frequency becomes relatively straightforward. The frequency of a sine wave is determined by the number of complete cycles it completes in a given time frame. You can calculate the frequency by measuring the time it takes for one complete cycle and taking the reciprocal of that duration.

B. How to Find the Frequency of a Sound Wave

In the case of sound waves, determining their frequency is crucial for understanding their pitch and musical notes. Sound waves are mechanical waves that propagate through a medium, such as air or water. To find the frequency of a sound wave, we can use various methods, including Fourier analysis, tuning forks, or digital audio processing techniques.

C. How to Find the Frequency of a Standing Wave

Standing waves occur when two waves of the same frequency and amplitude traveling in opposite directions interfere with each other. Finding the frequency of a standing wave involves analyzing the nodes and antinodes of the wave pattern. By measuring the distance between adjacent nodes or antinodes and the wave velocity, we can calculate the frequency of the standing wave.

How does the frequency of a wave impact the properties of diffraction in waves?

The frequency of a wave plays a crucial role in determining the properties of diffraction. Diffraction refers to the bending and spreading of waves as they pass through an opening or encounter an obstacle. The Properties of Diffraction in Waves article provides a comprehensive understanding of how various factors, including frequency, influence this phenomenon. Higher frequencies typically result in smaller diffraction angles, while lower frequencies lead to larger angles. This relationship highlights the intricate connection between the frequency of a wave and its diffraction behavior.

Common Misconceptions and Errors in Finding the Frequency of a Wave

how to find the frequency of a wave
Image by Konung yaropolk – Wikimedia Commons, Wikimedia Commons, Licensed under CC0.

A. Does the Frequency of a Wave Change?

The frequency of a wave remains constant throughout its propagation, regardless of any changes in amplitude or wavelength. While the wave’s characteristics may vary, such as its speed or shape, the frequency stays the same. It is an inherent property of the wave that determines its pitch, color, or any other audible or visible attribute.

B. Finding the Frequency of a Wave without the Speed

To find the frequency of a wave, we need to know either the wavelength or the wave velocity. Without one of these parameters, it is not possible to calculate the frequency directly. However, in some cases, we can infer the frequency indirectly by analyzing the wave’s behavior, interference patterns, or using other mathematical techniques such as Fourier analysis.

Understanding how to find the frequency of a wave is essential for analyzing and interpreting wave phenomena in various fields. Whether you are studying waves in physics, analyzing sound signals, or processing digital data, the ability to calculate the frequency provides valuable insights. By utilizing the relationships between frequency, wavelength, period, and wave velocity, we can uncover the hidden treasures hidden within the fascinating realm of waves. So go ahead, explore, and discover the wonders of wave frequency!

Also Read:

How To Find Velocity With Height And Distance:With Problems

velocity with height distance

How can zero velocity be determined using height and distance?

Exploring Zero Velocity with LambdaGeeks: Zero velocity refers to the state where an object remains at rest, with no change in its position over time. It is possible to determine zero velocity by considering the concepts of height and distance. By analyzing the height and distance covered by an object, we can ascertain whether it is in a state of zero velocity or not. For a detailed understanding of zero velocity and its implications, check out the article on Exploring Zero Velocity with LambdaGeeks.

How to Find Velocity with Height and Distance

velocity is a fundamental concept in physics that describes the rate at which an object changes its position. It is defined as the displacement per unit time. Understanding how to find velocity with height and distance is crucial for gaining insight into the behavior of moving objects. In this article, we will dive into the calculations and equations involved in determining velocity based on height and distance.

velocity with height N distance

Understanding the Concept of Velocity

Before we delve into the specifics of finding velocity with height and distance, let’s first have a clear understanding of what velocity represents. velocity is a vector quantity, meaning it has both magnitude and direction. It can be thought of as the speed of an object in a given direction. For example, if a car is traveling at 60 miles per hour due north, the velocity of the car is 60 mph in the north direction.

The Role of Height and Distance in Determining Velocity

Both height and distance play significant roles in determining the velocity of an object. height refers to the vertical position of an object, while distance refers to the overall length of the path traveled by the object. By incorporating height and distance into the calculation of velocity, we can gain a deeper understanding of an object‘s motion.

The Mathematical Relationship between Velocity, Height, and Distance

To calculate velocity with height and distance, we can utilize the fundamental equation of velocity:

velocity = \frac{distance}{time}

This equation represents the ratio of the distance traveled by an object to the time taken to travel that distance. By rearranging this equation, we can solve for any of the three variables: velocity, distance, or time.

Velocity With Height And Distance

Let’s take a look at an example to illustrate this relationship. Suppose a ball is thrown vertically upwards with an initial velocity of 20 m/s. The ball reaches a maximum height of 30 meters before falling back down. We can use the equation above to calculate the time it takes for the ball to reach its maximum height:

time = \frac{height}{velocity}

Plugging in the values, we have:

time = \frac{30 \, \text{m}}{20 \, \text{m/s}}

Simplifying the equation gives us:

time = 1.5 \, \text{s}

So, it takes the ball 1.5 seconds to reach its maximum height. Now, if we want to find the velocity of the ball when it reaches the ground, we can use the same equation:

velocity = \frac{distance}{time}

Since the distance is equal to the height of the ball (30 meters) and the time is the total time it takes for the ball to reach its maximum height and fall back down (3 seconds), we have:

velocity = \frac{30 \, \text{m}}{3 \, \text{s}}

Simplifying the equation gives us:

velocity = 10 \, \text{m/s}

Therefore, the velocity of the ball when it reaches the ground is 10 m/s.

By understanding and applying the mathematical relationship between velocity, height, and distance, we can accurately calculate the velocity of an object in various scenarios. Whether it’s a projectile launched at an angle, an object in free fall, or any other motion, incorporating height and distance into our calculations gives us a comprehensive understanding of the object‘s behavior.

Now that we’ve covered the fundamentals of finding velocity with height and distance, let’s move on to more specific calculations and examples in the following sections.

Also Read:

How To Find Horizontal Velocity Without Time: Different Aspects, Problems

Horizontal Velocity

How to Find Horizontal Velocity Without Time

In physics, understanding the concept of horizontal velocity is crucial for analyzing various motion scenarios. horizontal velocity refers to the speed at which an object moves horizontally, without considering the effects of time. By finding the horizontal velocity without time, you can determine the speed of motion in the horizontal direction, which is often vital in projectile motion problems and real-world physics applications. Let’s delve deeper into this concept and explore its significance.

Horizontal Velocity

Understanding the Concept of Horizontal Velocity

horizontal velocity represents the speed of an object’s motion in the horizontal direction. It is independent of the effects of gravity and air resistance. By considering only the horizontal component of an object’s motion, we can isolate the velocity in that direction. The horizontal velocity remains constant throughout the motion unless acted upon by external forces.

Importance of Horizontal Velocity in Physics

horizontal velocity plays a fundamental role in various physics problems. It helps us calculate the range of a projectile, determine the time of flight, and analyze the motion of objects in two dimensions. By understanding how to find horizontal velocity without time, we can solve a wide range of motion-related questions and gain a deeper understanding of physics principles.

The Relationship Between Horizontal Velocity and Time

In projectile motion, the motion of an object can be divided into horizontal and vertical components. The horizontal component, represented by Vx, is constant throughout the motion. It does not depend on time since there are no external forces acting on it horizontally. On the other hand, the vertical component, represented by Vy, changes due to the influence of gravity. The relationship between horizontal velocity and time is that the horizontal velocity remains the same regardless of the time elapsed.

The Physics Behind Horizontal Velocity

The Role of Gravity in Horizontal Velocity

While gravity affects the vertical motion of an object, it has no effect on the horizontal motion. Gravity only acts in the vertical direction, causing objects to accelerate downward. Therefore, the horizontal velocity of an object remains constant because there is no force acting on it horizontally to change its speed or direction.

The Impact of Air Resistance on Horizontal Velocity

Horizontal Velocity

Air resistance, also known as drag, affects an object’s motion by opposing its motion through the air. However, in the absence of any external forces, air resistance does not influence the horizontal velocity. It primarily affects the vertical velocity by slowing down the object’s descent. As a result, the horizontal velocity remains independent of air resistance.

The Principle of Independence of Motion

One of the essential principles in physics is the independence of motion. It states that the horizontal and vertical components of motion can be treated separately since they are not directly dependent on each other. This principle allows us to analyze motion in two dimensions by considering horizontal and vertical components independently.

Calculating Horizontal Velocity Without Time

The Basic Formula for Horizontal Velocity

To find the horizontal velocity without time, we can use the formula:

Vx = frac{{d}}{{t}}

where (Vx) represents the horizontal velocity, (d) denotes the horizontal displacement, and (t) is the time taken.

How to Manipulate the Formula to Exclude Time

Since we want to find the horizontal velocity without time, we need to rearrange the formula to eliminate the time variable. By multiplying both sides of the equation by time, we get:

Vx cdot t = d

This equation allows us to calculate the horizontal velocity using the horizontal displacement and the time taken.

Worked Out Examples of Calculating Horizontal Velocity Without Time

Let’s consider a scenario where an object is launched horizontally with an initial velocity of 20 m/s. The object travels a horizontal distance of 100 meters. We can find the horizontal velocity without time using the formula mentioned earlier.

Given:
– Initial velocity Vx = 20 m/s
– Horizontal displacement d = 100 m

Using the formula (Vx cdot t = d), we can rearrange it to solve for (Vx):

Vx = frac{{d}}{{t}}

Substituting the given values, we have:

20 , text{m/s} cdot t = 100 , text{m}

Solving for (t), we find:

t = frac{{100 , text{m}}}{{20 , text{m/s}}} = 5 , text{s}

So, the horizontal velocity without time is 20 m/s, and it took 5 seconds to cover a distance of 100 meters.

Common Misconceptions About Horizontal Velocity

Does Horizontal Velocity Affect Time?

No, horizontal velocity does not affect time. time is independent of the horizontal velocity because the horizontal component of motion remains constant throughout. It’s important to note that horizontal and vertical motion are separate, and changes in one component do not impact the other.

Does Horizontal Velocity Stay the Same?

Yes, horizontal velocity remains constant if no external forces act upon the object in the horizontal direction. As long as there are no forces that change the object’s speed or direction horizontally, the horizontal velocity will remain the same throughout the motion.

Clearing Up Confusions About Horizontal Velocity

Understanding the independent nature of horizontal velocity and its relationship with time can help clarify any confusions. Remember that horizontal velocity represents the speed of motion in the horizontal direction, unaffected by gravity or air resistance. By considering only the horizontal component, you can accurately analyze an object’s motion and make accurate calculations.

How can you find the horizontal velocity without knowing the time and calculate velocity without time?

Calculating velocity without knowing the time is a common problem in physics. To find the horizontal velocity without time, we can use the concept of projectile motion. By analyzing the horizontal displacement and height of the projectile, we can determine the initial horizontal velocity. The formula to calculate the horizontal velocity is Vx = Δx / t, where Vx is the horizontal velocity, Δx is the horizontal displacement, and t is the time. However, if we don’t know the time, we can use alternative methods like the range formula or trigonometric equations to find the horizontal velocity. To learn more about calculating velocity without knowing the time, check out the article on Calculating velocity without knowing the time.

Practical Applications of Calculating Horizontal Velocity Without Time

Use in Projectile Motion Problems

Finding the horizontal velocity without time is valuable in projectile motion problems. By knowing the horizontal velocity, you can calculate the range, time of flight, and other important parameters that characterize the trajectory of a projectile. This knowledge proves useful in various fields like engineering, sports, and astronomy.

Importance in Real-World Physics Applications

horizontal velocity without time finds applications in real-world physics scenarios. It helps us understand the motion of vehicles, projectiles, and other moving objects. By accurately determining the horizontal velocity, we can predict and analyze the behavior of these objects, contributing to improved designs and safety measures.

How Understanding This Concept Can Help in Physics Exams

Having a solid grasp of how to find horizontal velocity without time can greatly benefit students during physics exams. It enables them to solve projectile motion problems, which are commonly tested. By applying the appropriate formulas and principles, students can tackle these questions with confidence and accuracy.

Remember, by understanding the concept of horizontal velocity, its relationship with time, and how to calculate it without time, you can efficiently analyze motion problems, make accurate predictions, and excel in physics.

Also Read: