51 Appium Interview Questions(Most Beginner’s Don’t Know!)

App package7 1024x535 1

In this tutorial, we will discuss the top 50 Appium interview questions and Answers. It will help you to prepare for the interview and crack it.

We will divide the questions and answers into three parts:

Basic Appium interview Questions

What is Appium?

Ans: Appium is an open-source freely distributed mobile UI testing framework.

What types of application can we automate with Appium?

Ans: Appium supports native application, Hybrid applications and Web-views.

List out the Appium abilities?

Ans: For this answer please refer to this Link.

List out the prerequisite to use Appium?

Ans: We need below tools/jar/plugins to work with Appium

  1. JDK
  2. ANDROID studio
  3. IntelliJ/Eclipse
  4. TestNG plugin or dependency if you use Maven
  5. Appium java client

Mention the disadvantages or limitations of Appium?

Ans: Like every tool, Appium also has certain limitations. Please check the answer here.

What are the native Apps?

Ans: Please check the answer from here.

What are hybrid apps?

Ans: Please check the answer from here

What do you understand by M-Web or Mobile Web Apps?

Ans: Please check the answer from here.

What are the supported languages in Appium??

Ans: Appium allows clients to interact with Appium based on sessions. Clients send session requests as a form of POST and pass desired capabilities as a parameter. There are multiple clients like Java, JavaScript, PHP, Ruby, Python, and C#.

Mention the advantages or benefits of using Appium.

Ans: The answer is the same as Question 3. You will find the answer here

List out the Appium supported Automation and Unit Test Framework ?

Ans: We can use all type of test frameworks with Appium. For example, java unit, java TestNG, NUnit etc as unit test framework . Appium test implements the Selenium webDriver to interact with Android or iOS devices.

Mention the limitations or disadvantages of Appium?

Ans: The answer is the same as Question 5. You will find the answer here

How can you verify elements on the iOS app?

Ans: For the iOS app, we can verify the elements using Appium inspector. It is an excellent tool to identify the elements’ id, XPath etc. It can also perform to perform user actions.

What is the Appium inspector?

Ans: Appium inspector is used to inspecting DOM to find out the elements both in Android and iOS. We can record the actions we perform in the inspector. It can generate the scripts in different languages like Java/JUnit, python etc. For a complete guide on Appium inspector, please click here.

How to inspect the DOM element or XPath for mobile application?

Ans: You can find the DOM element or XPath in Couple of ways. Either you can use “UIAuteviewer/UIAutomateviewer2”, or you can use Appium inspector for Android. For iOS, you can use Appium inspector. To learn how to inspect element, please refer to this link.

What’s the difference between simulator with emulator ?

Ans: Emulator and simulator both are visual devices. The emulator is a virtual device for Android, and simulator is a virtual device for iOS launched from Xcode.

How much time does Appium take to automate a test?

Ans: It depends on the scenario you are testing. If you are verifying multiple flows in a single method, it is likely to take more time. But it is always better to make the test cases precise and straightforward so that if any issue occurs in between your execution, you can have the recovery mechanism.

When should we use Appium?

Ans: Appium supports native, mobile web app and hybrid app. It supports cross-platform testing. If you have running on Android or iOS and want to verify it, you can use Appium.

What’s the best approach while Testing is it on real devices or emulators/simulators?

Ans: Again, this is depending on your test scenarios, application behaviours. If it is a straightforward application, you can test both on real devices or simulator/emulator. But if your application has complex logic, it is always better to go for real devices. Generally, we should use these to automate because it is ultimately the end-user who is going to use these applications. Real devices also have issues when connecting to the computer for a long time. ADB connections get lost, and it will show devices not attached, which will fail your test cases.

How to identify M-Web or Mobile Browser objects using Appium?

Ans: UserAgent can be used to identify objects in a M-Web or Mobile Browser. It provides you an way to alter the browser by using mobile proxy to resolve the issue.
Or we can use ChromeCasting for object identification in a Mobile Browser. Using Chromecast, your mobile to the system connection could be established and then you could do inspect elements on mobile from the chrome casting system.

What approach to take to identify the unique object in Appium while same class name having multiple objects

Ans: driver.findElements(By.className) gives the lists off elements. Once we get the lists, we need to traverse through the indexes to handle the elements uniquely with the same class name.

Perform the comparison among Appium and Selenium ?

Ans: As we know Selenium is an open-source tool. It helps to automate web application.On the other hand Appium is also an open-source tool. It uses to automate mobile application( Native, Hybrid, Web-apps). Appium implements Selenium Webdriver to interact with the devices.

How to hide the keyboard in Appium?
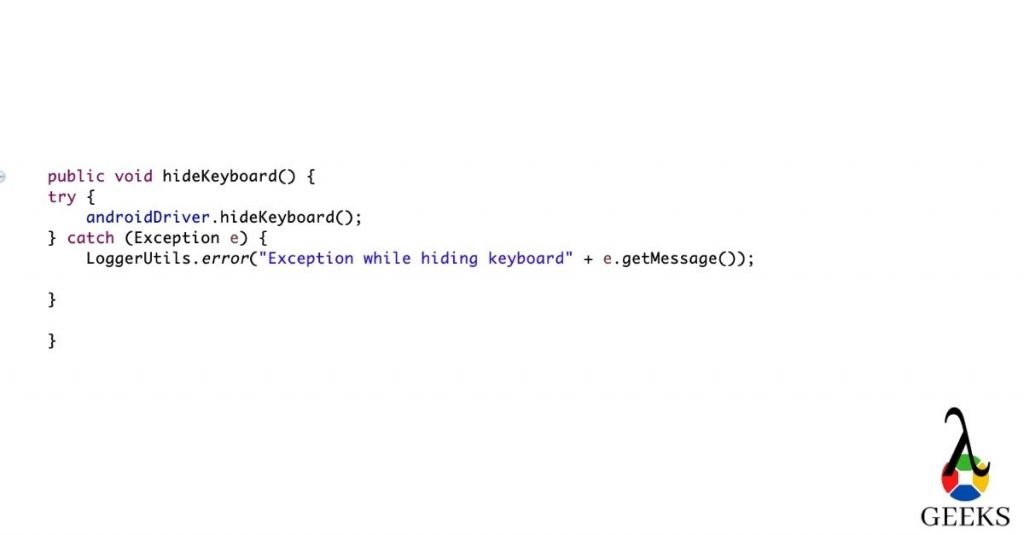
how to hide keyboard
Appium interview questions: How to hide keyboard

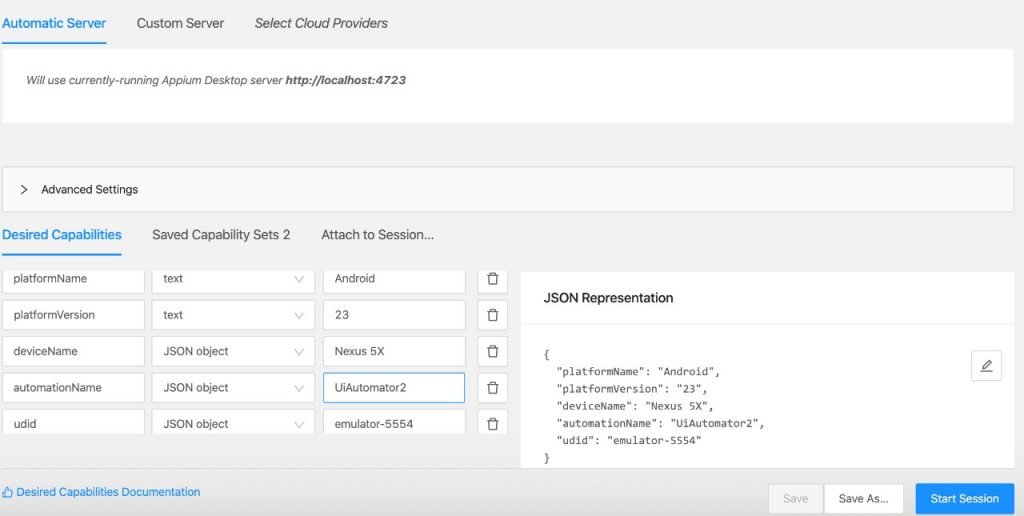
What are the desired capabilities required for Android?
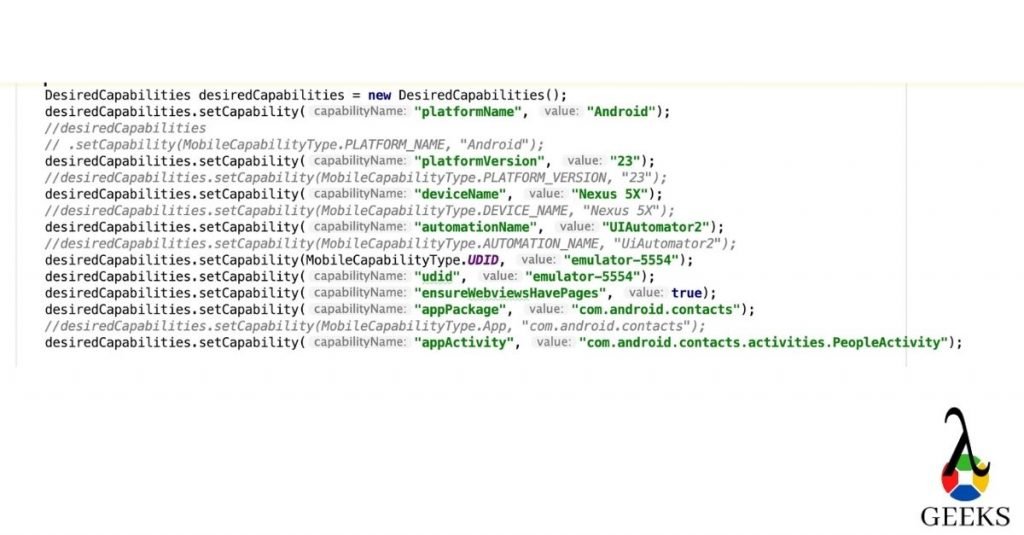
desired capabilities for android
Appium interview questions: desired capabilities for android

What are the required desired capabilities for iOS?
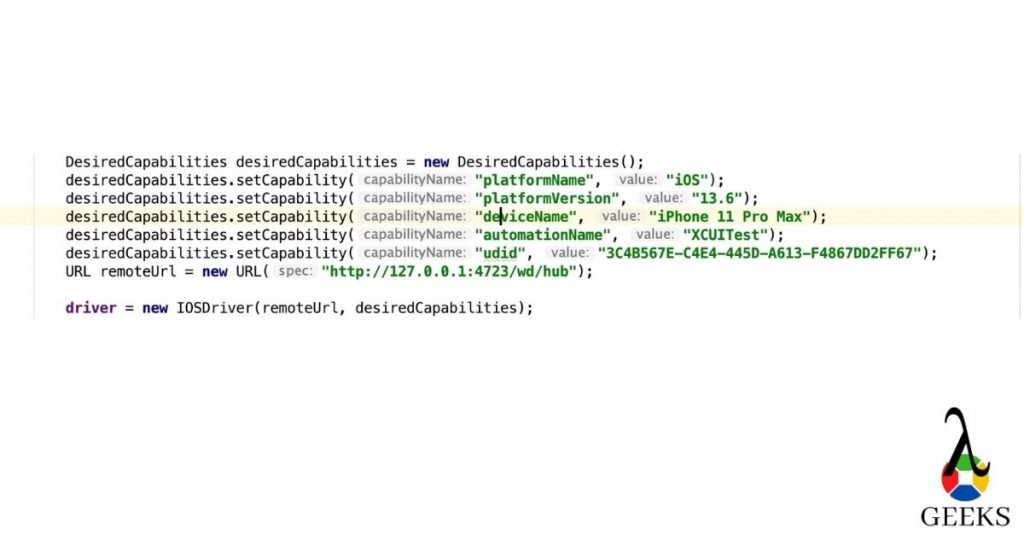
desired capabilities for iOS
Appium interview questions: desired capabilities for iOS

Intermediate Appium Interview Questions

What Data Exchange is when you do testing on Mobile devices?

Ans: Data exchange in Appium exchange the data hosted by complex objects which actually are being stored in different components of Web-view based app. One example can be the window object.

What are the errors you face in Appium?

Ans:

  • “The following desired capabilities are needed but not provided: Device Name, platformNameError.”
  • “Could not find adb. Please set the ANDROID_HOME environment variable with the Android SDK root directory pathError.”
  • “openqa.selenium.SessionNotCreatedException: A new session could not be createdError.”

What are the conditions to write Appium tests?

To write an Appium test, we must follow the below points:

Appium client: This is an Appium client written in a different language which connects to the Appium server. For example, Appium Java client. 

Appium Session: Appium interacts with mobile devices based on sessions. We need to create a session with the help of Appium client. 

Desired Capabilities: Desired Capabilities are like parameters which we pass while creating the session. It helps the Appium server to identify the devices uniquely.

Driver command: Driver command is nothing but the user actions we perform in devices. For example click() or sendKeys().

How can you verify elements in the Android Native Application?

Ans: You can use “UIAuteviewer/UIAutomateviewer2”, or you can use Appium inspector for Android.

How to scroll down in an App?
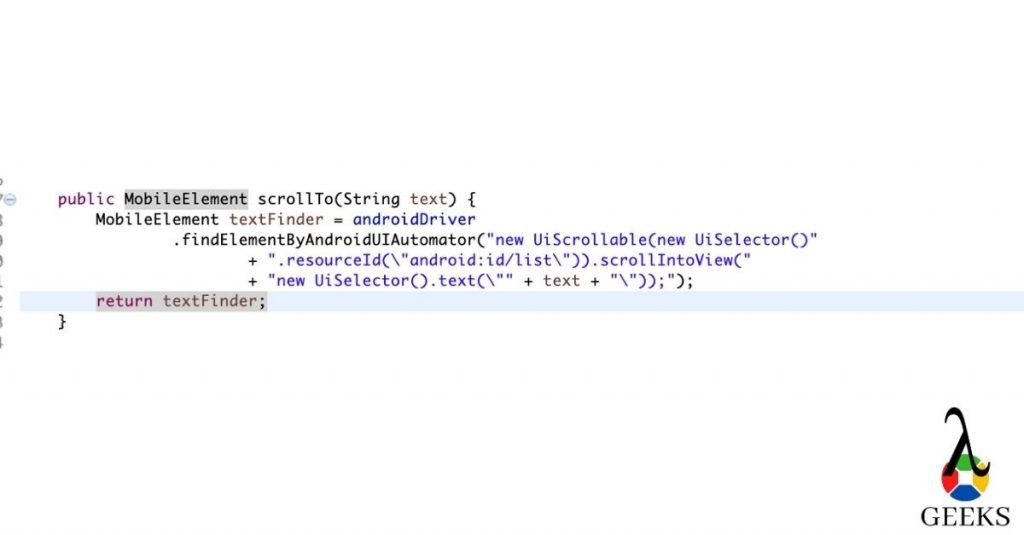
how to scroll down
Appium interview Questions: how to scroll down

Is it possible to start the Appium server programmatically?

Ans: Yes, we can programmatically initiate the Appium server session. As Appium uses node.js, we can create .bat file(for Windows) or shell file/command(Linux/Mac) to start the Appium server passing bootstrap port, hub IP and port.

How to swipe left in Appium?
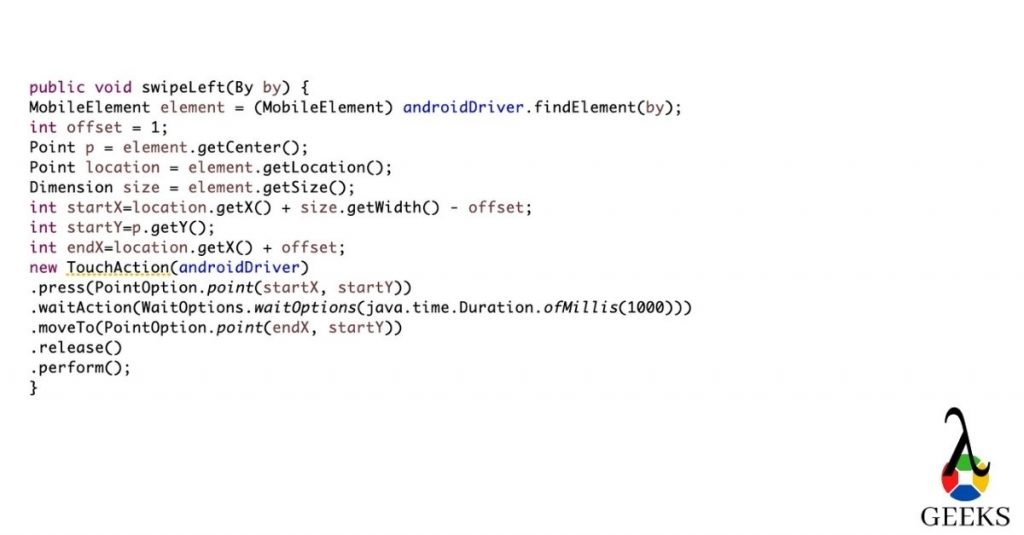
how to swipe left
Appium interview questions: how to swipe left

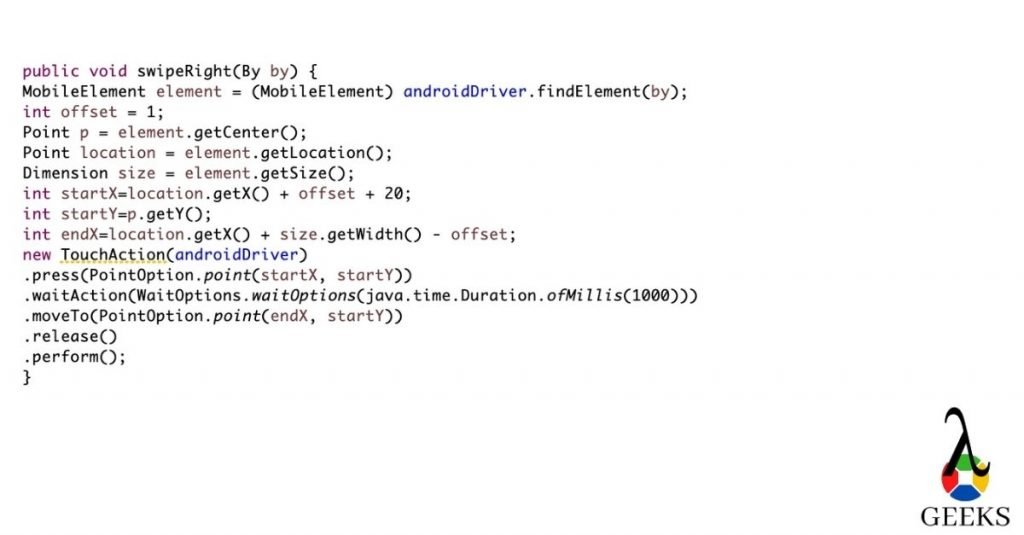
How to swipe right in Appium?

how to swipe right
Appium interview questions: how to swipe right

Is it possible to run a parallel/multithreaded test in Appium?

Ans: Yes we can run tests on the multithreaded environment, but the condition is to make sure that same Appium server should not used to parallelize the two tests.

Mention the Parallel Testing approach in IOS using Appium?

Ans: Appium has given an option to run iOS tests in parallel from Xcode version 9 and above. There are a couple of prerequisites we need to follow.

  1. “UDID” should be unique.
  2. “wdaLocalPort” should be unique
  3. derivedDataPath root should be unique for each driver instance. 
  4. Sauce Labs gives an option to run iOS tests parallel. We have to upload our Appium test to sauce labs. After that, it will run in multiple iOS tests in parallel.

How to swipe up in Appium?
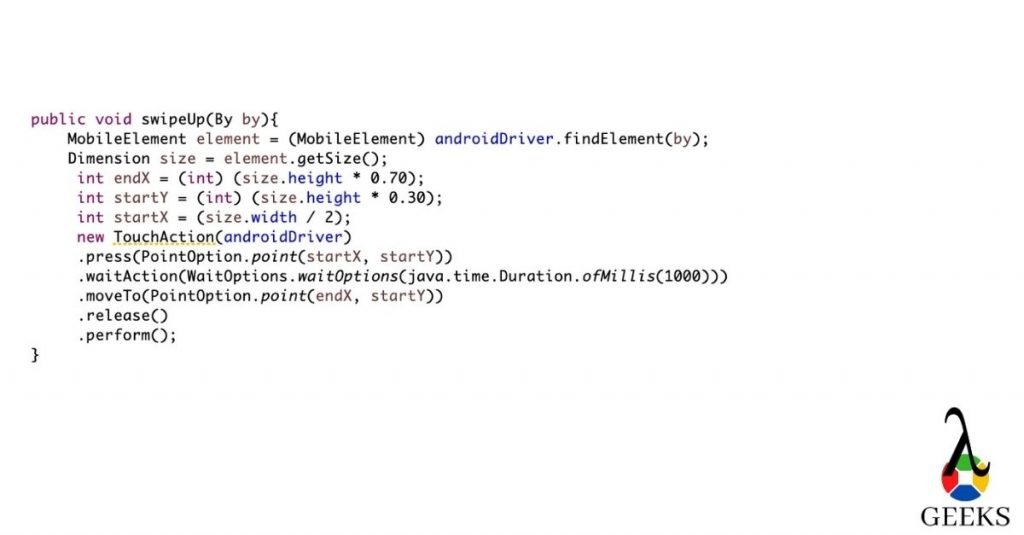
how to swipe up
Appium interview questions: how to swipe up

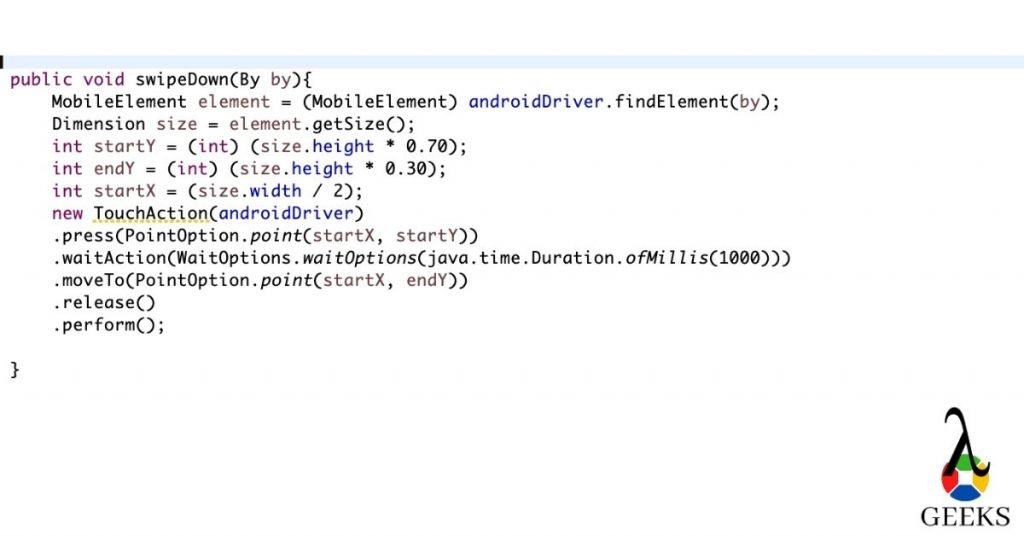
How to swipe down in Appium?

how to swipe down
Appium interview questions: how to swipe down

Advanced Appium Interview Questions

What are the selenium commands works with Appium?

Ans: Appium implements Selenium WebDriver. That’s why almost all the WebDriver commands work with Appium. Few examples are mentioned below:

  • Click() command for clicking/tapping the button/links.
  • sendKeys() command to send the value.
  • It supports java scripts commands.
  • Handles alerts.
  • It can switch between the context in web-views.

What are the advantages of Real devices over emulator/Simulator?

 There are a couple of advantages using real devices over emulator/Simulator

  1. We can check low battery scenarios with real devices.
  2. How fast battery gets drained out during testing.
  3. We can check the actual performance of the devices and do app profiling.
  4. We can check Bluetooth related scenarios.
  5. We can check messages and phone calls.

What are the different tools for debugging in Android and iPhone?

Ans: We verify the logs to debug the issues occur in the devices. For Android we can check Monitor, “adb logcat” or “dumpsys” . For the iPhone, we can use iPhone configuration utility.

How can you switch between Android applications?
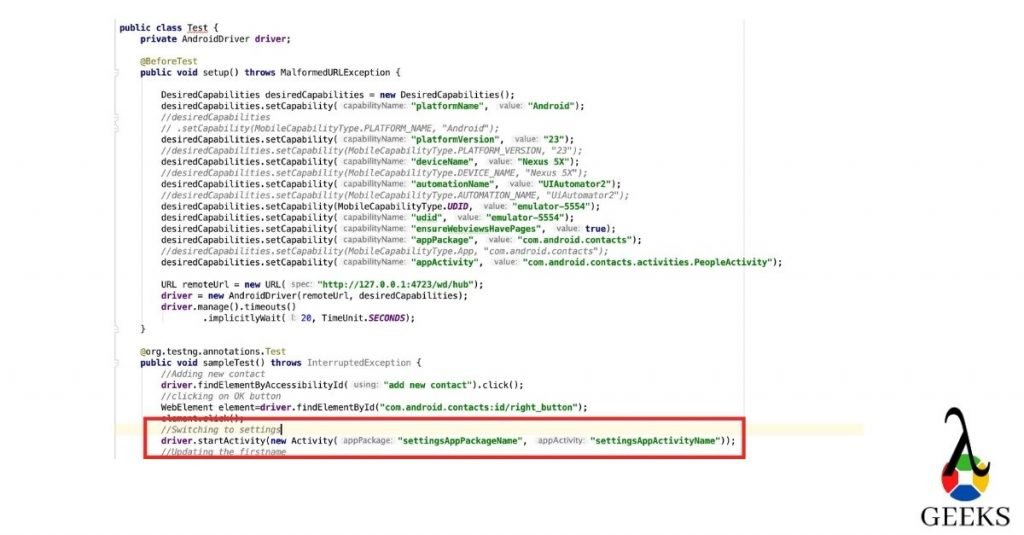
switch between Android app
Appium interview questions: Switching between android app

How can you switch between iOS applications?
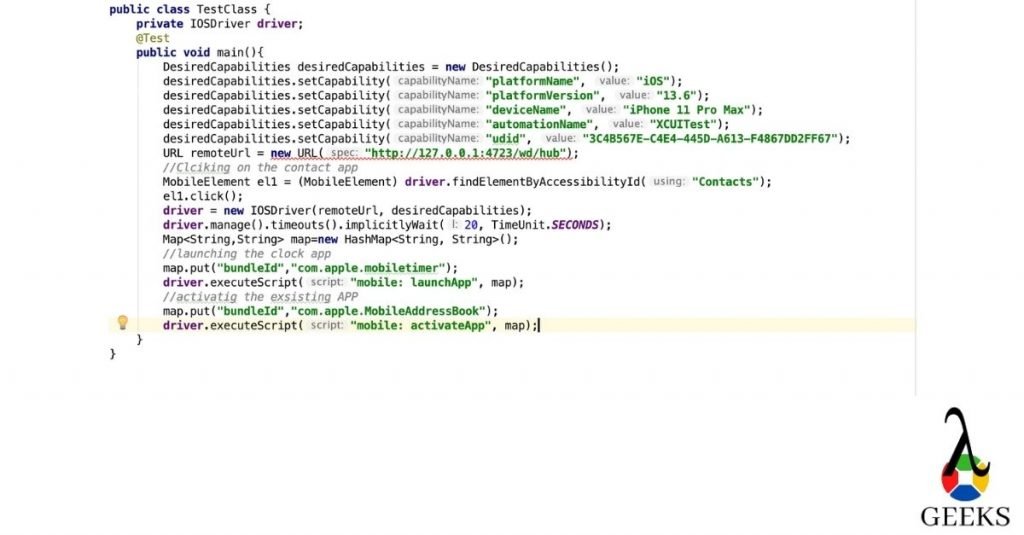
how to switch between iOS app
Appium interview questions: Switching between iOS app

How can you find bundle id in iOS?

  • Copy the .ipa file to your systems and change the extension to .zip file
  • Now unzip the folder and search for iTunesMetadata.plist file
  • Once you get the file, open it in an editor and search for softwareVersionBundleId. It will give you the bundle id.

How can you enable the wifi while the phone is in Airplane mode?

ConnectionStateBuilder connection = 
new ConnectionStateBuilder();
driver.setConnection
(connection.withWiFiEnabled()
.build());));

How can you enable unicode keyboard ?

Ans: We need add below desired capabilities:

desiredCapabilities.setCapability("unicodeKeyboard", true);

How can you copy-paste in Appium?

Ans: Well, no direct method is there to do it. However you can get the value using getText() or getAttributes() methods and pass the same value to the sendKeys().

How to handle WebDriverAgentRunner-Runner.app encountered an error (Failed to install or launch the test runner issue?

rm '/usr/local/bin/carthage' 
brew install carthage 
brew link carthage

There might be other possible solutions to this problem. You can refer this link for other solutions.

When will choose automation testing over manual testing?

Ans: Automation testing will help during regression testing. If you have any complex scenarios or repetitive scenarios, you should automate it.

When will you choose manual testing over automation testing?

When you have new applications, you should test it manually first and probably then automate it. There are specific scenarios where you have to verify from logs/events; we should verify those manually. Scenarios where we don’t need frequent testings, we should not automate those.

How Appium works?

  • We have covered this part in our initial post. Please see the answer here.

How to double click in Appium?

double clicking
Appium interview questions: How to double click

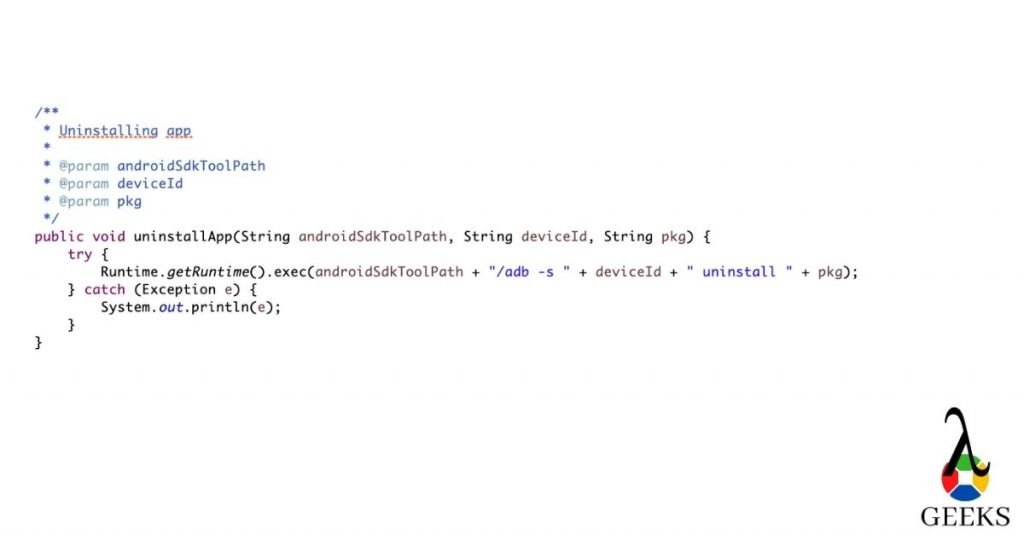
How to uninstall the app in Android?

Unistalling the app
Appium interview questions: How to uninstall the app

How to clear the app data in Android?
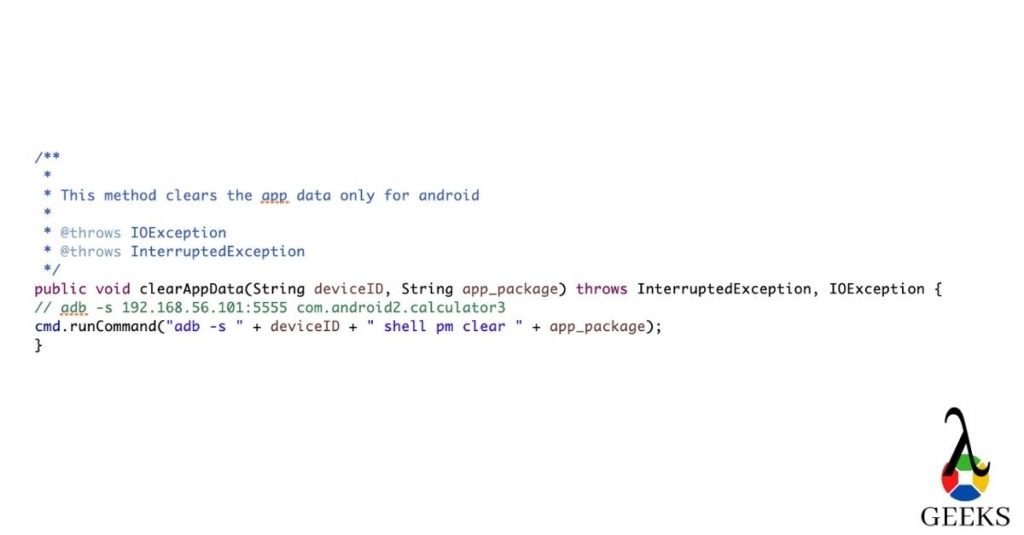
App package14
Appium interview questions: How to clear the app data

How will you handle failure cases in Appium ?

Ans: It depends upon the scenarios. If any test cases get failed, we need to restore the app state in order to execute the  next test cases. You can do it either in @AfterMethod or using listeners.

How to make your pass percentage higher in Appium?

Ans: Automating app using Appium sometimes makes the scrips inconsistent. If you run the test cases for longer times or may be due to network issues you can face the inconsistency issue. To make the script more robust we can take the following approach.

Is there any EventListeners in Appium?

Ans: yes, you can use AppiumWebDriverEventListener . You need to implement this interface .

Example:

public class AppiumListener implements AppiumWebDriverEventListener {
   public void beforeChangeValueOf(WebElement webElement, WebDriver webDriver) {
   }
   public void afterChangeValueOf(WebElement webElement, WebDriver webDriver) {
   }
   public void beforeAlertAccept(WebDriver webDriver) {
   }
   public void afterAlertAccept(WebDriver webDriver) {
   }
   public void afterAlertDismiss(WebDriver webDriver) {
   }
   public void beforeAlertDismiss(WebDriver webDriver) {
   }
   public void beforeNavigateTo(String s, WebDriver webDriver) {
   }
   public void afterNavigateTo(String s, WebDriver webDriver) {
   }
   public void beforeNavigateBack(WebDriver webDriver) {
   }
   public void afterNavigateBack(WebDriver webDriver) {
   }
   public void beforeNavigateForward(WebDriver webDriver) {
   }
   public void afterNavigateForward(WebDriver webDriver) {
   }
   public void beforeNavigateRefresh(WebDriver webDriver) {
   }
   public void afterNavigateRefresh(WebDriver webDriver) {
   }
   public void beforeFindBy(By by, WebElement webElement, WebDriver webDriver) {
   }
   public void afterFindBy(By by, WebElement webElement, WebDriver webDriver) {
   }
   public void beforeClickOn(WebElement webElement, WebDriver webDriver) {
   }
   public void afterClickOn(WebElement webElement, WebDriver webDriver) {
   }
   public void beforeChangeValueOf(WebElement webElement, WebDriver webDriver, CharSequence[] charSequences) {
   }
   public void afterChangeValueOf(WebElement webElement, WebDriver webDriver, CharSequence[] charSequences) {
   }
   public void beforeScript(String s, WebDriver webDriver) {
   }
   public void afterScript(String s, WebDriver webDriver) {
   }
   public void beforeSwitchToWindow(String s, WebDriver webDriver) {
   }
   public void afterSwitchToWindow(String s, WebDriver webDriver) {
   }
   /**
    * will work if there is any exception found in the scripts
    * @param throwable
    * @param webDriver
    */
   public void onException(Throwable throwable, WebDriver webDriver) {
       System.out.println("Execute Exception");
   }
   public <X> void beforeGetScreenshotAs(OutputType<X> outputType) {
   }
   public <X> void afterGetScreenshotAs(OutputType<X> outputType, X x) {
   }
   public void beforeGetText(WebElement webElement, WebDriver webDriver) {
   }
   public void afterGetText(WebElement webElement, WebDriver webDriver, String s) {
   }
}

Till now, we have covered three types of Appium interview questions. These are Basic Appium interview questions, Intermediate Appium interview questions and Advanced level of Appium interview questions. This tutorial will help you to prepare for Appium interview questions and give you the confidence to crack it. To learn in-depth on Appium, you can refer to this link.
Reference: Appium

How to successfully inspect element android | IOS with Appium Inspector-2021

Using Appium Inspector, we will learn how to inspect element android and how to inspect element on the iPhone in this Appium tutorial. Appium provides the capability to inspect elements both in android and iOS.

How to inspect element on iPhone using Appium inspector

Step 1 →Opening iOS simulator

In this tutorial, for all the examples we have covered with the iOS simulator. To open the iOS simulator, follow the below process:

Step 2 →Getting “udid.”

To connect the Appium inspector with the Simulator, we need udid. To get the 

booted udid, please run below command

  • xcrun simctl list | egrep ‘(Booted)’

it will list down the device id and name of the Simulator booted up recently

Step 3→ Getting OS version

Now we need the OS version of the Simulator. To get the OS version, please run the below command

  • instruments -s devices |grep “iPhone SE” [please replace the device name with the device name you got from above command]

Step 4→ Opening Appium Inspector

Now we have the device id and os version with us. Please click on the button highlighted in the below image. It will open the New Inspector.

Click on search
Click on search

Step 5→ Connecting Appium inspector with Simulator

Now add all the desired capabilities required to start the session. Please follow the below image for the required desired capabilities and start the session.

If you want to verify with a specific app, you can add an app path. In this tutorial, W have worked with the existing “Contact” app in the Simulator.

Add desiredCapabilities
Start the session
Start the session

Step 6→ Getting the default screen.

Once the session is started, you can see the Simulator’s home screen image and the XML hierarchy. Please look at the below image for more details.

Appium inspector
Appium inspector

Step 7→Inspect and clicking on the contact.

Now click on the Simulator’s contact button to reflect the inspector’s screen and click on refresh. Alternatively, you can find the Xpath of the contact and click on Tap. Please see the image below.

How to inspect element on iPhone

Step 8→ How to start recording?

After clicking on Contacts, we will see the image below. Now click on “Start recording” to capture all the actions. It will help to generate the Appium scripts in the desired language. 

Start recording
Start recording

Step 9→Inspect the element and clicking on tap.

Please follow the highlighted portion in the below image. First, find the XPath of the “Add” button, and after that, click on the Tap button.

Perform actions from inspector

Step 10→Sending keys.

After tapping on the Add button below screen will appear. Please follow the highlighted part to send the value from the Appium Inspector itself.

Use sendKeys
Use sendKeys

Step 11→Typing hello.

Please write any value to update the “First Name” value and click on “Send keys.”

Type hello
Type hello

Step 12→Value reflected in both the app.

The value will be reflected in both places, like in the image below. Appium inspector 

as well as Simulator 

value reflected in both app

Step 13→generating code.

Now click on the link shown below in the image. It will generate Automation scripts in the preferred language. Here language has been selected as Python. You can view this in the below image.

click to generate the code

Step 14→Sample code.

Below are the sample scripts generated by the Appium inspector. Here language has been selected as Java-Junit.
import io.appium.java_client.MobileElement;
import io.appium.java_client.ios.IOSDriver;
import junit.framework.TestCase;
import org.junit.After;
import org.junit.Before;
import org.junit.Test;
import java.net.MalformedURLException;
import java.net.URL;
import org.openqa.selenium.
remote.DesiredCapabilities;
public class SampleTest {
  private IOSDriver driver;
  @Before
  public void setUp() throws MalformedURLException {
    DesiredCapabilities desiredCapabilities = new DesiredCapabilities();
    desiredCapabilities
.setCapability("platformName", "iOS");
    desiredCapabilities
.setCapability("platformVersion", "13.6");
    desiredCapabilities
.setCapability("deviceName", "iPhone SE");
    desiredCapabilities
.setCapability("automationName", "XCUITest");
    desiredCapabilities
.setCapability("udid", "B5FDD9EB-05C6-4F3B-9DFE-1A4EC3E06A7F");
    URL remoteUrl = new URL("http://localhost:4723/wd/hub");
    driver = new IOSDriver(remoteUrl, desiredCapabilities);
  }
  @Test
  public void sampleTest() {
    MobileElement el1 = (MobileElement) driver
.findElementByAccessibilityId
("Contacts");
    el1.click();
    MobileElement el2 = (MobileElement) driver
.findElementByAccessibilityId("Add");
    el2.click();
    MobileElement el3 = (MobileElement) driver
.findElementByAccessibilityId("First name");
    el3.sendKeys("Hello");
  }
  @After
  public void tearDown() {
    driver.quit();
  }
}

Issues faced opening the Appium Inspector in Mac. 

How will you solve issues like “Encountered internal error running the command: Error: Unknown device or simulator UDID?”

You need to install "libimobiledevice."
Please use command → brew install libimobiledevice --HEAD. 

 How will you solve it if you get “WebDriverAgent because of xcodebuild failure: not found: carthage” issue?

You need to install the carthage
Please use command→ brew install carthage.

How to inspect element on android using Appium inspector

Step 1 → Opening emulator

In this tutorial, for all the examples we have covered with the Android emulator. To open the Android emulator, follow the below mentioned process:

Step 2→ Opening the Appium inspector.

Now we have the device id and os version with us. Please click on the button highlighted in the below image. It will open the New Inspector.

Opening Appium inspector

Step 3→ Connecting Appium inspector with Simulator

Now add all the desired capabilities required to start the session. Please follow the below image for the required desired capabilities and start the session.
If you want to verify with a specific app, you can add an app path. In this tutorial, we have worked with the existing “Contact” app in the emulator.

Adding desiredCapabilities

Step 4→ Opening home screen

Once the session is started, you can see the emulator’s home screen image and the XML hierarchy. Please refer to the below image for details.

Opening Home screen
Opening Home screen

Step 5→Inspect element and start recording.

Now click on the contact button from the emulator. Please see the below image for more details.

how to inspect element on android

Step 6→Clicking add button

After clicking on Contacts, we will see the image below(Here we have chosen the favorite tab and refresh the page from the inspector). Now click on “Start recording” to capture all the actions. It will help to generate the Appium scripts in the desired language. Please click on the tap button highlighted below.

Perform actions
Perform actions

Step 7→ Clicking on send keys.

After tapping on the Add button below screen will appear. Please follow the highlighted part to send the value from the Appium inspector itself.

click on sendKeys
click on sendKeys

Step 8→Typing Hello

Please write any value to update the “First Name” value and click on “Send keys.”

typing hello
typing hello

Step 9→Generating code

The value will be reflected in the edit box, like in the image below. Appium inspector,
as well as an emulator. To generate the code, click on the highlighted arrow.

click to generate code

Step 10→ Sample code

It will generate below scripts:
import io.appium.java_client.MobileElement;
import io.appium.java_client
.android.AndroidDriver;
import junit.framework.TestCase;
import org.junit.After;
import org.junit.Before;
import org.junit.Test;
import java.net.MalformedURLException;
import java.net.URL;
import org.openqa.selenium
.remote.DesiredCapabilities;
public class SampleTest {
  private AndroidDriver driver;
  @Before
  public void setUp() throws MalformedURLException {
    DesiredCapabilities desiredCapabilities = new DesiredCapabilities();
    desiredCapabilities
.setCapability("platformName", "Android");
    desiredCapabilities
.setCapability("platformVersion", "23");
    desiredCapabilities
.setCapability("deviceName", "Nexus 5X");
    desiredCapabilities
.setCapability("automationName", "UIAutomator2");
    desiredCapabilities
.setCapability("udid", "emulator-5554");
    desiredCapabilities
.setCapability
("ensureWebviewsHavePages", true);
    URL remoteUrl = new URL("http://localhost:4723/wd/hub");
    driver = new AndroidDriver(remoteUrl, desiredCapabilities);
  }
  @Test
  public void sampleTest() {
    MobileElement el1 = (MobileElement) driver
.findElementByAccessibilityId
("Contacts");
    el1.click();
    MobileElement el2 = (MobileElement) driver
.findElementById
("com.android.contacts:"+
"id/contact_tile_list");
    el2.click();
    MobileElement el3 = (MobileElement)
 driver.findElementByAccessibilityId
("add new contact");
    el3.click();
    MobileElement el4 = (MobileElement) 
driver
.findElementByXPath("/hierarchy+
"/android"+
".widget." +
"FrameLayout/android"+
".view.ViewGroup/android.widget" +
".FrameLayout[2]/android.widget"+
".FrameLayout/android.widget" +
".ScrollView/android.widget"+
".LinearLayout/android.widget" +
".LinearLayout[2]/android"+
".widget.LinearLayout/android
.widget" +
".LinearLayout/android.widget"
".LinearLayout/android"+
".widget.EditText")
                .sendKeys("Hello");
    el4.sendKeys("Hello");
  }
  @After
  public void tearDown() {
    driver.quit();
  }
}

Please Note:

Conclusion

Till now, we have discussed how to inspect element android and how to inspect element on iPhone. In the next topic, we will write about how to write the first script in Appium. To start the subject from the beginning, please click here. For more details for this section, please refer to this link.

21 Appium Methods:How To Use Guide(With Code !)

We will discuss how to use Appium methods in this Appium tutorial. Appium is a wrapper on top of Selenium webDriver. All the Selenium methods are already present in Appium. Apart from that, Appium provides a good number of ways to interact with native applications.

How to use the pressKey code using Appium methods?

 public void pressKeyCode(AndroidKey code) {
\tandroidDriver.pressKey(new KeyEvent(code));
   \t }
Here you can pass keyEvent like AndroidKey.ENTER to enter or AndroidKey.BACK to tap 
on 
back button Similarly, users can use this for long key presses like:
public void longPressKeyCode(AndroidKey code) {
    \tandroidDriver.longPressKey(new KeyEvent(code));
        \t}

How to get the current activity using Appium commands?

To get the current activity, we can use the current Activity method.
For Example:
public String currentActivity() {
\treturn androidDriver.currentActivity();
   \t }

How to check if the app is installed or not?

To check if the app is installed or not we can use:
public boolean isAppInstalled(String bundleId) {
return androidDriver
.isAppInstalled(bundleId);
}

How to start activity in Android using Appium methods?

Please follow the below method to start the activity:
public void startActivity(String packageName, String activity) {
try {
  androidDriver.startActivity(new Activity(packageName, activity));
} catch (Exception e) {
\t    e.printStackTrace();
}

How to scroll to a particular text using Appium methods?

public MobileElement scrollTo(String text) {
MobileElement textFinder = androidDriver
.findElementByAndroidUIAutomator
("new UiScrollable(new UiSelector()"
+ ".resourceId(\\"android:id/list\\"))
.scrollIntoView("
+ "new UiSelector().text(\\"" + text + "\\"));");
\t    return textFinder;
}

How to hide the keyboard using Appium methods?

public void hideKeyboard() {
try {
androidDriver.hideKeyboard();
} catch (Exception e) {
LoggerUtils.error("Exception in hiding keyboard" + e.getMessage());
}

How to get progress dialog using Appium methods?

public MobileElement getProgressDialog() {
return androidDriver
.findElementById
("android:id/progress");
}

How to swipe left using Appium methods??

public void swipeLeft(By by) {
\tMobileElement element = (MobileElement) androidDriver.findElement(by);
\tint offset = 1;
\tPoint p = element.getCenter();
\tPoint location = element.getLocation();
\tDimension size = element.getSize();
\tint startX=location.getX() + size.getWidth() - offset;
\tint startY=p.getY();
\tint endX=location.getX() + offset;
\tnew TouchAction(androidDriver)
    .press(PointOption.point(startX, startY))
    .waitAction(WaitOptions.
waitOptions(java.time
.Duration.ofMillis(1000)))
    .moveTo(PointOption.point(endX, startY))
    .release()
    .perform();
    }

How to swipe right using Appium methods?

public void swipeRight(By by) {
\tMobileElement element = (MobileElement) androidDriver.findElement(by);
\tint offset = 1;
\tPoint p = element.getCenter();
\tPoint location = element.getLocation();
\tDimension size = element.getSize();
\tint startX=location.getX() + offset + 20;
\tint startY=p.getY();
\tint endX=location.getX() + size.getWidth() - offset;
\tnew TouchAction(androidDriver)
    .press(PointOption.point(startX, startY))
    .waitAction(WaitOptions.
waitOptions(java.time
.Duration.ofMillis(1000)))
    .moveTo(PointOption.point(endX, startY))
    .release()
    .perform();
    }

How to swipe up using Appium methods?

MobileElement element = (MobileElement) androidDriver.findElement(by);
    \tDimension size = element.getSize();
    \t int endX = (int) (size.height * 0.70);
         int startY = (int) (size.height * 0.30);
         int startX = (size.width / 2);
         new TouchAction(androidDriver)
         .press(PointOption.point(startX, startY))
         .waitAction(WaitOptions.
waitOptions(java.time
.Duration.ofMillis(1000)))
         .moveTo(PointOption.point(endX, startY))
         .release()
         .perform();
        
    }

How to swipe down using Appium methods?

public void swipeDown(By by){
    \tMobileElement element = (MobileElement) androidDriver.findElement(by);
    \tDimension size = element.getSize();
    \tint startY = (int) (size.height * 0.70);
        int endY = (int) (size.height * 0.30);
        int startX = (size.width / 2);
        new TouchAction(androidDriver)
        .press(PointOption.point(startX, startY))
        .waitAction(WaitOptions.
waitOptions(java.time
.Duration.ofMillis(1000)))
        .moveTo(PointOption.point(startX, endY))
        .release()
        .perform();
        
    }

How to double click in Appium using Appium commands?

public void doubleClick(WebElement element) {
TouchActions action = new TouchActions(androidDriver);
action.doubleClick(element);
action.perform();
}

How to switch off GPS in Android?

public static void swicthOffGPSConnection(String androidSdkToolPath, String 
deviceId) {
\ttry {
\t    Runtime.getRuntime().
exec(androidSdkToolPath 
+ "/adb -s" + deviceId
+ " shell settings put secure location_providers_allowed ' '");
\t} catch (Exception e) {
\t    
\t    e.printStackTrace();
}

How to switch on GPS in Android?

public static void swicthONGPSConnection(String androidSdkToolPath, String deviceId) {
\ttry {
\t    Runtime.getRuntime()
.exec(androidSdkToolPath + "/adb -s" + deviceId
\t\t    + " shell settings put secure location_providers_allowed gps ");
\t} catch (Exception e) {
\t  
\t    e.printStackTrace();
\t}
    }

How to switch off Wifi in Android?

public void switchOFFWifiConnection(String androidSdkToolPath,String deviceId) {
\t\t
try {
Runtime.getRuntime()
.exec(androidSdkToolPath+
"/adb -s"+deviceId
+" shell am start -n io.appium.settings/.Settings -e wifi off");
} catch (IOException e) {
\t\t\t
e.printStackTrace();
}
}

How to switch on Wifi in Android?

public void switchONWifiConnection(String androidSdkToolPath,String deviceId) {
try {
Runtime.getRuntime()
.exec(androidSdkToolPath
+ "/adb -s"+deviceId+" shell am start -n io.appium.settings/.Settings -e wifi on");
} catch (IOException e) {
\t\t\t
e.printStackTrace();
}
}

How to switch off data in Android?

public void switchOFFDataConnection(String androidSdkToolPath,String deviceId) {
try {
Runtime.getRuntime()
.exec(androidSdkToolPath
+ "/adb -s"+deviceId+" shell am start -n io.appium.settings/.Settings -e data off");
System.out.println("************** Wifi off *******");
} catch (IOException e) {
// TODO Auto-generated catch block
e.printStackTrace();
}
}

How to switch on data in Android?

public void switchONDataConnection(String androidSdkToolPath,String deviceId) {
try {
Runtime.getRuntime()
.exec(androidSdkToolPath
+ "/adb -s"+deviceId+" shell am start -n io.appium.settings/.Settings -e data on");
} catch (IOException e) {
// TODO Auto-generated catch block
e.printStackTrace();
}
}

How to uninstall the app in Android?

public void uninstallTheApp(String androidSdkToolPath, String deviceId, String pkg) {
try {
Runtime.getRuntime()
.exec(androidSdkToolPath + "/adb -s " + deviceId + " uninstall " + pkg);
} catch (Exception e) {
System.out.println(e);
}
}

How to toggle flight mode in iOS?

public void toggleFlightMode() {
\tDimension window = iosDriver.
manage().window().getSize();
\ttry {
\tint startX = window.width / 2;
\t\tint startY = window.height;
\t\tint endY = window.height / 10;
\t\tnew TouchAction(iosDriver)
\t\t.press(PointOption.point(startX, startY))
\t\t.waitAction(WaitOptions
\t\t.waitOptions(java.time
.Duration.ofMillis(1000)))
\t\t.moveTo(PointOption
\t\t.point(startX, endY)).release().perform();\t\t\t\t\t\t\t\t\t\t\t\t\t\t
\t\t} catch (Exception e) {
\t\tSystem.out.println("\
Could not swipe to top.\
");
\t\te.printStackTrace();
\t\t}
\t\tMobileElement flight = null;
\t\tif ((flight = iosDriver
\t\t\t.findElement(By
\t\t\t.name("Airplane Mode"))).isDisplayed()) {
\t\t\tflight.click();
\t\t\tnew TouchAction(iosDriver)
\t\t\t\t\t.tap(TapOptions
\t\t\t.tapOptions()
.withPosition(PointOption
\t\t\t.point(window.width / 2, 10))).perform();
\t\t} else {
\t\t\tthrow new RuntimeException("Flight mode button not found.");
\t\t}
\t}

Conclusion

Till now, We have discussed about the top 20 most used Appium methods. In the next topic, We will write about the Appium Inspector for Android and iOS. For more details for this section, please refer to this link.

Appium Tutorial for Mobile Automation- The Comprehensive guide-20-21

We have written this Appium tutorial to give  a complete picture of Appium mobile automation. We will discuss all the major topics here.

Introduction

It is an open-source tool. It supports  Android, iOS, windows OS. We can execute same code in different os versions like Android, iOS.It reduces redundant code and helps to increase code reusability. It has implemented the Selenium webDriver, which connects through Apple’s XCUITest(iOS 9.3 and above) or UIAutomation(iOS 9.3 and lower) or UiAutomator/UiAutomator2 (Android) or WinAppDriver(Windows) dependent on the type of devices.

We will cover the below topics in this Appium tutorial:

Advantages of Appium

Disadvantages of Appium

Types of Mobile applications

There are three types of applications supported :

Native Application

Native applications are written using Windows, Android, iOS SDKs.

Hybrid Application

Hybrid applications are a mix of web and native applications. Here native applications have control, and it interacts with mobile web applications.

Mobile Application

Mobile web applications are web-based applications. These are accessible using chrome(Android), Safari(iOS) browser. We can develop this type of application by HTML, CSS, JavaScript, AngularJS.

Appium Architecture :

How It works on the iOS platform

How It works on the Android platform

Prerequisite for setup

Appium tutorial for installing Appium Desktop on Windows

  • Please go to http://appium.io/, and you will see the below screen. Please click on the below-highlighted button. 
Please click on the Appium Download button
Please click on the download button
  • Once you have clicked the above button, you will see the below page. Please click on the highlighted .exe file or .zip file to get it downloaded in your system.
Please download the .exe file or .zip file or windows
Please Download the .zip or exe file
  • Here We have taken the .zip file to install it. Please unzip the file. After that, you will see the image below. Please click on Appium.exe.
Please unzip the file and click on Appium.exe
Unzip the file
  • Now you can see the image below, and you are ready to start your server.
Start The Server
Please start the server
  • Now you can see the image below, and your server is ready.
Server started
Server has started

Appium tutorial for installing Appium Desktop on Mac

  • Please go to http://appium.io/, and you will see the below screen. Please click on the highlighted button shown below.
Download Appium
Please click on download button
  • Once you have clicked the above button, you will see the below page. Please click on the highlighted dmg file to get it downloaded in your system.
Please download the dmg file
  • Please click on the dmg file, which got downloaded recently, and you will see the below screen. Please the instruction mentioned in the below image.
Drag Appium to Application folder
Please drag to Application folder
  • It will start copying in the Application folder.
Copying started
Copying started
  • Suppose you have already installed another version in your system. You will get below pop up. It is your choice to keep both or replace the older one.
You can replace or keep both version
You cab keep both or replace one
  • Once it is installed in your system, you can go to the launchpad and search with Appium, and you will get below icon and click on the icon. Alternatively, you can go to the Application folder and click on the icon.
Please search Appium, and click on the icon
Please search for the icon
  • Many times after launching it, you can get below error messages. No need to worry; we can solve this issue.
Security error
Security error
  • To solve the above issue, you have to go to system preference from the apple icon shown on the top left corner and then click on Security and privacy. You will see the screen below. Please click on “Open Anyway.”
Please go to privacy settings, and click
Please go to privacy settings, and click on Open Anyway
  • Now click on the icon once again and this time, choose to open it. Please follow the below image.
Please Click on Open
  • Now you can see the image below, and you are ready to start your server.
Please start the server
  • Please click on the start server to start the server. Your screen will look like below.
Appium Server Started
Server Started

conclusion

Till now We have covered the basics of Appium mobile testing in this Appium Tutorial. In the next topic, We will write about top 20 most used methods to automate native application. For more details on this topic, please refer to this link.