Table of Contents
- What is Cypress Commands?
- UI Interaction commands provided by Cypress
- Cypress Right Click Command
- Cypress Double Click Command
- Cypress Click Command
- Cypress Trigger Command
- Cypress Type Command
- Cypress Select Command
- Cypress Check Command
- Cypress Clear Command
- Are Cypress Commands asynchronous?
- Cypress Custom Commands
- Chaining Assertion commands in Cypress
- Overwriting existing Cypress commands
- Cypress Chainable Commands
- Parent Custom Command in Cypress
- Child Custom Command in Cypress
- Dual Custom Command in Cypress
- Cypress Custom Commands with Example
- Cypress Import Commands
- Cypress Custom Command IntelliSense

What is Cypress Commands?
Cypress provides us API’s and methods to interact with the UI of the application. They are known as Cypress Commands and helps with the interaction of the web application. All the commands that are available have in-built methods and we will only invoke the methods in our test cases. The Cypress commands will simulate a similar action to an user trying to perform operations on the application.
UI Interaction Commands provided by Cypress
There are different commands provided by Cypress that interact with the UI. We will look into the list of all the commands in detail.
- .click()
- .dblclick()
- .rightclick()
- .type()
- .clear()
- .check()
- .uncheck()
- .select()
- .trigger()
Cypress Click Command
.click() – This command is to click any element on the DOM.
The following are the syntaxes for click command
.click()

.click(options)

.click(position)

.click(position, options)

.click(xCoordinate, yCoordinate)

.click(xCoordinate, yCoordinate, options)
As you can see above, the click accepts parameters like options, position, and coordinates.
Options
The possible options that can be passed to click are
| Option | Default | Description |
|---|---|---|
| altKey | false | Switch on the Alternate key (Option Key in Mac), as optionKey |
ctrlKey | false | Switch on the control key. Also known as: controlKey. |
| metaKey | false | Actuates the meta key (Windows key in Windows or command key in Mac). Also: commandKey, cmdKey. |
| shiftKey | false | Actuates the shift key |
| log | true | Prints the logs in the command line |
| force | false | This option forces the action and disables the wait for actionability |
| multiple | false | Sequentially click multiple elements |
| timeout | defaultCommandTimeout | Time for .click() wait before resolving the time out |
| waitForAnimations | waitForAnimations | Option to wait for the elements to complete animating before executing the command |
Positions
The different types of positions that can be passed to .click() are
- center (default)
- left
- right
- top
- topLeft
- topRight
- bottom
- bottomLeft
- bottomRight
Example
cy.get('btn').click()  //clicking the button
cy.get('btn').click({ force: true })  //clicking the button by passing the option 'force' as true
cy.get('btn').click('bottomRight') // clicking the button at the botton right position
cy.get('btn').click(10, 70, { force: true }) // clicking the button with position value and force true
Cypress Double Click Command
Double click can be achieved by using dblclick() syntax in Cypress.
Syntax
.dblclick()
.dblclick(position)
.dblclick(x, y)
.dblclick(options)
.dblclick(position, options)
.dblclick(x, y, options)
Options
.dblclick() accepts all the options that are accepted by .click(). You can find the options in the above section.
Positions
All the possible positions that are specified in .click() are also available for dblclick(). The list of the positions can be found in the above section.
Example
cy.get('button').dblclick() // Double click on button
cy.focused().dblclick() // Double click on element with focus
cy.contains('Home').dblclick() // Double click on first element containing 'Home'
cy.get('button').dblclick('top') // Double click on the button on top position
cy.get('button').dblclick(30, 10) // Double click on the coordinates of 30 and 10
Cypress Right Click Command
This Cypress command, right clicks the DOM element .rightclick() command will not open context menus of the browser.rightclick() is used to test handling of right click related events in the application such as contextmenu.
Syntax
.rightclick()
.rightclick(position)
.rightclick(options)
.rightclick(position, options)
.rightclick(x, y)
.rightclick(x, y, options)
Options
As we saw above, all the options that are accepted by .click() command can be configured with .rightclick() command too.
Positions
All the possible positions that can be passed to the .rightclick() is same as the .click() mentioned above.
Example
cy.get('.welcome').rightclick() // Right click on .welcome
cy.focused().rightclick() // Right click on element with focus
cy.contains('January').rightclick() // Right click on first element containing 'January'
cy.get('button').dblclick('topRight') // Double click on the button on top right position
cy.get('button').dblclick(80, 20) // Double click on the coordinates of 80 and 20
Cypress Type Command
.type() command enters value into a DOM element.
Syntax
.type(text)
.type(text, options)
Arguments
.type() accepts string as an argument. Values passed to .type() can include any of the special character sequences given below.
| Sequence | Notes |
|---|---|
{{} | Enters the literal { key |
{backspace} | Deletes character from right to the left of the cursor |
{del} | Removes character from left to the right of the cursor |
{downarrow} | Shifts cursor down |
{end} | Shifts cursor to the end of the line |
{enter} | Types the Enter key |
{esc} | Types the Escape key |
{home} | Shifts cursor to the start of the line |
{insert} | Positions character to the right of the cursor |
{leftarrow} | Moves cursor left |
{movetoend} | Shifts the cursor to end of typeable element |
{movetostart} | Shifts the cursor to the start of typeable element |
{pagedown} | Scrolls down |
{pageup} | Scrolls up |
{rightarrow} | Shifts cursor right |
{selectall} | Selects all the text by creating a selection range |
{uparrow} | Shifts cursor up |
Options
We can pass in the objects as options to modify the default behaviour of .type()
| Option | Default | Description |
|---|---|---|
delay | 10 | Option for Delay in time after each keypress |
force | false | Forces the action to execute and disables waiting for actionability |
log | true | Displays the logs in the Command log |
parseSpecialCharSequences | true | Parse special characters for strings surrounded by {}, such as {esc}. You can set the option to false to enter the literal characters. |
release | true | This option allows to enable a modifier stay activated between commands |
scrollBehavior | scrollBehavior | Viewport position to where an element to be scrolled before executing any command |
timeout | defaultCommandTimeout | Time to wait for .type() command to resolve before time out |
waitForAnimations | waitForAnimations | To say whether to wait for elements to finish animating before executing any command. |
Example
Let us see examples for .type() command
cy.get('textarea').type('Hey there') // enter value in the text area
cy.get('body').type('{shift}') //enables the shift key
cy.get('body').type('{rightarrow}') //type event right arrow
Cypress Clear Command
Clear command will clear the values in input area or the text field.
Syntax
The syntax for clear command is a follows.
.clear()
.clear(options)
Options
We will look into the options that can be passed to the .clear() command.
| Option | Default | Description |
|---|---|---|
force | false | This will forces the action and disables waiting for actionability to occur |
log | true | Shows the command in the Command log |
scrollBehavior | scrollBehavior | Viewport position to where an element must be scrolled to before performing the command |
timeout | defaultCommandTimeout | This option is the time to wait for .clear() to resolve before time out |
waitForAnimations | waitForAnimations | This will wait for elements to complete animating before executing the command. |
Example
Let us look into the examples for clear command
cy.get('[type="text"]').clear() // Clear input of type text
cy.get('textarea').type('Welcome!').clear() // Clear textarea
cy.focused().clear() // Clear focused input/textarea
Cypress Check Command
The check command will check or in simpler words, tick the checkboxes or radio buttons. You can uncheck the checkboxes or radio buttons by using the .uncheck() command.
Syntax
We will understand the syntax for check command in Cypress.
//Syntax for check command
.check()
.check(value)
.check(options)
.check(values, options)

//Syntax for uncheck command
.uncheck()
.uncheck(value)
.uncheck(options)
.uncheck(values, options)
Options
The possible options that can be passed to check/uncheck commands are the options same as the clear command listed above
Example
We will look into the example of how we can use check and uncheck commands.
cy.get('[type="checkbox"]').check() // Check checkbox element
cy.get('[type="radio"]').first().check() // Check first radio element
cy.get('[type="radio"]').check('Male') //Check the radio element which has Male
cy.get('[type="checkbox"]').uncheck() //Uncheck checkbox element
cy.get('[type="radio"]').uncheck()  //Uncheck the first radio element
cy.get('[type="checkbox"]').uncheck('Breakfast') // Uncheck the breakfast element
Cypress Select Command
The select Cypress command allows you to select elements within a <select> tag.
Syntax
The following are the syntax for select command
.select(value)
.select(values)
.select(value, options)
.select(values, options)
Options
We can pass in the options to modify the default behaviour of select command.
| Option | Default | Description |
|---|---|---|
force | false | This option forces the action to take place and disables waiting for actionability |
log | true | Displays the logs in the Command log and is set as true by default |
timeout | defaultCommandTimeout | This option is the time to wait for .select() to resolve before time out |
Example
Let us look into examples for the select command
cy.get('select').select('butterfly') // Select the 'butterfly' option
cy.get('select').select(0) // selects the element with 0 index
cy.get('select').select(['parrot', 'peacock']) //selects the parrot and peacock option
Cypress Trigger Command
Trigger command helps to trigger any event on the element.
Syntax
We will look into the syntax for accessing the trigger command
.trigger(eventName)
.trigger(eventName, position)
.trigger(eventName, x, y)
.trigger(eventName, position, options)
.trigger(eventName, options)
.trigger(eventName, x, y, options)
Option
Trigger command accepts all the options that are mentioned for .clear() command. Additionally, there are few options we can configure that are listed below.
| Option | Default | Description |
|---|---|---|
bubbles | true | Whether the event should bubble |
cancelable | true | Whether the event can be cancelled |
eventConstructor | Event | The constructor for creating the event object (e.g. MouseEvent, keyboardEvent) |
Example
Let us different ways of using .trigger() in the code.
cy.get('a').trigger('mouseover') // Trigger mouseover event on a link
cy.get('.target').trigger('mousedown', { button: 0 }) //mousedown triggered at button 0
cy.get('button').trigger('mouseup', topRight, { bubbles: false }) //mouseup triggered on topRight position with setting bubble as false
Are Cypress commands async?
All the Cypress commands are asynchronous. They are queued for execution at a later point in time and will not wait for the completion of the commands. Cypress command do not do anything at the time of their invoke,instead they save it for later for execution. You can understand the asynchronous behaviour of Cypress here
Cypress Chainable Commands
In Cypress, we can use a series of commands to interact with elements in DOM. It is imperative to understand how the chaining of commands work internally. If we are chaining commands in a particular line, then Cypress will handle a promise based on the command chain and will yield a command based on the subject to the next command, until the chain of commands end or an error has occurred.
Cypress allows us to click an element or type into elements using the .click() or .type() commands by getting the elements using cy.get() or cy.contains(). Let us see a simple example of chaining commands
cy.get('textarea').type('How are you?')
In the above example, cy.get() is one Cypress command and .type() is another command, where we are chaining the .type() command onto the cy.get() command, telling it to type to the subject that is yielded from the cy.get() element. Similarly, we can chain all the commands that we discussed above.
Chaining Assertion Commands in Cypress
Similar to chaining multiple commands using Cypress, we can also chain assertions with commands. Assertions are commands that let you to describe the expected state or behaviour of the application. Cypress will wait until the elements reach the expected state, and the test will fail if the assertions don’t pass. We will see how we can use chaining commands in asserting an element.
cy.get('button').should('be.disabled') //expect whether the button should be disabled
cy.get('form').should('have.class', 'form-vertical') //expect whether the form should have class as 'form-vertical'
cy.get('input').should('not.have.value', 'Name') // assert whether the input should not have the value 'Name'
As listed above, we are using the cy.get() command and chaining it with the .should() assertion command to expect the behaviour based on the result. This way, we can use chain assertion commands in Cypress.
Cypress Custom Commands
Cypress provides us API’s to create commands based on our requirements. Cypress custom command is similar to the default commands that are pre-existing, except it is user-defined. With custom commands, we can play around with the commands and chain them based on our use case. Cypress custom commands are useful in our workflow if you require reusing them over and over in the tests.
Let us see the syntax for creating a new custom command in Cypress.
Cypress.Commands.add(name, callbackFn)
Cypress.Commands.add(name, options, callbackFn)
Cypress.Commands.overwrite(name, callbackFn)
where the arguments are as follows
name – The name of the command in string that we want to add or overwrite
callbackFn – This function takes an argument passed to the command
options – Pass any options object to define the behaviour of the command
Note : options are supported only for the add commands and do not support for the overwrite commands
| Option | Accepts | Default | Description |
|---|---|---|---|
prevSubject | Boolean, String or Array | false | defines how to handle the previously yielded subject. |
The options that prevSubject accepts are as follows
false– ignore previous subjects (parent command)true– accept the previous subjects (child command)optional– pass in whether you want to start a new chain or use an existing chain (dual command)
Parent Custom Command in Cypress
We will see how to add a parent custom command in Cypress. Parent command will always begin a new chain of commands, eventhough you have chained off a previous command. The previously chained command will be ignored and a new command will be chained always. Some of the parent commands are cy.visit(), cy.get(), cy.request(),cy.exec(), cy.route()
Example
We will see an example of how to write a parent custom command in Cypress
Cypress.Commands.add('clickLink', (label) => {
  cy.get('a').contains(label).click()
})
//clicking the "Buy Now" link
cy.clickLink('Buy Now')
In the above example, ‘clickLink‘ is the name of our custom command. It will search for the label. In line 2, the command gets ‘a‘, and search for the link which contains label and click the element. cy.clickLink() will execute the action in the test file and clicks the “Buy Now” link.
Child Custom Command in Cypress
Child Custom commands in Cypress are chained off a parent command or another child command. The subject from the previous command will be yielded to the callback function.
Some of the Cypress commands that can be chained as a child command are .click(), .trigger(), .should(), .find(), .as()
Example
We will look into an example on how to chain a child custom command
Cypress.Commands.add('forceClick', {prevSubject: 'element'}, (subject, options) => {
  // wrap the existing subject and do something with it
  cy.wrap(subject).click({force:true})
})
//accessing the forceClick in the test file
cy.get("[data-test='panel-VALUES']").forceClick();
In the above example, we are naming our custom command as ‘forceClick‘. We are passing the prevSubject argument to the element and wrapping the existing subject. With cy.wrap(), we are force clicking the subject. Then in the test file, we are accessing the custom command, ‘forceClick‘ on a cy.get() command.
Dual Custom Commands in Cypress
Dual custom commands are hybrid between a parent and child command. You can begin a new chain of commands or chain off an existing command. Dual commands are helpful if we want our command to work in different ways with or without the existing subject.
Some of the commands that can be used for dual commands are cy.contains(), cy.screenshot(), cy.scrollTo(), cy.wait()
Example
Let us see an example of how to use dual custom commands
Cypress.Commands.add('getButton', {
  prevSubject: 'optional'
}, (subject) => {
  if (subject) {
   cy.get(subject).get('btn').its('button');
  } else {
    cy.get('btn').its('button');
  }
})
In some cases, we will require to get the button of the text using getButton which will acquire all the button of the element. Now we can use getButton to chain the with the parent element or chain the child element, where it can invoke the elements of the parent.
Since the prevSubject is optional, we can either pass the subject as an argument or invoke the command without the subject in the test file as below
cy.getButton() // without the subject
cy.get('#loginBtn').getButton() // with the subject
Overwriting Existing Cypress Commands
We can overwrite the already existing Cypress commands and modify the behaviour in order to avoid creating another command that will try to use the original command at the end.
Some of the original Cypress command that can be overwritten are cy.visit(), cy.type(), cy.screenshot(), cy.contains()
Example
Let us see an example on how we can overwrite the existing Cypress command.
Cypress.Commands.overwrite('contains',
  (originalFn, subject, filter, text, options = {}) => {
    // determine if a filter argument was passed
    if (typeof text === 'object') {
      options = text
      text = filter
      filter = undefined
    }
    options.matchCase = false
    return originalFn(subject, filter, text, options)
  }
)
As we saw above, we are using the Cypress.Commands.overwrite to modify the existing Cypress command. We are naming our custom command as contains and we are passing arguments to determine whether the filter argument has passed.
Cypress Import Commands
In this section, we will understand how to import Cypress Commands.
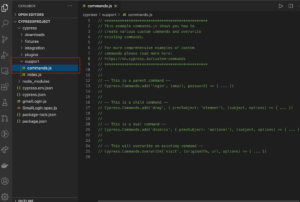
We must create our Cypress custom commands in the cypress/support/commands.js file. We shall add the custom commands in the command.js file and import in our test case file to use it.
Cypress Custom Commands with Example
We will understand how to create a custom command and use it in our spec file with real-time example.
As we saw above, we have to add new custom commands under the commands.js file. In that file, let us add a custom command for a login function
Cypress.Commands.add("login", (username, password) => {
    //adding a new command named login
    cy.get('[id=Email]').clear();
    cy.get('[id=Email]').type(username);
    cy.get('[id=Password]').clear();
    cy.get('[id=Password]').type(password);
    cy.get('[type=submit]').click();
  });
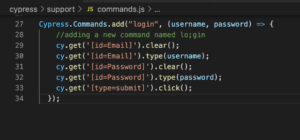
In the above code, we are naming our custom command as login. Inside the custom command, we have added the steps of clearing the username field and entering value in the textfield. Similarly, we are clearing the field and adding the password in the password field. Later, we are clicking the submit button. This is a simple custom command that accepts two arguments : username and password. We will be passing the value for the username and password in our spec file.
Now let us create a spec file named customCommand.spec.js under integration folder. Our spec file will contain the following code
describe("Custom Commands Example", () => {
    it("should login using the custom commands", () => {
      cy.visit("https://admin-demo.nopcommerce.com/");
      cy.login("[email protected]", "admin");
      cy.url().should('be.equal', 'https://admin-demo.nopcommerce.com/admin/')
    });
  });
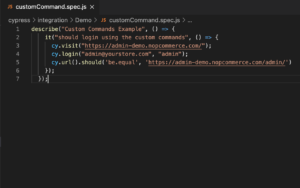
As we saw above, we are accessing our custom command as cy.login() ,where we are passing the values of username and password.
Cypress Custom Commands IntelliSense
IntelliSense provides intelligent code suggestions in the IDE or code editor directly while we are writing tests. It helps by showing a popup that displays the command definition, link to the documentation page and code examples. If we are using any modern code editor like Visual Studio Code or IntellJ, then IntelliSense will be very useful.
IntelliSense uses Typescript to understand and displays the syntax. If we write custom commands and provide TypeScript definitions for the custom commands, we can use the triple slashes to display IntelliSense, even if our project uses JavaScript only.
To configure IntelliSense, we need to describe the code in cypress/support/index.d.ts file.
// type definitions for Cypress object "cy"
/// <reference types="cypress" />
declare namespace Cypress {
    interface Chainable<Subject> {
      /**
       * Login with credentials
       * @example
       * cy.login(username,password)
       */
      login(username: String, password: String): Chainable<any>
    }
  }
Now, we should let our spec files know that there are some Typescript definitions in the index.d.ts file. So, at the beginning of our spec file, add the below code to let IntelliSense provide suggestions for us.
// type definitions for custom commands like "login"
// will resolve to "cypress/support/index.d.ts"
// <reference types="../support" />
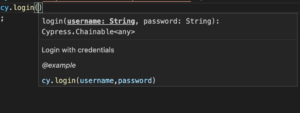
As we saw above, IntelliSense provides us with the arguement we provided in our command.js file and helps in auto-completing.

Hi…I am Aishwarya Lakshmi, completed my B.Tech and have nearly 2+ years of experience in the testing domain. I am a testing enthusiast and passionate about testing and love to explore new things in my field and share them with my peers. I enjoy writing blogs during my free time in the simplest but effective way. As a tester, I like to have things to perfection, so I wish my readers to have the perfect understanding of the technology. I keep myself updated with the new technologies related to testing and spend time understanding them. I am glad to help students understand the concepts in testing.